Using a rotary tool for adjustments on door hardware, like a strike plate, can make your DIY life so much easier. Whether you’re fixing a sticky door or just want things to close smoothly, this handy tool can help you fine-tune the details. For instance, using a brand like Dremel, you can easily carve out just the right amount of material to make your door work like a charm. Let’s dive in and see how exactly you can use a rotary tool to tackle those pesky adjustments.
What is a Rotary Tool?
A rotary tool is a versatile device that spins attachments at high speeds, allowing you to cut, grind, polish, or drill into various materials. It’s kind of like a Swiss Army knife but for your DIY projects. The key feature here is the variety of attachments you can use—each one designed for different tasks. For example, you might have a cutting wheel for slicing through metal or a grinding bit for smoothing out rough edges.
The beauty of a rotary tool lies in its adaptability. You can use it in tight spaces where a regular drill might not fit. If you think about it, it’s like having a magic wand for your projects. You simply switch out the attachment for whatever task you’re tackling. Need to adjust a strike plate? There’s an attachment for that!
Why Use a Rotary Tool for Door Hardware Adjustments?
You might be wondering, why go through all this trouble? Well, using a rotary tool makes fine adjustments a breeze. It gives you the precision you need to make small but vital changes without tearing your entire door apart. For instance, a strike plate might need to be moved slightly to better align with the latch. A rotary tool allows you to make those adjustments quickly and efficiently.
Additionally, using a rotary tool can save you time. Instead of spending hours with a file or a manual screwdriver, you can complete the job in just minutes. And let’s be honest—there’s a certain satisfaction in getting things just right, don’t you think? With the right technique, you’ll have your door functioning smoothly in no time.
Tools and Accessories You’ll Need
Before you start, let’s go over the tools and accessories you’ll need for this project. Here’s a quick list to get you ready:
- Rotary tool (like a Dremel)
- Cutting wheels or grinding bits
- Safety goggles to protect your eyes
- Clamp to hold your work steady
- Measuring tape for precision
- Pencil or chalk for marking
Having the right tools makes all the difference. Safety goggles, for instance, are essential—flying bits of material are no joke. And a clamp helps keep everything steady while you work, allowing for cleaner cuts and adjustments.
Step-by-Step Guide to Using a Rotary Tool on Door Hardware
Getting started is easier than you think. Here’s a step-by-step guide to help you through the process of adjusting that strike plate.
1. Assess the Situation
Before you jump in, take a moment to assess what needs to be done. Is the strike plate too high or too low? Maybe it’s misaligned to the left or right? Take your measuring tape and measure where the latch meets the strike plate. Mark these points with a pencil—this will guide you as you make adjustments.
2. Prepare Your Rotary Tool
Now it’s time to set up your rotary tool. Attach the cutting wheel or grinding bit that’s appropriate for your adjustments. Before you plug it in, take a moment to check that everything is secure. Once you’re ready, put on your safety goggles and plug it in.
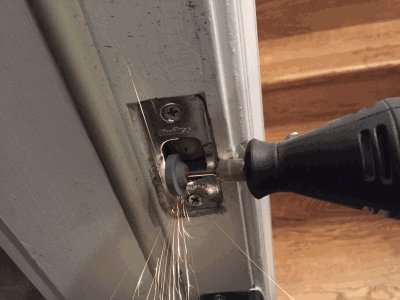
3. Make the Adjustments
Carefully position the rotary tool against the strike plate area that needs adjusting. Start slowly, allowing the tool to do the work without too much pressure. You want to remove material gradually. If you feel it’s taking too long, it’s okay to go a bit faster, but be cautious.
As you work, frequently check your marks to ensure you’re on the right path. It’s easier to adjust as you go than to fix a mistake later!
4. Test Your Work
Once you’ve made your adjustments, it’s time to test the door. Close it to see if it latches smoothly. If it’s still not right, you may need to make a few more tweaks. Just remember to go slow and steady.
You might find that a small adjustment makes a big difference. Don’t be discouraged if it takes a couple of tries to get it just right!
Common Issues and Troubleshooting
Even with the best tools, you might run into some hiccups. Here are a few common issues and how to troubleshoot them.
Misalignment
If the door still doesn’t close properly, it could be due to misalignment. Recheck your measurements and marks. Sometimes, a small shift can lead to significant differences.
Over-grinding
Another issue is over-grinding, where you remove too much material. If this happens, you may need to replace the strike plate entirely. It’s a good idea to start small and increase gradually.
Tool Malfunction
Finally, if your rotary tool isn’t functioning properly, make sure it’s clean and well-maintained. Dust and debris can affect performance. A quick cleaning might just do the trick!
Alternatives to Rotary Tools for Door Adjustments
While rotary tools are incredibly versatile, they aren’t the only option out there. If you’re hesitant to use one, here are a couple of alternatives:
- File: A manual file works for small adjustments but can take longer.
- Drill: A standard drill is good for creating new holes but might not work for fine adjustments.
Ultimately, the best choice depends on your comfort level and the specifics of your project. But honestly, once you get the hang of the rotary tool, you may find it’s your new best friend in home improvements.
Using a rotary tool for fine adjustments on door hardware, like a strike plate, opens up a world of possibilities for DIY enthusiasts. It makes precision work simple and fast. With a little practice, you’ll become more comfortable using this powerful tool.
Always remember to take your time and double-check your work. Fine adjustments can make a significant difference in how well your door functions. So grab your rotary tool, gather your materials, and take on those adjustments. Your future self will thank you for it!