This issue pops up in all kinds of homes, whether you’ve just installed a basic foam strip or splurged on a heavy-duty vinyl seal from brands like Frost King or 3M. Every door has its quirks, and sometimes the “one-size-fits-all” promise doesn’t quite work out. When that weatherstripping is too thick, suddenly the door won’t close, or it takes a full-body push—definitely not what anyone signs up for. Let’s break down why this happens, what you can do about it, and how to get your door closing smoothly without losing the whole point of weatherproofing.
Why Does Weatherstripping Make My Door Hard to Close?
Here’s the thing: *Weatherstripping needs just the right fit*. Too thin, and drafts sneak right in. Too thick, and your door starts acting like it’s glued shut. Honestly, it’s a classic Goldilocks problem—except instead of porridge, it’s the seal around your door.
When you press a thick weatherstrip between the door and the frame, you might think, “This will block everything!” But the physics just don’t cooperate. The compression forces the door away from the latch, making it hard (sometimes impossible) to close and lock. You might even hear the latch clicking but see a gap, or have to throw your weight against the door just to get it to catch.
A lot of brands, like M-D Building Products or Frost King, offer strips designed for “universal” fits. But doors aren’t always standard, especially older ones that might have warped or settled. What feels solid and snug in theory often doesn’t play out when you try to code your own fix at home. It all comes down to matching the *compression* of the weatherstripping to the *gap* you’re filling.
Signs You Chose Weatherstripping That’s Too Thick
You might be wondering, “How do I know if the weatherstripping is actually too thick? Maybe the door is just old or out of alignment.” Let me explain what to look for with a quick checklist.
- It’s tough to close or latch the door: If a door that used to swing shut easily now takes a strong push, that’s a red flag.
- You see the door frame flex: Subtle, but sometimes you’ll notice the frame bows out as you force the door. That’s excessive pressure from a thick seal.
- The weatherstripping gets crushed, torn, or falls off: Some foam types will actually rip or peel up as the door presses too tightly.
- There’s still a draft or gap: Ironically, too-thick weatherstripping can prevent the door from closing fully, leaving the problem unsolved.
If you installed a new strip from a brand like 3M, checked the packaging, followed the instructions, and the door still won’t close—odds are, the thickness just isn’t right. The lesson? It’s not just about “how much” seal you add, but *matching* the right size and shape to your particular door.
How to Measure Door Gaps for Weatherstripping
This part is important, and honestly, it’s where most folks go wrong. Grabbing the first roll of weatherstripping on the shelf is tempting, but it usually backfires. The key is figuring out exactly how big the gap is—down to a fraction of an inch.
You’ll want a good ruler or a set of feeler gauges (the kind used for checking spark plugs, if you know your way around tools). Open the door and slip the ruler or feeler gauge into the gap at several spots—top, bottom, and both sides. Note if the gap isn’t uniform; old houses love to surprise you like that.
- If the gap is less than 1/8″: Go for a thin, compressible foam strip.
- If the gap is 1/4″ or more: You can use thicker, vinyl, or rubber weatherstripping, but don’t overshoot—measure carefully.
If you’re unsure, bring those measurements (and a photo on your phone!) to the hardware store. A knowledgeable staffer can help you sync your numbers to the right product, whether you need a universal strip or one specific to your door brand.
What to Do If You’ve Already Installed Weatherstripping That’s Too Thick
So, you’ve installed new weatherstripping, and now the door won’t close. Annoying, yes—but totally fixable. Don’t reach for the sledgehammer just yet.
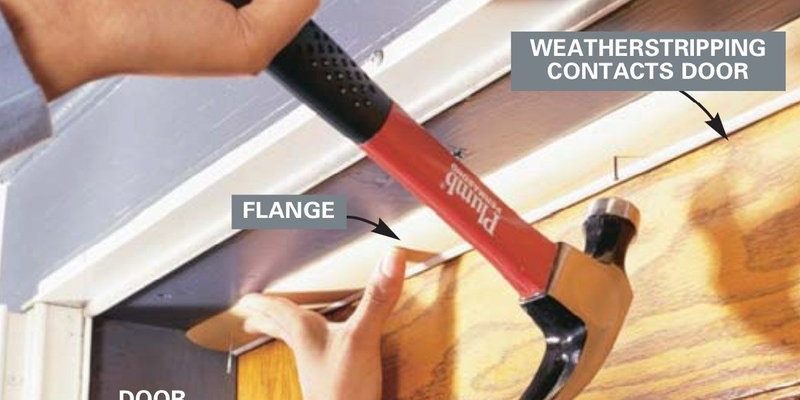
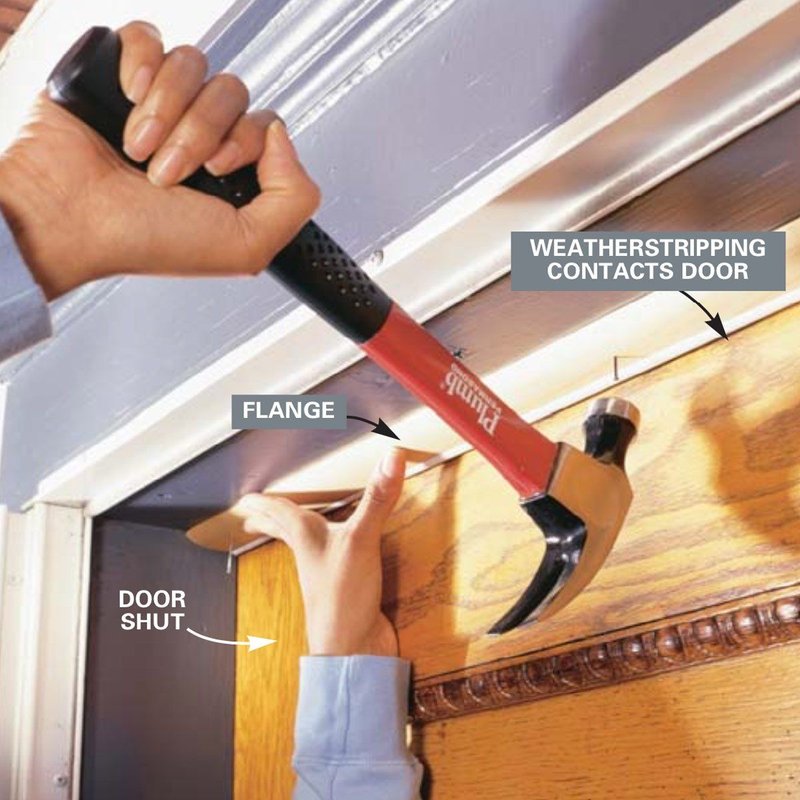
First, *don’t force the door*. Forcing it shut can wreck the frame, strip, or even the hinges. Instead, gently peel off the offending weatherstripping. If it’s adhesive-backed, use a bit of heat from a hair dryer to loosen the glue. For tacked-in or screwed-on strips, remove the fasteners with a screwdriver.
Once the strip is off, check if you’ve got any sticky residue left behind (this can happen with some Frost King or 3M strips). A little rubbing alcohol or adhesive remover will do the trick. Now, re-measure your gap (see above) and choose a thinner or more compressible seal. Sometimes, switching from D-shaped foam to a flat tape style makes all the difference.
If you still have trouble, test-fit the new weatherstripping by taping it in place temporarily, closing the door, and checking the feel. If it closes smoothly and seals well, you’re good to pair the strip for a permanent fix.
Alternative Options: Thinner Strips, Different Materials & Custom Solutions
Let’s talk options. Not all weatherstripping is created equal. Even if you started with a universal vinyl strip, it doesn’t mean you’re stuck. There are lots of ways to code a better fit, even if your door is a little wonky.
- Foam Tape: Super easy to trim with scissors and comes in all sorts of thicknesses. It’s compressible enough for tight spots and works well if you want to reset your fix.
- V-Strip (or V-Seal): This thin, flexible plastic bends into shape and works for smaller gaps along the sides of doors and windows.
- Felt Weatherstripping: Old-school, but sometimes it’s just compressible enough for tricky doors—especially in older homes.
- Adjustable or Screw-On Seals: Some brands have aluminum tracks with replaceable rubber inserts. You can adjust the tension and swap the gasket if it’s too thick or thin.
If you’re handy, you can even layer two thin strips instead of one thick one, or cut down a too-thick strip before reinstalling. The key is to reset your expectations: it’s about finding the *right* material for your unique door—not just going with whatever’s on sale.
Tips for Getting a Good Seal Without Making the Door Hard to Close
Here are a few tricks I always recommend, whether you’re troubleshooting a sticky door or syncing a new weatherstripping setup.
- Test as you go: Before sticking down the strip, tape it in place and try closing the door. If there’s resistance, it’s probably too thick or stiff.
- Install in warm weather: Some materials like foam and vinyl are easier to manipulate and pair better with the door when temperatures aren’t freezing.
- Trim excess length or thickness: If your strip is just barely too thick, you can sometimes shave a thin layer off with scissors or a utility knife.
- Don’t block the latch or deadbolt: Make sure the weatherstripping stops short of the lock hardware—otherwise you’ll have trouble closing or syncing the latch.
Adjusting your approach can make all the difference. Sometimes you just need to reset your materials or tweak the install method to pair everything up smoothly.
When to Replace Door Weatherstripping Instead of Adjusting
You might reach a point where trimming or adjusting just isn’t enough. Maybe the foam has lost its shape, the adhesive won’t stick anymore, or you’ve tried every code in the manual and your door is still stubborn.
- Weatherstripping is torn, compressed, or falling off: No matter the brand, worn-out material won’t seal or stay put, so reset your expectations and replace it.
- Door is severely warped or out of alignment: Weatherstripping can only sync so much. If the door itself is the issue, you may need to repair the frame or hinges first.
- Persistent drafts or leaks even after install: Sometimes, the problem isn’t the strip itself but a gap somewhere else—like under the door—or air sneaking in through the lock set.
In these cases, it’s worth starting fresh. Pair the right material for your situation—sometimes switching brands or types makes all the difference.
Comparing Universal Weatherstripping Kits vs. Brand-Specific Seals
Here’s a quick rundown of the pros and cons when syncing up your door with *universal* versus *brand-specific* weatherstripping kits.
Universal kits are like those “one-size-fits-most” hats. They’ll get the job done but might need tweaking. Brand-specific seals, on the other hand, are tailored for a particular door model—think of them as custom-tailored clothing.
| Universal Kits | Brand-Specific Seals |
|
– Widely available – Affordable – Easy to trim – May not fit older or odd-sized doors perfectly |
– Designed to pair with certain door brands or models – Usually pricier – Can be harder to source – Installation sometimes requires extra steps or syncing with existing hardware |
If your door is fairly standard and you’re confident in your measurements, a universal strip from brands like Frost King should do the trick. But if you have an Anderson or Pella door with a very specific design, you might need to code a fix with a manufacturer kit to ensure a perfect seal.
Closing Thoughts: Getting Your Door Sealed and Working Smoothly
Weatherstripping isn’t just about blocking a draft—it’s about making your door work right, without adding new headaches. If your door’s hard to close after adding a too-thick strip, remember: you’re not alone, and you haven’t messed up. It all comes down to the right match between the seal and the gap. Take a little time to measure, reset your approach if needed, and test as you go. There’s almost always a way to pair your door and weatherstripping so you get a tight seal *and* an easy-close door. A bit of patience, a few simple tools, and the right material can turn a stubborn door into a smooth operator once again.