Here’s the thing: weatherstripping is your home’s armor against the elements. When it fails, you feel it right away—whether it’s a gust of cold air in winter or a spike in your energy bill. Maybe you’ve already tried some basic fixes, or you’ve bought strips from a well-known brand like Frost King or M-D Building Products but still can’t get a good seal. Don’t worry—you’re not alone. Let’s break down why this happens and how to troubleshoot weatherstripping problems on bent or wonky wood frames.
Why Weatherstripping Stops Sealing on Distorted Wood Frames
Weatherstripping is designed to fill gaps, but when your wood frame warps, it’s not just a simple crack anymore—it’s a weird, uneven surface. Imagine stretching a rubber band across a lumpy rock. Some parts press tight, while others float above the surface, totally missing the point. This problem usually gets worse with older homes or doors that have seen a lot of weather.
If you notice light or air sneaking around the sides, or the door rattles a bit even when closed, that’s a clear sign your weatherstripping isn’t making full contact.
Distortion happens for a few reasons: changes in humidity, age, improper installation, or even years of slamming doors. Over time, these factors make the once-perfect frame shift and twist. The weatherstripping, no matter how premium the brand, can’t sync up with gaps that grow and shrink unpredictably.
Many folks jump straight to replacing their weatherstripping, thinking it wore out. Sometimes, though, it’s not about the strip at all. The frame itself needs troubleshooting before anything else. If you’ve reset or paired your weatherstripping a dozen times and nothing sticks, your wood might be the culprit.
Spotting the Trouble: How to Check for Frame Distortion
Before reaching for a new weatherstripping kit, take a close look at your wood frame. You might be wondering, “How do I know if my frame is really the problem?” Here’s how to spot the signs:
- Look for visible warping. Stand back and check if the door or window frame looks bent, twisted, or bulging. Use a straight edge or level if you’re not sure.
- Shine a light around the edges. If you see daylight peeking through—especially in odd patterns or just at the corners—that’s a telltale sign the frame isn’t flat.
- Test with a dollar bill. Close the door or window on a bill and tug gently. If the bill slides out easily in some spots but not others, your frame’s alignment is off.
If the distortion is severe, you may even hear a whistle on windy days, or the hardware won’t latch smoothly. Remember, weatherstripping is supposed to act like a gasket—it only works if there’s a consistent surface to press against. Think of it as trying to code a universal remote to a device with a glitchy battery: no matter how many times you reset or pair it, the underlying problem gets in the way.
Types of Weatherstripping and Their Limits on Uneven Frames
Not all weatherstripping is created equal, and some types handle distortion better than others. Here’s a quick comparison to help make sense of your options:
- Foam tape: Flexible and forgiving, but only up to a point. It can fill small gaps, but large or uneven voids will make it sag or tear.
- Rubber or vinyl bulb weatherstripping: Offers a snug seal, but needs a pretty uniform frame. If the gap changes size along the door, you’ll end up with leaks.
- Spring metal (V-strip): Good for old wood windows, as it can “spring” slightly to fill gaps. That said, if the distortion is severe, even the strongest V strip can’t sync with wild curves.
Don’t grab the fanciest brand just yet. Honestly, the best weatherstripping for a distorted frame is one that adapts without losing its shape. Sometimes, layering two types (like foam plus a thin rubber strip) works better than any single style alone.
If you’re dealing with a stubborn gap, you might have to experiment. Remember those universal remotes that promise to work with every device? Sometimes they miss the odd brand—weatherstripping can be the same way.
Preparing a Distorted Wood Frame for Weatherstripping
Let me explain: no matter how high-quality your weatherstripping is, it won’t perform if you don’t prep the frame first. You wouldn’t put a new sticker on a dusty laptop, right? The same logic applies here.
- Clean the surface. Use a damp cloth to wipe away dirt, dust, or old adhesive. If there’s paint flaking, scrape it gently—weatherstripping needs a smooth base to stick.
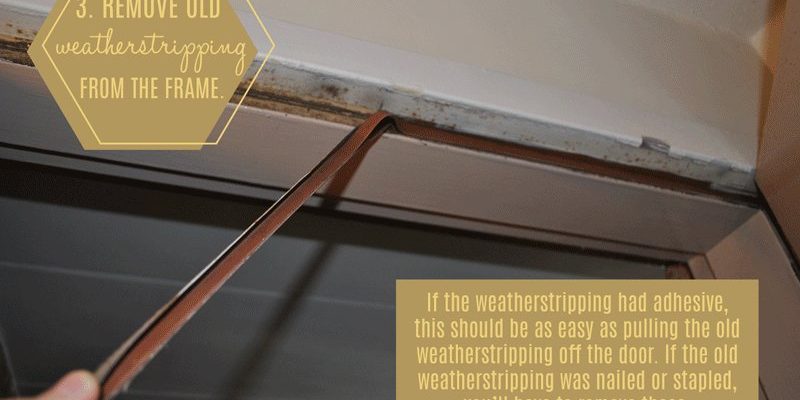
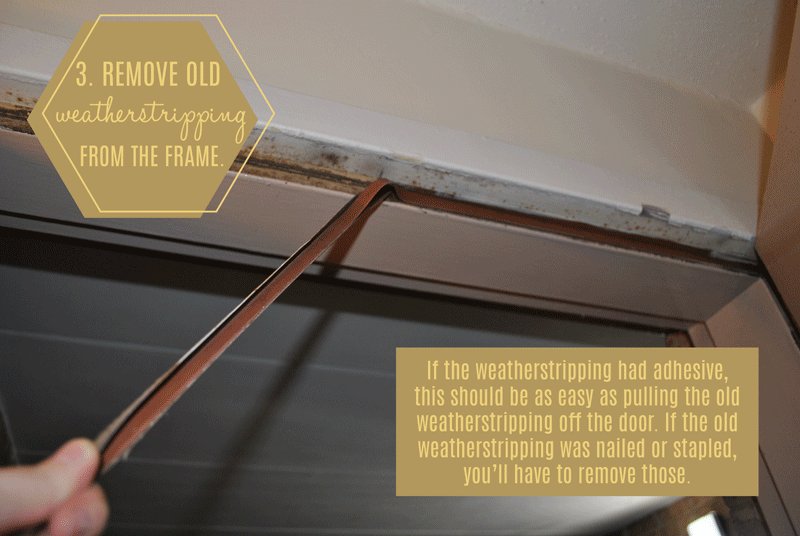
- Remove old weatherstripping. Peel it off carefully. Sticky residue can be tackled with rubbing alcohol or a commercial adhesive remover.
- Check for rot or loose wood. Soft spots mean deeper trouble. Press gently with a screwdriver; if it sinks in, the wood needs repair or patching before you go further.
If your frame is only slightly warped, you can sometimes sand down high spots or fill low areas with wood filler. Let everything dry completely before trying to install new strips. This prep work might seem like overkill, but skipping it is like trying to sync a remote with corroded battery contacts—it just won’t work right.
How to Install Weatherstripping on a Warped Wood Frame
You might be thinking, “Isn’t it just stick-and-go?” Here’s the thing: installing weatherstripping on a straight, clean frame is easy, but with a warped wood frame, you’re troubleshooting on the fly. Here’s a careful approach:
- Measure the gap at multiple points. Gaps will vary along the frame. Write down the thinnest and widest measurements.
- Choose a flexible type. Foam tape or a compressible rubber strip can handle minor twists and swells. Make sure the strip is a bit thicker than your widest gap, so it compresses everywhere.
- Apply in sections. Rather than running a single strip all the way around, cut your weatherstripping into sections that match the trouble spots. Press firmly, making sure each bit follows the bends of the frame.
If you find a spot too wide for the strip to bridge, consider doubling up or layering a second line. Just don’t overdo it—too much can stop the door from closing at all. It’s a balance, like pairing a remote: too many codes and things get confusing, too few and nothing syncs.
Testing and Adjusting Your Seal
After installation, you’ll need to test your work. Sometimes, a quick reset is all it takes—a bit of repositioning so the strip sits right. Here’s how to troubleshoot stubborn leaks:
- Close the door or window several times. This helps the weatherstripping “settle” into place. Listen and feel for resistance—there should be a slight, even pressure all the way around.
- Check with the dollar bill test again. If the bill pulls out too easily in any one spot, adjust or add more material there.
- Look for new gaps after a few days. Wood can shift again with weather changes, so revisit your work if you notice new leaks or drafts.
Don’t get discouraged if it isn’t perfect the first time. Honestly, even the pros have to go back and tweak things. Treat it like troubleshooting a remote—sometimes you need to reset, pair, or even swap out a section to get the best result.
When to Repair or Replace the Wood Frame
Here’s where reality kicks in. If your wood frame is badly distorted, no amount of troubleshooting the weatherstripping will give you a solid seal. At some point, it’s time to consider bigger repairs.
- Minor warping: Try sanding down high spots or filling in hollows with wood filler, then re-sand and repaint for a smooth edge.
- Severe twisting or rot: You might need to remove and replace part of the frame, or call in a pro. Think of it like a remote with a dead battery—sometimes it’s better to replace than keep fighting the same battle.
If you’re attached to the look of old wood, you can get creative with custom-built weatherstripping shapes or add thin shims under the strips to fill extra gaps. There’s always a workaround, but weigh the time, cost, and effort against just replacing the frame if things are really bad.
Alternatives and Next Steps for Persistent Leaks
If weatherstripping just isn’t syncing up with your distorted wood frame, there are still some tricks up your sleeve.
- Caulk for small gaps: Flexible caulk can fill tiny cracks that weatherstripping misses, though it’s not a fix for major warping.
- Draft stoppers or door sweeps: These are like the universal remotes of the sealing world—they cover a lot of sins and can be moved or replaced as needed.
- Interior solutions: Heavy curtains, rugs, or draft snakes help cut down on airflow until you’re ready for a bigger fix.
Bottom line: Sometimes you need a temporary patch while saving up or planning for a full frame repair.
Stay proactive—leaky frames and failed weatherstripping can add up in energy costs fast. If you keep having to troubleshoot the same spot, take a step back and think about a more permanent solution.
Wrapping Up: Getting Your Weatherstripping to Seal on a Distorted Wood Frame
Dealing with weatherstripping that’s not sealing on a distorted wood frame can feel like a never-ending loop of troubleshooting, resets, and “almost-there” fixes. But with patience, a bit of problem-solving, and the right materials, it’s possible to get a good seal—even on fussy old wood. Prep your frame, pick flexible weatherstripping, and don’t be afraid to tweak your install until it fits just right. And remember: sometimes, the best solution is addressing the frame itself—not just swapping strips or brands. A well-sealed, draft-free home is worth the extra effort, and you’ll feel the payoff every time the weather outside goes wild.