Let’s say you’re working with a FLIR One or Seek Thermal camera—two popular choices for hobbyists and pros alike. You point the camera at your device, fire up the app, and suddenly, every hot spot and cold patch pops into view. It’s not magic, but it sure can feel like it when you’re hunting down tricky hardware issues. Whether you’re repairing a laptop, checking your home server, or troubleshooting a remote or battery-powered gadget, thermal imaging gives you a major advantage.
How Do Thermal Imaging Cameras Work?
Let me explain how thermal imaging cameras actually see heat. Every object emits some level of infrared radiation. Your eyes can’t pick it up, but a thermal camera can. It’s like having superpowers—you suddenly spot things that look perfectly normal to the naked eye, but are pulsing with heat underneath.
Most thermal cameras use a sensor array that detects this infrared energy and translates it into a visual map. The hotter the spot, the brighter (or sometimes, the more colorful) it appears on the camera’s screen. For example, a faulty battery on a remote or a code board that’s about to fail might show up as a surprising bright spot compared to the cooler areas around it.
Honestly, once you start using one, you begin to think in thermal colors. A cold solder joint, an overheating IC, or even a wrongly-paired component will stand out in a way normal tools just can’t reveal.
Spotting the Most Common Hardware Issues
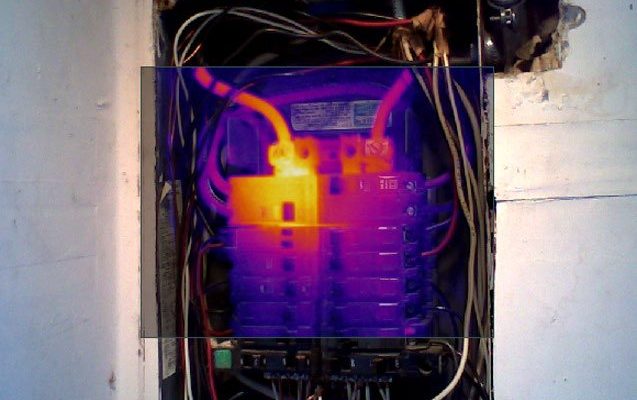
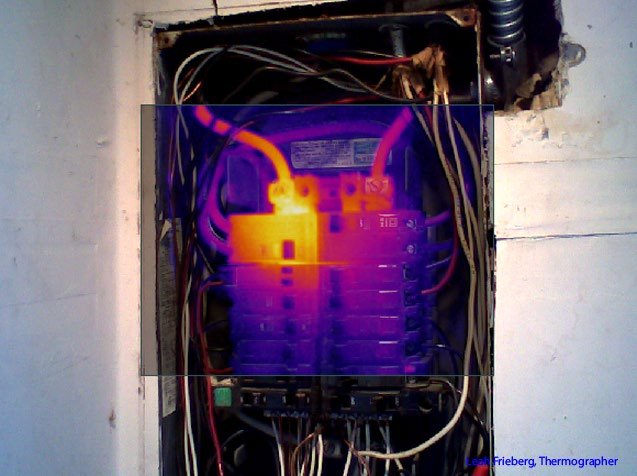
So, how can a thermal imaging camera help you actually solve real-world hardware problems? Here’s the thing: thermal cameras are perfect for locating heat-related issues in pretty much any device.
- Overheating Electronics: Chips, processors, or power regulators often overheat. A quick scan finds the outlier without the guesswork.
- Short Circuits: If a circuit is shorted, the affected area will usually heat up rapidly—making it easy to spot and fix before more damage occurs.
- Battery Issues: Swollen or failing batteries (like those in remotes) often run hotter than healthy ones. You’ll see the heat signature right away.
Let’s say your TV remote keeps resetting or won’t pair with your device. A FLIR camera can instantly show whether the battery or a specific circuit is running too hot, pointing you toward a solution—like replacing the battery or re-soldering a connection.
Step-by-Step: Using a Thermal Imaging Camera for Troubleshooting
If you’re new to thermal cameras, don’t worry. Here’s a simple rundown of how to use one for troubleshooting:
- Turn off and unplug your device first. Safety comes first, especially if you’re working with anything plugged into the wall.
- Connect and initialize your camera. For USB models like the FLIR One, plug it into your phone, open the app, and allow it to calibrate.
- Scan the hardware slowly. Aim the camera at your device and move it steadily. Give the sensor a few moments to pick up temperature changes.
- Look for hot and cold spots. Bright areas usually signal heat issues. Don’t forget to check near batteries, chips, and power supplies.
- Narrow down the problem. If you spot a suspicious area, turn off the device, let it cool, and inspect or replace the component as needed.
Most apps also let you snap photos or record videos—handy if you’re asking for help from a friend or a repair forum.
Thermal Imaging in Action: Real-Life Examples
You might be wondering, “Is a thermal camera really that helpful?” Honestly, it can save hours of frustration.
Imagine you’re fixing a laptop that keeps shutting down at random. Sure, you could poke around with your finger, but it’s risky and slow. With a Seek Thermal camera, you scan the motherboard and see a voltage regulator running way hotter than everything else. That’s your culprit. Or maybe your universal remote isn’t syncing and you suspect a battery drain problem. A quick scan shows the battery area is unusually warm, suggesting it’s time to swap it out.
I’ve even seen folks use thermal cameras to spot failing power supplies in desktop PCs, or to catch a tiny solder bridge on a Raspberry Pi. The process is visual, quick, and—once you get the hang of it—kind of addictive.
Comparing Thermal Imaging to Traditional Troubleshooting Tools
Let’s break down why thermal cameras stand out compared to more classic troubleshooting methods:
- Multimeter: Great for measuring voltage or continuity. But it tells you where a problem might be, not why it’s happening or how bad it is.
- Visual Inspection: Sure, you can often spot burned or damaged parts. But not every problem leaves a visible mark. Heat tells another story.
- Trial and Error: Swapping out parts blindly is frustrating and time-consuming. Thermal imaging lets you target your efforts, saving time and sanity.
Here’s the bottom line: a thermal imaging camera isn’t a replacement for your code reader, multimeter, or soldering iron—but it’s an incredible complement. It’s like having a sixth sense for troubleshooting.
Tips for Getting the Best Results with Your Thermal Imaging Camera
If you want your camera to become your go-to troubleshooting tool, a few habits can help:
- Let devices warm up. Some problems only show after a few minutes of use. Don’t be afraid to run your gear for a bit before scanning.
- Know your camera’s limits. Entry-level cameras (like the FLIR One or Seek Compact) are super handy, but won’t pick up tiny temperature differences—the picture might be a little “blurry” with fine details.
- Watch out for reflective surfaces. Shiny metal can bounce heat, making things look hotter or colder than they are. Try tilting the camera for a better read.
- Use side-by-side comparisons. Comparing a known good device next to the one you’re troubleshooting can really help—especially if you’re unsure what’s “normal.”
These little tricks can make your scans much more useful and help you avoid jumping to the wrong conclusions.
When (and When Not) to Use a Thermal Imaging Camera
Thermal imaging is powerful—but it isn’t always the right tool. If you’re dealing with software bugs or trying to debug a stuck code on a remote, a thermal camera won’t help. But if you suspect a physical problem—especially anything involving batteries, circuit boards, or wiring—it’s a game-changer.
Here’s when it shines:
- Intermittent resets or power failures
- Overheating devices—laptops, servers, chargers, etc.
- Battery drain issues in remotes or wearables
- Checking repairs after replacing or resetting a component
But for troubleshooting code, syncing, or software pairing problems, you’ll want to reach for other tools first.
In my experience, the best troubleshooting setups use thermal imaging as one part of a complete toolkit alongside traditional testers, software utilities, and good old-fashioned logic.
What to Look For When Choosing a Thermal Imaging Camera
Wondering which camera to buy? Here’s what actually matters:
- Resolution: Higher is better for fine electronics. Look for at least 80×60 pixels for gadgets (FLIR One Pro, Seek Compact Pro).
- Refresh Rate: Faster refresh (above 9Hz) gives a smoother image and catches quick temperature changes.
- Compatibility: Make sure the camera works with your phone, tablet, or PC. Some plug in via USB-C, others connect wirelessly.
- Software Features: Some apps let you export photos, sync heat maps, or reset imaging settings for better integration with repair logs or forums.
Don’t get distracted by gimmicks—focus on clear images, reliable syncing or pairing, and an easy-to-use interface. For most beginner and intermediate users, a FLIR or Seek thermal imager fits the bill perfectly.
Closing Thoughts: Making Troubleshooting Smarter, Not Harder
Fixing hardware issues used to feel like a guessing game—swapping batteries, poking at connections, or hoping resetting a remote would do the trick. With a thermal imaging camera, you add a new layer of confidence and accuracy. You don’t need to be a pro to spot trouble: if something’s running too hot, you’ll see it. Whether you’re helping a friend fix their laptop, figuring out why a device won’t sync or pair, or just curious to see how your tech “glows,” a thermal camera can be a fun, practical, and surprisingly affordable addition to your troubleshooting toolkit.
Honestly, once you start troubleshooting hardware with thermal imaging, you’ll wonder how you ever managed without it.