Let me explain why this is such a common headache. When you varnish a door—whether it’s an interior bedroom door or a fancy entryway setup—any hardware like handles, locks, or hinges can suddenly start acting up. It doesn’t really matter if it’s a modern Schlage lock, a familiar Kwikset handle, or just your average no-name knob from the hardware store. The beautiful finish that makes your door pop can, unintentionally, make everything stick, slip, or squeak in ways it never did before.
If you’re here, you’re probably hoping for a clear, step-by-step way to troubleshoot these hardware issues without needing to call in a pro or rip the whole thing off the hinges. You might have tried to wiggle a stuck handle, force a tough lock, or wonder why your door latches just barely catch. Let’s dig in, sort out the most common problems, and get your doors running smoothly again.
Why Varnish Can Trigger Hardware Problems
Here’s the thing: varnish is a lifesaver for old, tired-looking doors, but it’s a little sneaky. When you apply varnish, it forms a protective seal—a kind of invisible raincoat for your wood. But sometimes, this raincoat overreaches and tries to cover your hardware too. If you didn’t remove your doorknobs, locks, or hinges before varnishing (hey, we’ve all been there), you might end up sealing moving parts or tiny gaps where metal needs to shift freely.
The result? You might notice that your lock was buttery-smooth before, but now you have to jiggle it into submission just to get inside. Or maybe the handle suddenly feels glued in place. The problem is almost always about dried varnish sneaking into crevices, gumming up mechanisms, or creating a thin film between metal parts.
Another issue is that varnish can add a little bulk to the door or frame. Even just a millimeter can shift how hardware lines up—especially if your door was already a tight fit. That’s why latches that used to click right in might now barely reach, or hinges might start making odd noises as they move against the fresh finish.
So, if your doors started acting up soon after varnishing, don’t panic—it’s a classic hardware troubleshooting scenario, and you’re definitely not alone.
How To Diagnose Door Hardware Issues After Varnishing
Before you pull out the toolbox, it’s smart to figure out exactly what’s wrong. Think of this step like being a detective—look, listen, and feel for clues. Most hardware issues on previously varnished doors fall into a few categories:
- Sticking or hard-to-turn knobs and locks
- Hinges that squeak, grind, or seize up
- Latches that don’t catch or won’t release
- Handle or lock misalignment
Start by opening and closing the door a few times. Does it feel smooth, or is there a spot that hangs up? Try turning the lock or knob. If something’s stuck or grinding, make note of where it happens. Sometimes, just running your finger along the hardware can reveal a crust of dried varnish or a sticky patch.
You might be wondering if it’s really the varnish or just an old lock finally giving up. Here’s an easy trick: if the problem showed up right after varnishing, and the hardware worked perfectly before, you can almost always blame the finish. If you see shiny residue or feel stickiness, that’s your culprit.
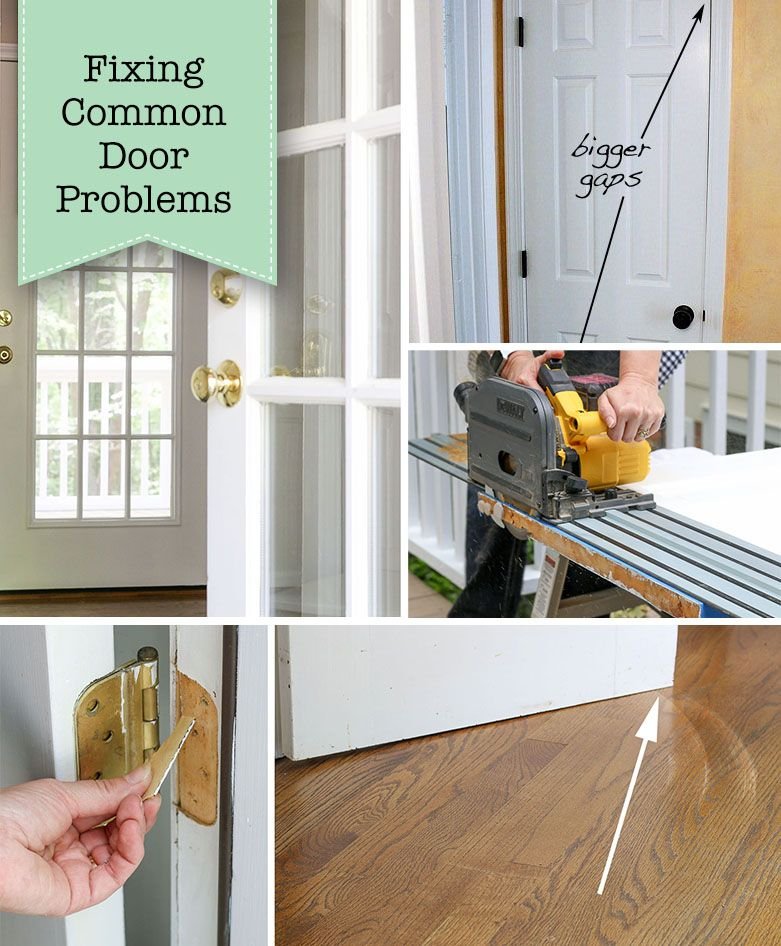
Take a close look at the edges where metal meets wood. Any visible globs, drips, or rough patches? That’s often where varnish sneaks into hinges, latch pockets, or screw holes. If you’ve got a lock that’s suddenly refusing to “sync” with its latch, check for a thin crust along the strike plate or inside the bolt pocket.
Removing Varnish Build-Up On Door Hardware
Once you’ve spotted where the varnish is causing trouble, it’s time to do a little hands-on troubleshooting. The best approach usually depends on what kind of hardware is stuck and how much varnish got into the works.
- If you see visible varnish on the surface, a clean rag and a little rubbing alcohol often do the trick. Rub gently—no need to scratch up your nice hardware.
- For tougher build-up, you may need a dental pick, plastic scraper, or even an old toothbrush. Carefully scrape away dried varnish around the edges of handles, keyholes, or latch plates.
- Don’t forget about the hinges. If they’re squeaky or stiff, remove the hinge pins (a small screwdriver works here). Clean off any varnish build-up and apply a drop of light oil before reinstalling.
- If the latch or lock isn’t moving freely, consider unscrewing and removing it from the door. You’ll get better access to clean out varnish stuck inside the mechanism. Let the hardware soak in a small bowl of rubbing alcohol if needed, then dry it completely before reinstalling.
Honestly, patience is your friend here. Rushing can scratch the hardware or damage the wood. Take your time, work slowly, and listen for the satisfying click or smooth swing that says you’ve cleared the problem.
Careful cleaning is better than brute force. If something is jammed, stop and check for hidden varnish—don’t just twist until something breaks.
When To Reset, Adjust, Or Replace Door Hardware
Let’s say you’ve cleaned off any obvious varnish, but the hardware still isn’t right. Sometimes, dried finish does more than just gum things up—it can cause the hardware to sit just a little out of place or mess with the “sync” between parts.
Start by loosening the screws that hold the handle, lock, or latch in place. Give each piece a gentle wiggle to see if it’s stuck to the door from excess varnish. If it is, slide a thin piece of cardboard or plastic under the hardware to break the varnish seal without scratching things up.
Now, retighten the screws—just enough so they’re snug, not cranked down hard. You might notice that everything lines up better now. If not, you may need to re-seat the hardware. Remove it entirely, check for varnish build-up under the plates, and sand or scrape it flat before reinstalling.
Some locks or latches have adjustment screws you can use to move the strike plate or bolt pocket. Moving these just a hair closer or farther away can help everything “reset” and work smoothly again. If things still don’t line up, it could be that the added thickness of varnish means the hardware is now out of alignment. Consider lightly sanding the area under the hardware until it sits flush.
If your hardware is old, corroded, or actually damaged (hey, it happens), sometimes a fresh replacement is the most trouble-free fix. Most modern handles and locks from brands like Kwikset or Schlage are designed to fit standard door preps, so swapping them out can be a quick upgrade.
Dealing With Latch And Lock Issues After Varnishing
Latch and lock problems are honestly the most frustrating—and the most common—hardware headaches after a varnishing project. You turn the key, and nothing happens. Or the latch just bounces off the strike plate without catching. Here’s how to troubleshoot:
- First, check the strike plate and latch for varnish build-up. Even a thin film can stop the latch from seating fully. Clean any residue with rubbing alcohol and a rag.
- If the latch still won’t catch, close the door slowly and watch where the latch meets the strike plate. Is it too high, too low, or just not reaching? This usually means the door or hardware shifted slightly from the varnish.
- Try loosening the strike plate screws and moving it up, down, or sideways until the latch lines up perfectly. Retighten screws and test the action.
- For deadbolts or keyed locks, check that the bolt extends smoothly into the door frame. If it grinds, you might need to enlarge the hole in the frame or lightly sand the inside edge.
If the lock mechanism feels gritty or tight after cleaning, a small squirt of graphite powder or dry lubricant can help. Avoid oil-based lubricants inside locks—they attract dust and can make things worse long-term.
If your lock won’t code, sync, or reset after varnishing, the real culprit is usually sticky residue. Get the mechanism as clean as possible before worrying about complicated repairs.
Fixing Squeaky Or Stiff Hinges On Varnished Doors
Let’s talk hinges, because nothing ruins a peaceful morning like a door that shrieks every time you open it. Squeaky or stiff hinges are practically guaranteed if varnish made its way under the hinge leaves or onto the pins.
Here’s a simple step-by-step to fix it:
- With the door closed, tap the hinge pin upward using a small nail and hammer until it pops free.
- Wipe the pin and inside the hinge with a rag and a little rubbing alcohol. Scrape off any stubborn varnish with a plastic scraper.
- Apply a light coat of silicone spray, dry graphite, or 3-in-1 oil to the pin and hinge barrel.
- Slide the pin back in and move the door back and forth to spread the lubricant.
If the hinges are painted or heavily varnished, they might still grind. In that case, you’ll need to remove the entire hinge, sand or scrape the backside and screw holes, then reinstall. Double-check that you’re not missing any screws or that the hinge isn’t bent from past “creative problem-solving.”
Pro tip: If you have decorative hinge covers or caps, give them a quick wipe—varnish loves to hide under little details where you can’t see it.
How To Prevent Hardware Problems Next Time You Varnish A Door
Honestly, the best troubleshooting is what you do before trouble even starts. If you’re thinking about giving another door a shiny new finish, here’s how to avoid these headaches in the first place.
- Take off all hardware before you start. Yes, it’s extra work, but it’s totally worth it—trust me. Even universal-fit handles and locks from big brands are easy to remove and reinstall with a screwdriver.
- If you can’t remove something (maybe it’s painted over or stuck), use painter’s tape and plastic wrap to cover all hardware. Press the tape into any seams where varnish might seep in.
- Let each varnish coat dry fully before reinstalling hardware. Rushing this can glue everything in place.
- After reinstalling, test every part—knob, latch, lock, and hinge—multiple times while the door is still off its hinges, if possible. Small issues are easier to spot when you’re not craning your neck trying to close a stuck door.
Let me say: a few minutes of prep beats hours of scraping or adjusting hardware later. And if you do have to reset, clean, or replace something, having the right screwdriver and a little patience makes all the difference.
Alternatives To Traditional Door Hardware—And When To Upgrade
You might be wondering, “Is there hardware that’s less likely to be ruined by varnish, or just easier to deal with?” The answer is yes. Some universal-fit locks and handles are designed to be swapped in and out quickly, with fewer nooks where finish can hide. High-end hardware often has removable faceplates or covers, making it simpler to clean or adjust if you ever do have to varnish again.
Here are a few options for easier maintenance:
- Universal latch sets: These fit almost any door prep, making replacement downtime minimal if something gets wrecked.
- Magnetic latches: No moving parts in the strike plate means less to gum up with varnish. They’re also quieter than traditional latches.
- Smart locks: Modern smart locks usually install with a single screw set and can be removed quickly—handy if you varnish frequently.
- Upgraded hinges: Stainless or ball-bearing hinges resist both corrosion and sticky finishes better than basic steel models.
Just remember, even fancy hardware isn’t immune to a thick layer of varnish if you aren’t careful. If you’re already investing in new hardware, consider picking up an installation jig (these help align holes perfectly) so you can avoid alignment issues—especially if the door is older or slightly warped.
Wrapping Up: Keeping Doors Smooth After Varnish
Dealing with door hardware issues after varnishing can feel like a cruel twist of fate—you do all that work to make your doors look beautiful, and suddenly, the hardware acts up. But with a bit of patience, some careful cleaning, and a willingness to adjust or reset what’s out of sync, you’ll usually have things running smoothly in no time.
If you take away anything from this troubleshooting guide, let it be this: a little prevention (like removing or covering hardware) saves tons of time later. When you’re troubleshooting, go slow and work methodically—most issues boil down to dried varnish or tiny misalignments that are easy to fix with basic tools and a steady hand. And if you do need to upgrade, plenty of brands now offer easy-to-install, low-hassle options that stand up better to future projects.
So next time you’re eyeing that can of varnish and a set of doors that could use a makeover, you’ll have some hard-earned wisdom on your side—and hardware that’s ready to open and close without a fight.