
Gaps around a closed exterior door can lead to all sorts of annoying problems: chilly rooms, higher energy bills, sticky locks, or even unwelcome critters sneaking in. Sometimes, it’s just a thin stripe of daylight along the bottom; other times, it’s a full-on breeze. No matter if your door is a classic wood model or a modern steel one, the issues and fixes are pretty similar. Let’s walk through why these gaps happen and how you can troubleshoot them—no handyman degree required.
What Causes Gaps Around An Exterior Door?
Let’s start with the basics. When you close your exterior door, you expect it to seal tightly all the way around. But if that’s not happening, something’s off—either with the door itself, the frame, the weatherstripping, or sometimes all three.
The most common reason for these gaps is simple wear and tear. Over years, doors swell and shrink with the weather, hinges loosen, and old weatherstripping breaks down. Even a tiny shift in your home’s foundation can throw everything out of alignment. That means your once-snug door might start letting in more than just your Amazon packages.
Here’s the thing: the size and shape of the gap matters. A wide gap at the bottom usually points to a worn-out threshold or sagging hinges. If you see light along the top or sides, your door might be warped or not sitting square in the frame. Knowing where the gap is helps you zero in on the fix. Think of it as detective work—but with more drafts and fewer trench coats.
Don’t forget, installation plays a big part too. If your door was never hung quite right, small issues can snowball into big gaps over time. Maybe the original installer rushed, or the house settled more than expected. Either way, understanding the root cause makes troubleshooting a lot less mysterious.
How To Inspect Your Exterior Door For Gaps
Before you jump into repairs, you need to play detective for a few minutes. Grab a flashlight and take a close look with the door shut—inside and out. Look for spots where light shines through or feel for cold air on a windy day.
Start by running your hand slowly around the edges of the closed door. If you feel air coming in—or worse, see daylight—you’ve found at least one problem area. Move a lit flashlight around the frame (with the lights inside off) and check if light escapes to the outside. This trick is surprisingly good at revealing tiny gaps, especially in early morning or evening light.
Next, check the door’s movement. Does it drag on the floor or stick when closing? That can be a clue that the hinges are loose or the door is out of square. Open and close the door a few times, listening for any odd squeaks or catching. Look closely at the frame; a cracked or warped jamb can cause uneven gaps, either at the top, side, or bottom.
Finally, inspect the weatherstripping. Is it torn, brittle, or missing in places? Old weatherstripping often looks flattened and doesn’t spring back if you poke it. If you spot problems here, you’re already halfway to a solution.
Common Problems Behind Door Gaps (And What They Mean)
When you spot a gap, it usually falls into one—or more—of these categories:
- Bottom Gaps: A space under the door often points to a worn threshold or a door that’s settled over time. Sometimes, the rubber sweep on the bottom is cracked or missing. This is the classic “cold feet in winter” problem.
- Side Gaps: If the gap hugs just one side, your door could be out of alignment. Maybe the hinges are loose, or the screws have stripped out. If the gap is bigger at the top or bottom, you might be dealing with a slightly twisted door frame.
- Top Gaps: A gap up top usually means the door has sagged on its hinges. Over time, the weight of the door pulls down, especially if the upper hinge is loose. That can also throw off the latch, making it harder to lock the door securely.
- All-Around Gaps: If you see daylight everywhere, the door might be too small for the frame, or the weatherstripping is completely shot. This sometimes happens when a universal fit door was used in a non-standard frame.
Let me explain: Even a tiny gap can let in a surprising amount of air or moisture. And if you live somewhere buggy, you might notice more insects sneaking inside. Each type of gap suggests a slightly different fix, so pinpointing the problem area saves you time and effort.
Fixing Loose Hinges And Adjusting Your Door
Hinges might seem like a minor part, but honestly, they do most of the heavy lifting. If your exterior door sags or won’t close tightly, the hinges are often to blame. Don’t worry—tightening or adjusting them usually just takes a screwdriver and a few minutes.
First, open the door and check each hinge. See if any screws are loose or sticking out. If so, grab a screwdriver and tighten them clockwise. If a screw just spins in place, the hole might be stripped. Here’s a quick trick: pull the screw out, shove some toothpicks or a wooden matchstick dipped in glue into the hole, then screw it back in. This fills the gap and helps the screw bite.
If the door is sagging at the top, try tightening the top hinge first. Sometimes, swapping in a longer screw (at least 2.5″ or 3″) will let it bite into the framing behind the jamb, pulling the door back up into place. Check your results by shutting the door and looking at the gap again—it should be much smaller.
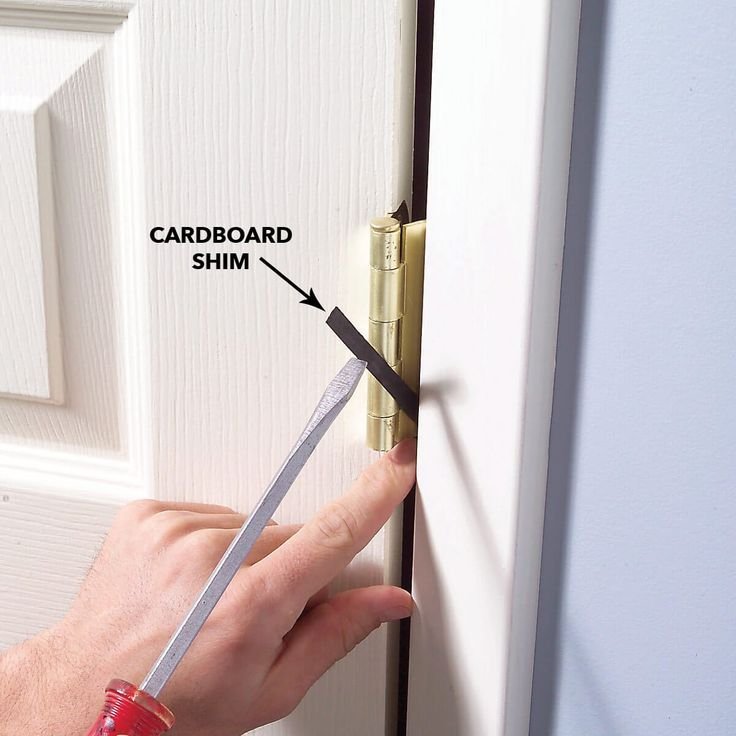
On rare occasions, you might need to shim behind a hinge (a thin piece of cardboard works in a pinch) to even things out. This can help if the door is rubbing on one side or won’t latch. Adjust one hinge at a time and test carefully, since a little movement can make a big difference.
Weatherstripping: The Unsung Hero Of Door Sealing
You might be wondering why weatherstripping matters so much. Here’s the secret: even a solid, heavy door can’t keep out drafts if the weatherstripping is old, brittle, or missing. It’s the soft barrier that closes the tiny gap between your door and the frame, creating that satisfying “seal” when the door shuts.
Start by checking what type of weatherstripping you have. Foam tape, rubber gaskets, felt strips, or metal—the options are pretty varied, and each wears out at its own pace. If you see gaps, cracks, or missing chunks, it’s time to replace.
Here’s how to do it:
- Carefully peel off the old weatherstripping or pry out any nails or staples.
- Clean the surface with a damp rag to remove dust and debris—new strips won’t stick well otherwise.
- Cut the new weatherstripping to length, following the manufacturer’s instructions (universal fit brands work for most doors, but thicker options are best for larger gaps).
- Stick or nail it in place, making sure there’s no bunching or overlapping at the corners.
Test the door after you’re done—a well-sealed door closes with a slight resistance and doesn’t let in light or air around the edges. If you still spot a gap, try layering a thicker strip or checking if the door is out of alignment.
How To Fix A Gap Under An Exterior Door
A gap at the bottom of the door is one of the most common (and most frustrating) problems. It lets in drafts, dust, and sometimes even water during heavy rain. Here’s how to tackle it step by step.
First, check if there’s a door sweep—a rubber or bristle strip attached to the bottom edge. If it’s missing, cracked, or flattened, you’ve found your culprit. Swapping it out is straightforward: unscrew the old sweep and attach a new one, making sure the fresh sweep brushes just lightly against the threshold without dragging.
If you still see daylight after replacing the sweep, inspect the threshold (the metal or wood strip under the door). Some thresholds are adjustable; they have screws that let you raise or lower the strip. Turn these slowly until the gap disappears. Not all thresholds adjust, though—in that case, you might need to install a new one, which is a little more involved but still a solid DIY project.
Don’t forget: if the floor under your door is uneven, you might need to use a thicker sweep or add a draft stopper. Universal options are cheap and work with almost any door brand or type.
When To Call A Pro For Door Troubleshooting
Most gaps around an exterior door are easy to fix with a screwdriver, some weatherstripping, and a little patience. But sometimes, it’s worth calling in reinforcements. If your door frame is cracked, warped, or feels wobbly, a pro can check for bigger structural issues—like foundation settling or wood rot.
Another sign it’s time for help is if you’ve tried all the basic fixes and the gap just won’t go away. Some older doors simply don’t fit their frames anymore, especially if your house has shifted over the years. Pros can realign, plane, or even replace the door if needed.
And let’s be honest: if the job just feels overwhelming or you don’t have the right tools, there’s no shame in getting an expert involved. Paying for a proper fix now can save you way more in energy bills and headaches down the line.
Quick Comparison: Brand-Specific Vs Universal Door Seals
You might notice some weatherstripping and door sweeps are labeled for certain brands or models, while others claim to fit “any” exterior door. Is there a real difference? Here’s a quick rundown.
| Brand-Specific | Made for a particular door manufacturer or model. Tends to fit perfectly, but often costs more and may require special ordering. |
| Universal | Designed to work with almost any exterior door. Usually cheaper and easier to find at hardware stores, but may need to be trimmed or adjusted for a perfect fit. |
If you have a modern name-brand door, brand-specific seals or parts might be worth the extra trouble for a perfect fit. For older or “mystery brand” doors, universal options are often more practical—and let you get back to enjoying your porch coffee that much sooner.
Preventing Gaps From Coming Back
Once you’ve fixed the gaps around your exterior door, keeping them away is all about maintenance and regular checkups. Here’s what works:
- Check hinges every few months. If you notice even a tiny wobble, tighten things up before it turns into a big problem.
- Inspect weatherstripping at least once a year, especially before winter or during the rainy season.
- Clean and lubricate locks and latches—sometimes a sticky lock is caused by misalignment from a shifting door.
- Watch for signs of water damage or swelling along the frame, especially after storms.
Here’s the thing: Small fixes over time are way easier (and cheaper) than dealing with a sagging, drafty door that needs total replacement. Treat your door to a quick checkup whenever you clean your windows or mow the lawn, and those annoying gaps won’t stand a chance.
Even the best exterior doors need a bit of love to stay gap-free and energy efficient. Troubleshooting gaps around a closed door is mostly about knowing where to look, what to adjust, and not being afraid to get your hands a little dirty.
When it comes down to it, a tight-sealing door does more than just keep the elements out—it helps your home feel safe, comfortable, and put together. Whether you’re rocking a new high-end steel door or an old wooden classic, taking these steps puts you in control. So next time you spot a sliver of daylight where there shouldn’t be, you’ll know exactly what to do.