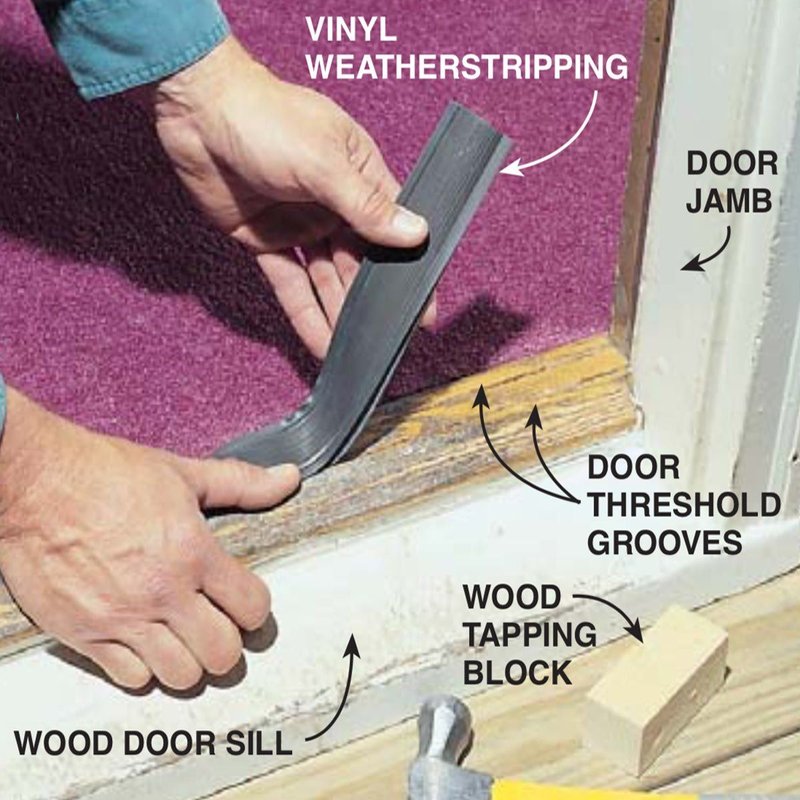
Here’s the thing: no matter if you’re working with the squishy foam kind or a more rigid rubber seal, it’s easy for these strips to get distorted over time. Maybe you’ve got a drafty window, a leaky door, or you’re putting in a replacement for the first time. This isn’t just a quick fix. The type of weatherstrip you have—say, a Frost King, M-D Building Products, or even a generic brand—can make a big difference. So, if your weatherstrip keeps twisting, crushing, or popping out, let’s dig into why it happens and what you can do.
Why Weatherstrips Lose Their Shape
You might be wondering why weatherstrips even get bent out of shape in the first place. There are several reasons, but most of them come down to a mix of physical stress, material fatigue, and sometimes, just plain old age. Over time, pressing a door shut over and over will flatten the strip, forcing it to take on a permanent crease. If you’ve ever squished a foam pillow and noticed it doesn’t bounce back, you know the feeling.
Moisture is another big culprit. Rubber and foam weatherstrips can absorb water or become brittle in cold conditions. Ever left a rubber band in the sun? It becomes cracked and loses its elasticity. The same thing can happen with weatherstrips, especially if they’re exposed to outdoor conditions or aren’t protected by a threshold.
Installation hiccups matter too. If the strip is stretched too tightly, cut too short, or not seated correctly in the groove, it’ll fight back—curling, bulging, or popping out at the corners. Think of it like zipping up a jacket that’s too small: something’s bound to give, and it’s rarely pretty. Add in a few years of slamming and seasonal temperature swings, and even the toughest brands, like Frost King or M-D, aren’t immune.
Common Signs Your Weatherstrip Isn’t Right
Sometimes it’s obvious your weatherstrip is struggling, other times you might not notice until a draft chills your toes in the middle of the night. A weatherstrip that’s not holding its shape usually shows one (or more) of these symptoms:
- Visible gaps or uneven lines: If you look along the edge and see daylight or wavy spots, it’s a sure sign the strip isn’t sealing properly.
- Unusual resistance or sticking: When opening or closing the door/window feels harder than usual, the misaligned weatherstrip could be pushing against it.
- Noise or increased drafts: If you notice more outside noise, air, or even water sneaking in, your strip’s probably lost its form.
Here’s a tip: close the door or window and pass your hand around the edge. If you feel cold air, something’s up. With sliding doors and windows (where you might use a self-adhesive foam weatherstrip), look for bulges or corners that won’t lie flat. Some weatherstrips will even peel away or crumble when touched. Honestly, if you see that, it’s time for a replacement.
Checking Weatherstrip Material and Type
Not all weatherstripping is created equal, and the type you’re using has a huge effect on how well it holds its shape. Most home weatherstrips fall into a few main categories:
- Foam tape: Flexible and easy to install, but it can get crushed or lose its “spring” over time.
- Rubber or vinyl bulb seals: These are more durable, but still prone to flattening, especially if they’re exposed to a lot of pressure.
- Felt strips: Inexpensive and very common, but they wear down quickly and don’t always snap back after being compressed.
- Door sweeps and thresholds: These are usually made of rubber or plastic and mounted at the base of the door—they can warp, crack, or peel if installed incorrectly or exposed to harsh weather.
Let me explain: say you’re dealing with a Frost King foam tape on a window that’s opened daily. Over a few months, that constant movement is like doing push-ups—eventually, it’s going to run out of strength. On the other hand, a heavy-duty vinyl seal on a rarely-used door might last years. Matching the strip to the job (and the brand’s track record) is half the battle.
One more thing: look for any product code or model number on the packaging. If you’re upgrading or replacing, cross-checking the code can help you find a compatible style that holds its shape better.
Weatherstrip Troubleshooting: Step-by-Step Solutions
Alright, so your weatherstrip’s not doing its job. Here’s how you can troubleshoot it before giving up:
1. Inspect carefully: Open the door or window and look closely at the weatherstrip along the edge. Is it squashed flat, cracked, or poking out? Check every inch—sometimes the problem’s just at the corners.
2. Reset or re-seat the strip: If it’s come loose or twisted, gently peel it back and realign it. For foam tape, press it into place firmly along its entire length. For inserted types (like those that slide into a track), push them back in until they sit flush.
3. Trim, don’t stretch: If the strip is too long, it’ll bunch up—use scissors or a utility knife to trim the end neatly. Never pull a weatherstrip too tight during installation; that’s a recipe for it snapping back or popping loose.
4. Replace if it’s worn out: No shame here—if your weatherstrip’s crushed, brittle, or missing chunks, grab a replacement. Brands like M-D Building Products and Frost King have direct codes for matching replacement strips. Go for a slightly thicker, more resilient material if your last one wore out too fast.
5. Add extra support or adhesive: If you notice the strip keeps peeling or won’t stay in its groove, a dab of strong adhesive or double-sided tape can help. For metal doors or windows, magnetic weatherstripping is a solid alternative that holds its shape better over time.
Honestly, sometimes the fix is as simple as pressing it back into place. Other times, you’ll realize it was the wrong size or material from the start—and there’s no shame in swapping it out for one that fits better.
Tips for Installing Weatherstrips That Hold Their Shape
You might be thinking: Is there a way to keep weatherstrips from sagging or twisting in the first place? Absolutely. Good installation is half the battle. Here’s how to give your weatherstrip the best start:
- Clean the surface: Dirt, dust, or old adhesive will keep any strip from sticking or sitting properly. Wipe with soap and water, then dry fully before applying.
- Don’t overstretch: Lay the strip gently into place without pulling. For self-adhesive foam, apply it with just enough pressure to stick, not to compress.
- Let adhesive cure: With stick-on strips, wait a few hours before opening and closing the door or window—this helps the adhesive bond fully.
- Check the fit: Close the door or window slowly after installation. If it’s tough to close, or if the strip bunches up, adjust before the glue sets.
If you’re installing a brand-specific weatherstrip, like one with an M-D code or for a Frost King door sweep, double-check the instructions. Sometimes, it’s just a matter of lining up the edges or pressing into a pre-cut channel. Don’t rush—this is the kind of job where a few extra minutes make a difference that lasts for years.
How Temperature, Weather, and Use Affect Weatherstrips
Weatherstrips have a tough job: they’re squeezed, stretched, and exposed to everything from icy wind to blazing summer heat. Let’s talk about how everyday use and changing seasons play into them losing their shape.
Cold weather can make rubber and vinyl strips stiff or brittle, like a garden hose left outside in winter. Instead of bouncing back, they stay flattened. Hot weather, on the other hand, can make adhesives ooze or lose their grip, especially with foam tape. You might notice a sticky mess or a strip that’s slumping out of place.
Regular use—especially with high-traffic doors or windows—just adds to the wear. Every time you open the door, the strip is compressed and released. Over months or years, this leaves little creases that become permanent. If you notice your weatherstrip looks tired after every cold snap or heat wave, it’s probably ready for a reset or replacement.
One pro tip: in really harsh climates, consider investing in higher-quality weatherstripping or even magnetic strips for an extra-tight seal that keeps its shape longer. These work especially well for steel doors and windows, locking in place every time you close up.
When to Replace vs. Repair a Weatherstrip
Deciding whether to salvage a floppy weatherstrip—or go ahead and replace it—comes down to a few signs. Here’s what to look for:
- Permanent deformation: If the strip stays flat or twisted no matter how much you fluff or adjust it, it’s past its prime.
- Cracks, tears, or missing chunks: These can’t be fixed with glue or tape. Replacing the strip is your best bet.
- Loss of stickiness: For self-adhesive types, if the backing won’t stick even after cleaning, new adhesive probably won’t hold for long.
Sometimes, though, it’s an easy fix. If the strip just slipped out of its channel, a careful reset can get it back in shape. If only the end is bent, trimming off the damaged part may help. But honestly, if you keep fighting with the same spot week after week, a new, sturdier strip will save you more hassle.
If you’re upgrading your weatherstripping, look for improved materials or a better fit—sometimes switching from foam to rubber, or from self-adhesive to track-mounted styles, makes all the difference.
Comparing Brand Options and Alternatives
With so many types and brands, it’s easy to get overwhelmed by choices. Frost King and M-D Building Products are two of the most popular names—both make a wide range of foam, rubber, and specialty strips. Universal strips (the kind you cut to size) work for most doors and windows, but a brand-specific strip, matched to your door’s model code, often fits more snugly and holds its shape longer.
Magnetic weatherstrips are another option. They work especially well for metal doors and tend to keep alignment better over time. If you’re in a high-traffic home or have a particularly drafty spot, the extra investment can be worth it.
If you’re stuck, bring the old strip (or a photo with any codes) to your local hardware store. The folks there can help you match the shape and thickness, so you don’t end up with a strip that’s too floppy or bulky for your frame.
Let’s be real: there’s no magic strip that lasts forever. But picking the right size, material, and brand for your needs—plus a careful installation—will save you endless rounds of troubleshooting.
Closing Thoughts: Keeping Weatherstrips Working Like New
Weatherstrips might be a small part of your home, but they do a big job. When they stop holding their shape, you get drafts, leaks, and higher bills—plus, let’s face it, those sneaky bugs and dust bunnies slipping in. The good news? With the right know-how, a bit of patience, and a careful touch, you can troubleshoot and, if needed, replace a weatherstrip that’s lost its form.
Whether you’re fixing a sticky Frost King foam strip, upgrading to a magnetic seal, or just experimenting with different brands, remember: the key is matching the strip to your door or window and installing it with care. Most importantly—don’t stress if you don’t get it perfect the first time. A properly installed, high-quality weatherstrip will hold its shape longer, doing its quiet job to keep your home comfortable, season after season.
