A threshold (that metal or wooden strip at your door’s base) is meant to keep the inside in and the outside out. For many folks, brands like M-D Building Products or Pemko might ring a bell—they make some of the most common residential and commercial door thresholds. No matter the brand, though, the process to fix a threshold that’s not properly sealed to the floor is basically the same. Let’s walk through what can go wrong, why it matters, and what you can do about it. I’ll break everything down in plain English, step by step, with no jargon or wild assumptions.
What Does It Mean When a Threshold Isn’t Sealed?
When someone says their threshold isn’t “sealed,” what they’re really talking about is a gap—maybe it’s between the bottom of the door and the strip itself, or between the threshold and the floor. Either way, that little space acts like a hole in an umbrella. Water, air, and dirt don’t care about your definitions; they’ll find their way inside.
Here’s the thing: a properly sealed threshold should be flush against the floor, with no cracks or wobbly spots. Sometimes, you can *see* daylight underneath. Other times, you only notice the draft or the sound. These small gaps might seem harmless, but over time they eat away at your comfort and even your energy bills.
Think of it like a code that’s missing a bracket or a remote that won’t sync—something that should connect, but doesn’t. If you have to keep adjusting your thermostat or you’re constantly sweeping up debris by the door, your threshold is failing at its most basic job. A solid seal matters for your home’s protection, energy efficiency, and even just a bit of peace and quiet.
Common Reasons Your Door Threshold Isn’t Properly Sealed
Honestly, most threshold problems aren’t mysterious. There are a few usual suspects, and you don’t need to be a pro to spot them.
- Aging or Worn Materials: Over time, wood swells and shrinks, metal warps, and vinyl gets crumbly. Even the best M-D Building Products threshold will eventually wear out. Once the surface isn’t perfectly flat, it’s almost impossible to get a good seal.
- Poor Installation: If your threshold was put in with uneven screws, no caulk, or just plain rushed, expect problems. Sometimes the installer skips steps, or the floor beneath isn’t level. The result? Gaps pop up immediately or after the first season change.
- Settling or Shifting Floors: Houses move—a little, every year. Floors settle, doors sag, and what was once a tight fit loosens up. Suddenly, that “perfect” threshold just doesn’t meet the floor anymore.
- Missing or Broken Seals: Many thresholds have a rubber gasket or vinyl insert that presses against the door or floor. If this part gets torn, cracks, or falls out, you’re left with a gap that sealing alone won’t fix.
You might be wondering: can you just patch things up with a little extra caulk or a weatherstrip? Sometimes, yes—but not always. Let me explain why the fix depends on what you find when you actually look at your threshold.
How to Check If Your Threshold Isn’t Sealed Properly
Before you start unscrewing things or searching for a new threshold brand, it’s smart to do a careful check. Troubleshooting here is a lot like diagnosing a remote that won’t sync—you don’t want to guess and buy the wrong replacement.
- Look for Light: Wait until it’s dark outside, turn off the lights in your entryway, and look for daylight peeking under the door. Any visible streak means you’ve got a gap.
- Check for Air Flow: Close the door and run your hand along the bottom or sides. If you feel a breeze—or, in winter, a cold spot—you know there’s an issue.
- Examine the Seal: Get down at eye level and inspect where the threshold meets the floor. Is there old, cracked caulk? Missing rubber? Any visible space?
- Inspect the Threshold Material: Push gently on the threshold. Does it shift or rock? If it’s not solidly fastened, sealing will never last.
Take your time here. The goal is to pinpoint what’s actually at fault. Sometimes, the problem isn’t just with the threshold itself—other times, you notice the door bottom is uneven or there’s a big dip in your floor. Write down what you find, because your fix will depend on the details.
Tools and Materials You’ll Need to Seal a Door Threshold
You don’t need a tool kit worthy of a pro installer, but you should gather what’s needed before starting. This is a bit like having extra batteries and a backup code handy when troubleshooting a remote—makes things smoother in the long run.
- Screwdriver (usually Phillips or flathead, depending on threshold type)
- Utility knife for trimming old seal or excess caulk
- Caulk gun and high-quality exterior caulk (silicone or polyurethane-based)
- Weatherstripping, if the old rubber or vinyl seal is missing or worn
- Replacement threshold or insert (match the brand and length to your current model, such as M-D Building Products or Pemko)
- Measuring tape to ensure you’re getting the right fit
- Gloves and safety glasses (trust me, caulk in the eye is no fun)
Optional, but helpful: a pry bar for removing stubborn thresholds, a small vacuum to clean the area, and painter’s tape to get crisp caulk lines. Having everything ready avoids those annoying mid-project trips to the hardware store.
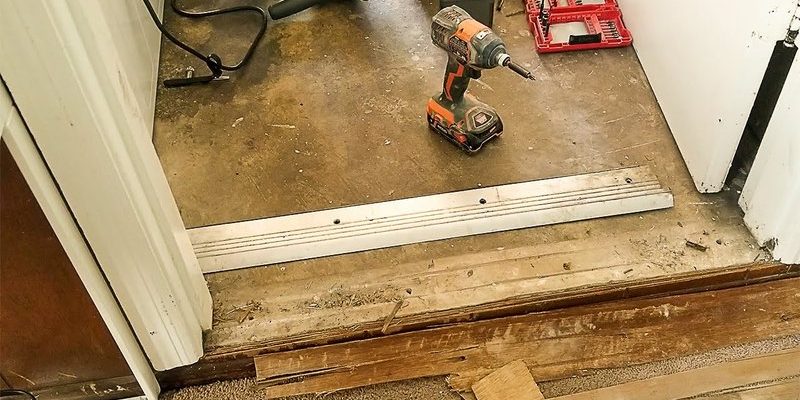
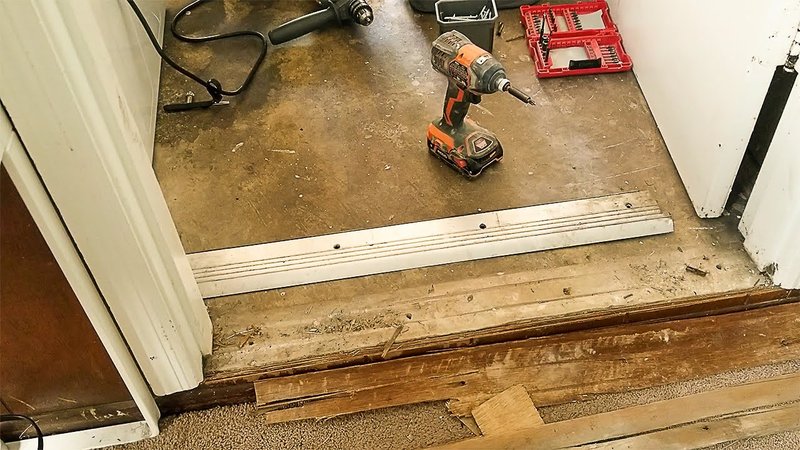
Step-By-Step Guide to Fixing a Poorly Sealed Threshold
Here’s what you’ve been waiting for—a simple, step-by-step process anyone can follow. Think of it as a reset for your threshold, much like you’d reset or pair a stubborn remote.
- Remove the Old Seal or Threshold: Start by unscrewing or gently prying up the existing threshold, if you’re replacing it. If it’s just the rubber insert or caulk, use your utility knife and pull out the damaged material. Be patient—breaking anything now will just mean more work.
- Clean the Area: Use a vacuum or brush to clear away dirt, old adhesive, and debris. Any leftover gunk will keep your new seal from sticking.
- Check for Uneven Floor or Door Gaps: Lay a straight edge along the floor. If it’s wildly uneven, you might need to fill in dips with a bit of wood filler or leveling compound (available at most hardware stores).
- Install New Seal or Threshold: If you’re installing a new rubber insert, slide or press it into place according to the manufacturer. For a new threshold, cut to length (if needed), then position it tight to the door bottom. Fasten with screws—don’t overtighten, as that can bow the material.
- Apply Caulk: Run a bead of exterior caulk along the seam where the threshold meets the floor, smoothing it with a damp finger or tool. This blocks air and moisture from sneaking under.
- Test the Door: Close the door and check for a firm, even connection. No visible light or air movement? Success. If not, adjust as needed or add weatherstripping to the door’s bottom edge for backup.
Each step’s important; skipping one is the fastest way to have to start over (and nobody wants that). Take your time, and don’t be afraid to double-check as you go.
Should You Replace or Repair the Threshold?
You might be debating: do I patch things up, or just swap out the whole threshold? Here’s how I see it—even the best brands, like M-D Building Products, have their limits. If the material is warped, rotten, or corroded, replacement is best. If it’s still structurally sound and you’re just missing a seal or a bit of caulk, a repair can often extend its life by years.
- Repair When:
- The threshold material is solid—no soft spots, splinters, or deep dents
- You just need a new rubber insert or a fresh line of caulk
- The issue is a small, visible gap (not a structural failure)
- Replace When:
- The threshold moves, rocks, or is obviously loose
- There’s water damage, rot, or the metal is rusted through
- No repair seems to stay sealed, no matter what you try
Just like with a failing remote, sometimes there’s no code or quick fix—you need a full reset. If you’re unsure, it’s better to replace than spend hours patching what won’t ever really work.
Tips for Preventing Future Threshold Problems
Once you’ve sealed things up, you want that fix to last. Here’s how to keep your threshold working as it should (and avoid troubleshooting all over again):
- Check the Seal Every Season: Just like you’d periodically check your remote’s battery, glance at the threshold during spring and fall cleaning. Look for cracks, missing pieces, or loose screws.
- Clean Regularly: Dirt and grit can wedge under a threshold or wear down the rubber, making gaps form sooner. Sweep or vacuum the area every so often.
- Touch Up Caulk: As soon as you spot a crack in the caulk, touch it up. Waiting can let water or bugs sneak in and cause bigger issues.
- Use the Right Materials: Don’t cheap out—high-quality exterior-grade caulk and authentic replacement parts from brands like M-D Building Products or Pemko last much longer than bargain substitutes.
If you ever notice a draft, don’t wait. Quick action now is easier (and cheaper) than a full replacement later.
Alternatives: When Universal Thresholds or Professional Help Make Sense
Sometimes, your door or floor just isn’t a standard size or shape. Maybe you’ve got an old home with quirky gaps, or you’ve tried all the above and nothing fits quite right. In cases like these, a universal threshold—one you can cut or trim to length—may be your best bet. These are designed to work with almost any door, though you might have to do a little extra adjusting.
If even universal options aren’t working, or your door frame/floor is badly out of alignment, it’s time to call a pro. There’s no shame in it—some issues, like significant floor settling or warped jambs, really do need expert hands and tools.
Sometimes, the smartest troubleshooting move is knowing when to call for backup—especially if you want it done right the first time.
Wrapping Up: Enjoy a Truly Sealed Threshold
Troubleshooting a threshold that’s not properly sealed to the floor takes some patience, basic tools, and a careful eye. The steps are simple in theory, but the trick is to really pay attention to the details—the material condition, the fit, the quality of your seal. In the end, a properly sealed threshold works a bit like a synced remote: the connection is invisible, but when it’s right, everything just works.
So next time you feel a breeze or spot some daylight under your door, don’t just shrug it off. Take a closer look, grab your tools, and give your home the solid, sealed threshold it deserves. You’ll save money, stay cozier, and keep the outside…outside.