Here’s the thing: it doesn’t matter if you’ve got a fancy steel door, a classic wooden entry, or even one of those modern fiberglass options. If the seal is too tight or installed wrong, it acts like sandpaper against your freshly painted frame. And honestly? Fixing this is way easier than living with peeling paint and nagging thoughts every time you pass by.
If you’re working with a typical weatherstripping seal—the kind found on popular door brands like Andersen, Therma-Tru, or Masonite—the steps below will break down what’s happening, why it matters, and most importantly, how you can stop your door seal from wrecking your paint job for good.
Why Door Seals Make Paint Chip in the First Place
Let me explain what usually goes wrong. Most doors are fitted with a weatherstripping seal around the edges to keep out cold air, water, and dust. This seal is supposed to gently press against the door or frame to create an airtight closure. But when things aren’t lined up just right, problems start. The seal can rub the same spot over and over, like a shoe that’s a little too tight, eventually scraping away the paint and exposing bare wood or metal underneath.
There’s also a moisture factor. If your door frame traps water or stays damp, the seal might stick to the paint, peeling it up each time you open the door. Think of it like pulling tape off an old wall—sometimes a layer comes with it. Over time, even top-quality paint can’t stand up to this kind of abuse.
You might be wondering, “Why now? My door was fine last year!” Sometimes, the culprit is seasonal. Wood doors and frames can swell or shrink with humidity, making the seal suddenly too tight. Even replacing a door or repainting a frame can change how the seal sits. In short, a door that worked perfectly in April might develop a chipping issue by July.
Spotting the Signs: Is Your Door Seal to Blame?
You don’t have to be a pro to tell if a door seal is causing your paint to chip. Here’s what to look for:
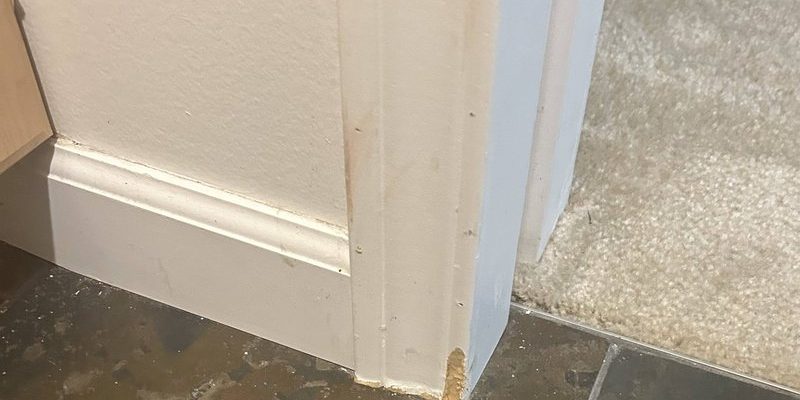
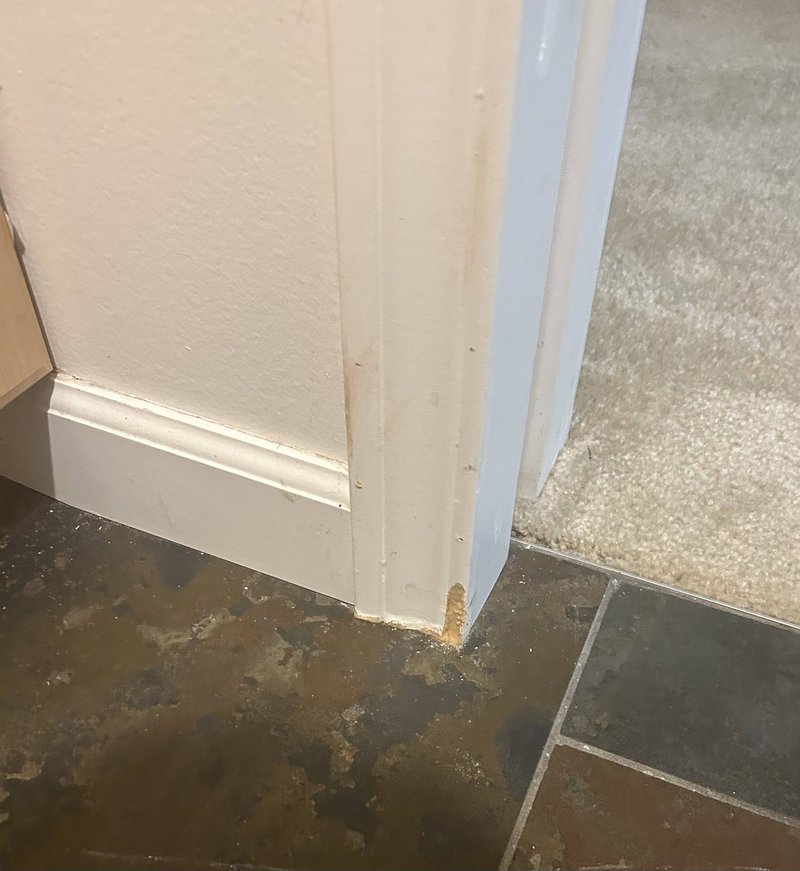
- Consistent scraping or wear marks along the frame, right where the seal touches.
- Paint flakes or chips scattered on the floor or stuck to the weatherstrip.
- Sticking or resistance when you open and close the door—almost like something is dragging.
Open the door and run your fingers along the frame and the edge where the seal sits. Do you feel any rough patches or raised paint? Sometimes, you can even hear a faint squeak or rubbing sound when the seal is too tight.
If you’re not sure, try this quick test: Close the door with a piece of colored chalk dusted on the seal. Open it up again—any colored streaks on the paint tell you exactly where the contact is happening.
If you notice chips only along the bottom or at a corner, the problem could be uneven hinges or a warped frame, not just the seal itself.
How to Adjust or Replace a Door Seal Without Damaging Paint
Here’s where the real troubleshooting starts. Most modern door seals are made to be removable, especially on brands like Therma-Tru or Masonite. Before you grab a replacement, it’s worth trying a few easy tweaks:
- Check for dirt or debris: Sometimes, even a little grit trapped under the seal can act like sandpaper and speed up chipping. Wipe everything down with a damp cloth before you move forward.
- Look for misalignment: If the weatherstripping sits unevenly, it’ll rub more in certain spots. Try gently adjusting it back into its groove. Some seals simply snap in—others might need a gentle push with a flat tool.
- Resize or trim the seal: If your seal is too thick, you can actually trim it down with scissors or a sharp utility knife. Make small adjustments and test the door each time so you don’t cut too much.
If those fixes don’t work, replacing the seal might be your best bet. Match the type and brand for the best fit (universal weatherstripping kits can work, but sometimes they’re too bulky or flimsy for tight doors). When installing, start at one end and press the new seal evenly along the channel. Don’t stretch it—let it relax into place. A stretched seal can snap back and start causing wear again.
How to Repaint and Protect a Door Frame After Seal Damage
Once you’ve solved the main issue, you’ll probably want to deal with the ugly paint chips left behind. Don’t just slap paint over the problem—prep makes a huge difference:
- Sand the chipped area gently with fine-grit sandpaper to smooth out rough edges. Wipe away dust with a damp rag.
- Prime any bare spots with a stain-blocking, exterior-grade primer. This helps the new paint stick and prevents future peeling.
- Repaint with a durable finish, like an exterior enamel or a trim paint specifically designed for doors and frames. Let it cure fully before replacing the seal or closing the door tightly.
Honestly, this part takes a little patience, but it’s worth it. If the surface isn’t smooth, the new paint will just peel again. And if you skip the primer, the seal might stick to the tacky fresh paint—back to square one.
Pro tip: If you have a favorite paint brand, check if they offer “door & trim” formulas built to handle rubbing and repeated contact. They’re usually tougher and less likely to chip under pressure.
Comparing Different Types of Door Seals (And What Works Best)
All weatherstripping isn’t created equal. Depending on your door brand or style, you’ll find a few common types:
- Foam tape: Cheap and easy to install, but wears down quickly—usually best for temporary fixes.
- Rubber bulb or tube-style seals: More durable and less likely to scrape, especially if cut to the right size.
- Brush or fin seals: These are gentler on paint, but don’t block drafts as well. You’ll see these on premium doors from brands like Andersen or Pella.
Let me explain why this matters. A stiff, oversized rubber seal can cause major chipping, while a slightly softer or more flexible option gives you a tight seal without grinding away at the paint. If you’re not sure, bring the old strip to your local hardware store—most employees can help you find a perfect match.
Here’s the thing: Sometimes, “universal” seals sound good but don’t fit as snugly, especially on name-brand doors. If your entry system is from a company like Masonite or Therma-Tru, ordering the official replacement part might save you time (and more paint issues) in the long run.
Preventing Paint Chipping in the Future: Maintenance Tips
Now that you’ve wrestled your door seal into shape, you probably never want to deal with chipped paint again. A little regular maintenance goes a long way:
- Inspect the seal every season: Look for flattening, gaps, or places where the seal has started to peel away. Replace or adjust it before it starts scraping again.
- Keep the door and frame clean: Dust and debris build up in the grooves and can act like grit, wearing away at both the seal and the paint.
- Touch up paint early: If you notice a tiny chip, don’t ignore it. Seal it up with primer and paint before moisture or friction makes it worse.
If your door tends to stick in humid weather, consider sanding the edge or adjusting the hinges—sometimes it’s not just the seal, but the whole door shifting with the seasons. And remember: Don’t paint over the seal itself! Paint can cause it to harden or stick, which actually makes chipping worse.
When It’s Time to Call a Pro (And What to Expect)
Most of the time, dealing with a door seal that’s chipping paint is a DIY job—but sometimes things go sideways. Here’s when it’s a good idea to bring in help:
- If you spot signs of rot or water damage under chipped paint. That usually means a deeper problem with the door frame itself.
- If you have a custom or old door where the right weatherstripping just doesn’t seem to fit, or the frame is crooked.
- If every fix you try still leaves you with chipped or peeling paint after a couple of weeks or months.
A qualified carpenter or handyman can reset the frame, properly install the right type of seal, and even repaint the door in a way that makes chips way less likely. Yes, it might cost more upfront, but you’re saving yourself from the constant cycle of scraping, sanding, and repainting. Think of it as an investment in your home’s first impression.
Wrapping Up: A Smooth Door and a Fresh Frame
A chipping door frame isn’t just a little cosmetic issue—it’s a low-key signal that something’s off with your door seal or the way your door is set up. The good news is, with a little troubleshooting and attention to detail, you can easily fix the problem and keep your entryway looking sharp for years. Whether you’re swapping out a sticky seal, giving your paint job a careful touch-up, or just keeping an eye on things every season, you’ll save yourself a ton of hassle down the road. And honestly, nothing feels better than opening your front door and seeing a clean, spotless frame—no chips, no flakes, just a smooth welcome every time.