
Here’s the thing: figuring out what’s wrong with a door closer isn’t always straightforward, especially if you’ve never looked twice at one before. Maybe the door slams with a bang, or it closes so slowly you could take a nap waiting. Sometimes it just won’t close at all, hanging open like it’s lost its job. Yale, Norton, and LCN are common brands, but honestly, most door closers work in similar ways and share the same headaches. If you’re ready to roll up your sleeves, let me walk you through how to troubleshoot a door closer on an exterior door—even if you’ve never even noticed there was one up there before.
How Does a Door Closer Work, Anyway?
Let me explain—think of a door closer almost like a shock absorber for your door. Inside the metal casing, there’s usually a spring and a chamber filled with oil or another kind of fluid. When you open the door, the spring tightens, and oil flows one way. When you let go, the spring and the oil work together to slowly, smoothly pull the door shut—no slamming, no drama.
Most door closers on exterior doors use an adjustable arm and mounting plate. The arm attaches to the door frame while the closer body is screwed onto the door itself. Some brands, like LCN or Yale, offer tweaks for how fast the door closes or how firmly it latches at the end. That’s why your neighbor’s front door might float shut like a ghost, while yours slams like it’s mad at you.
If you’re not sure if your door even has a closer, look for a metal cylinder or box at the top of the door, often with a swing arm running to the frame. That’s it. You’ve just found your culprit.
Common Signs Your Door Closer Needs Attention
You might be wondering: how do you know something’s actually wrong with your door closer? Well, it’ll usually let you know—loudly, slowly, or sometimes not at all.
- Slamming: The door closes way too fast, banging shut and rattling the frame.
- Dragging or Sticking: The door feels heavy or won’t close all the way, even if you push.
- Hissing or Leaking: If you spot oil on the closer or hear odd sounds, the internal seal might be shot.
- Inconsistent Closing: Sometimes the door closes fine, but other times it just won’t catch or latch properly.
Here’s the thing: ignoring these signs can actually make things worse. A broken door closer can damage the door, mess with your weatherproofing, or even be a security risk. It’s better to dive in and troubleshoot early, before small problems turn into big headaches.
What Tools and Supplies Do You Need?
Before you go poking around, grab a few simple tools. Trust me, you don’t want to start this job and realize you need to run to the store halfway through. For most troubleshooting or repairs, you’ll need:
- Phillips and flathead screwdrivers for adjusting and removing the closer
- Allen (hex) keys, since many closers use these for speed adjustments
- Step stool or ladder if the closer is out of easy reach
- Paper towels or a rag in case you have oil leaks
- Replacement screws or mounting hardware if anything’s loose or stripped
If your door closer is a more modern, code-compliant model (like some Norton or LCN closers with built-in safety features), you might also want the product manual nearby—either the original or a PDF from the manufacturer’s website. Manuals can help you spot where the adjustment codes or screws are hiding, and sometimes they have troubleshooting charts that make everything easier.
Step-by-Step Troubleshooting For a Door Closer on an Exterior Door
Ready to get your hands dirty? Troubleshooting a door closer is mostly about common sense and a little patience.
Don’t worry—you don’t have to be an expert. Most fixes are just simple tweaks, not rocket science.
1. Inspect the Closer For Obvious Damage
First, look for oil leaks, cracks, or any hanging parts. If oil’s oozing out, or the arm is loose, it’s a clear sign the closer’s internal parts are worn. Honestly, if the fluid is gone, the door closer will never work properly again. In this case, it’s time for a replacement.
2. Check The Mounting Hardware
Gently wiggle the closer and the arm. If anything wobbles, tighten the mounting screws with your screwdriver. Loose fasteners can throw off the closing cycle and even make the closer fall off completely (don’t laugh—it happens).
3. Adjust The Closing Speed and Latch
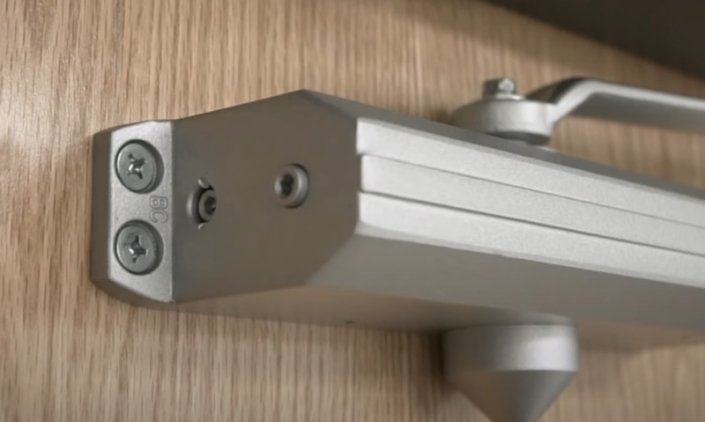
Most door closers have two adjustment screws, usually labeled “S” (for Sweep) and “L” (for Latch). Using an Allen key:
- Turn the Sweep screw to control how fast the door swings shut.
- Turn the Latch screw to control the last few inches—how hard the door pulls shut right before it clicks closed.
Turn each screw a quarter-turn at a time, then test the door. Tiny adjustments go a long way. If you overdo it, the door might slam or stop short, so be patient and tweak as needed.
4. Test For Smooth Movement
Open the door wide and let it go. If it sticks, grinds, or doesn’t move at all, check that the arm isn’t bent or binding. Sometimes, debris or a warped frame can stop the closer from doing its job, so clear out any gunk or obstructions around the mounting area.
Handling Oil Leaks, Broken Arms, or Total Failure
Sometimes, troubleshooting isn’t enough—your door closer might be truly done for. Here’s how to tell:
- Oil Leaks: If you see oil on the door, frame, or splattered on the ground, the internal seal is likely gone. Door closers need that oil like an engine needs its fluids. Once it leaks out, there’s no way to refill and re-seal it (at least, not safely at home).
- Bent or Broken Arm: If the arm is visibly bent or snapped, replacement is the only option. Trying to bend it back can make things worse—think of it like a broken bone; it just won’t work right after.
- Total Failure: If, after all your tweaks, the door still won’t close smoothly, or the adjustment screws don’t seem to do anything, the internal mechanism may have seized or worn out.
When you hit these walls, it’s better to swap the closer for a new one. Brands like Yale and LCN make models for standard exterior doors, and many are “universal,” meaning they’ll fit the same holes as your old closer. When in doubt, take a few photos, write down the model code, and ask at your local hardware store.
Door Closer Codes, Models, and Compatibility
You might be thinking, “Can I just buy any door closer?” Not quite—there are a couple of things to check first. Door closers are rated by “code” for fire safety, strength, and compatibility. For exterior doors, you want a model designed for outdoor temperature swings and heavier use. The code (often on a sticker or stamped on the closer body) tells you the size range and how much force the closer applies.
Brand-specific tips:
- Yale, LCN, and Norton are three top brands. All offer exterior-rated options, often with adjustable arms and speeds. If your old closer is one of these brands, finding a direct replacement is usually straightforward.
- Universal door closers are available, but it’s smart to double-check mounting hole patterns and arm lengths to ensure a smooth swap.
Always match the new closer to your door’s weight and width. Too weak, and your door won’t close. Too strong, and it can slam shut dangerously fast—definitely not what you want on a windy day.
How to Reset or Sync A New Door Closer
Swapping out a broken door closer for a new one? Here’s how you “reset” or sync the new closer with your door setup, step by step:
- Remove the old closer using your screwdriver, keeping track of any screws or mounting plates.
- Line up the new closer with the existing holes. Most universal models include templates in the box. If not, you may need to drill new holes to fit the mounting plate.
- Install the closer per the instructions, tightening all screws securely—but don’t overtighten and strip them.
- Attach and position the arm. Often, you’ll need to “preload” the arm at a specific angle before locking it into place. This helps the spring sync correctly with the door’s range of motion.
- Test and adjust the speed and latch as described earlier. It might take a few tries to get it perfect.
Don’t skip the manual if you’re unsure—each brand has its own quirks for how to sync and reset the closer. Using the correct code or adjustment process makes a huge difference in how the door works day to day.
When To Call A Professional (And What To Ask)
Most door closer fixes are proudly DIY-friendly, but there are cases where it pays to call in a pro. If your exterior door is especially heavy, in a public space, or you’re dealing with fire code-rated doors, safety comes first.
Consider hiring help if:
- The mounting area is damaged or rotted.
- You need to drill into brick, steel, or other tough materials.
- The door is part of a security or fire control system—tampering could void insurance or create safety issues.
When you call, be ready with the brand, model code, and a clear description of what the door’s doing (or not doing). A great repair tech can diagnose, recommend a new closer if needed, and make sure everything meets code.
Door Closer Troubleshooting: Key Tips and Takeaways
Wrapping up, here’s what matters most when you’re troubleshooting a door closer on an exterior door: go slow, adjust a little at a time, and always check for leaks or loose hardware first. Most of the time, you’ll find that a careful tweak to the closing and latching speed makes your door feel brand-new again. If the closer’s leaking oil or the arm is broken, don’t waste time—grab a replacement. Swapping out a closer isn’t complicated with the right tools and a little patience, and universal models make it easy to get back on track.
Honestly, taking care of your door closer doesn’t just make your life quieter and more convenient—it also protects your door, your entryway, and your peace of mind. Whether it’s a Yale or Norton closer, a universal model, or a homegrown brand, a well-tuned door closer just feels right. And if you ever get stuck, remember: there’s no shame in calling a pro to back you up. Good luck keeping those doors working smooth and steady.