The beauty of these soundproofing solutions is that they’re not just for professional studios or busy offices. You can easily add them to your home or apartment, particularly if you live near a bustling street or have rambunctious neighbors. Plus, it’s a rewarding DIY project that can enhance your living space’s comfort. So, let’s dive into how you can achieve that zen-like quietness by retrofitting your door with the right hardware.
Why Soundproof Your Door?
You might wonder why it’s even necessary to soundproof a door. After all, isn’t it just a barrier between rooms? Here’s the thing: doors can be significant pathways for noise. Whether it’s the chatter from the living room, the humming of a washing machine, or the ruckus of kids playing outside, it can all seep through gaps and cracks in your door.
Soundproofing isn’t just about blocking noise; it’s about creating a haven. You might find yourself needing a quiet space to focus on work or relax after a long day. By making a few changes to your door, you can dramatically improve your home environment. Just like you wouldn’t want to wear a thin jacket in a snowstorm, you wouldn’t want your door to leave you exposed to noise pollution.
Understanding Door Sweeps
Let’s start with one of the most straightforward solutions: door sweeps. Picture a door sweep as a little guard that sits at the bottom of your door. Its purpose? To seal those gaps that let sound sneak in. Door sweeps come in various materials, like rubber or vinyl, and they’re fairly easy to install—often requiring just a few screws or adhesive.
To install a door sweep, measure the width of your door, then cut the sweep to fit as needed. A snug fit is essential—if there’s too much space, noise will still seep through. When placed properly, the door sweep will make contact with your floor, providing a solid barrier against sound. It’s like putting on a pair of earmuffs for your door!
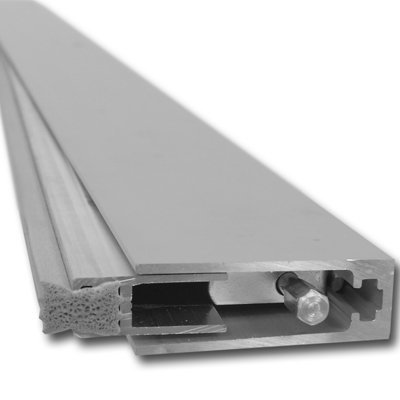
Exploring Door Seals
Next up are door seals, often referred to as weather stripping. Think of these as the ultimate defense against noise, sealing every nook and cranny around your door frame. There are several types of door seals, including foam tape, adhesive-backed rubber, and magnetic seals. Each one has its strengths, depending on your specific needs.
Applying door seals is a straightforward process. Start by cleaning the area around your door frame. This ensures that the adhesive will stick well. Measure the length of the sides of your door and cut your seal accordingly. Apply it along the top and sides of the door frame, ensuring a tight fit. Once done, you’ll notice a significant reduction in noise leakage, making your space more peaceful.
Choosing the Right Materials
Not all soundproofing materials are created equal, and choosing the right ones can impact how effective your retrofitting will be. For door sweeps, you might want to consider heavy-duty rubber for its durability and sound-blocking capabilities. On the other hand, if you’re opting for door seals, look for materials with a high soundproof rating.
Here’s a quick breakdown of some materials you can use:
- Rubber: Excellent for both sweeps and seals. It’s durable and provides a tight seal against sound.
- Foam: Soft and effective but may wear down faster than rubber.
- Vinyl: A versatile option that often comes in adhesive strips, making it easy to apply.
- Magnetic seals: Great for metal doors, providing an airtight seal.
Using the right materials is crucial. If you want long-lasting results, it’s worth investing in high-quality products that can withstand the test of time.
Installation Steps for Door Sweeps and Seals
Installing door sweeps and seals doesn’t have to be complicated. Here’s a step-by-step process to get you started:
1. Gather Your Tools: You might need a measuring tape, screwdriver, scissors, and adhesive (if applicable).
2. Measure Your Door: Accurate measurements are vital. Measure the width for the sweep and the height of the sides for seals.
3. Cut the Materials: Cut the door sweep to size if needed. Do the same for the seals, ensuring they’ll fit snugly along the sides.
4. Attach the Sweep: Position the sweep on the door’s bottom edge and secure it with screws or adhesive.
5. Install the Seals: Clean the door frame to ensure the adhesive sticks well. Attach the seal from the top down to the sides, making sure it’s aligned properly.
With these simple steps, you’ll have transformed your door into a much quieter barrier against noise.
Common Problems and Troubleshooting
Even with the best intentions, you might run into a few hiccups when retrofitting your door. For instance, you might notice gaps after installation, or perhaps the door doesn’t close properly. Here are a couple of common issues and how to fix them:
– Gaps Remain: If you still hear noise, double-check your measurements. You may need to adjust the sweeps or add additional seals for a tighter fit.
– Door Gets Stuck: If the door feels sticky after adding the sweep, it might be too low. You can trim the sweep or adjust its position slightly higher to ensure smooth operation.
Don’t forget, it might take a bit of trial and error to get everything perfect. Just be patient, and remember that even small adjustments can lead to big improvements in soundproofing.
Final Thoughts on Retrofitting Your Door
Retrofitting your door with specific soundproofing hardware—like sweeps and seals—is an effective way to achieve a quieter space. Not only does this enhance your comfort and privacy, but it can also boost your home’s overall value. If you’re tired of intrusive noises disrupting your peace, give this DIY project a try.
With the right materials and a little time, you can transform your space into a cozy retreat. Remember, it’s all about creating that bubble of tranquility you desire. So roll up your sleeves and get started; your quieter oasis awaits!