Retrofitting a door with concealed hinges can transform the look of your space. It’s like giving your door a makeover without much fuss. Whether you’re upgrading your home for aesthetic reasons or improving functionality, understanding how to replace your existing hinges with hidden ones can be a game changer. Here’s a step-by-step guide to help you get started.
What Are Concealed Hinges?
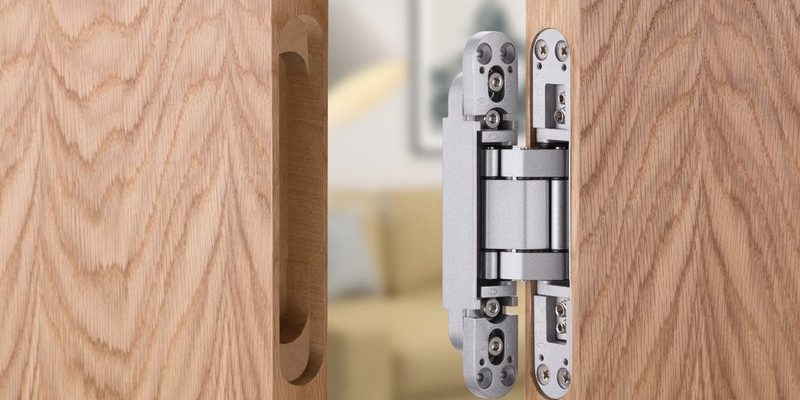
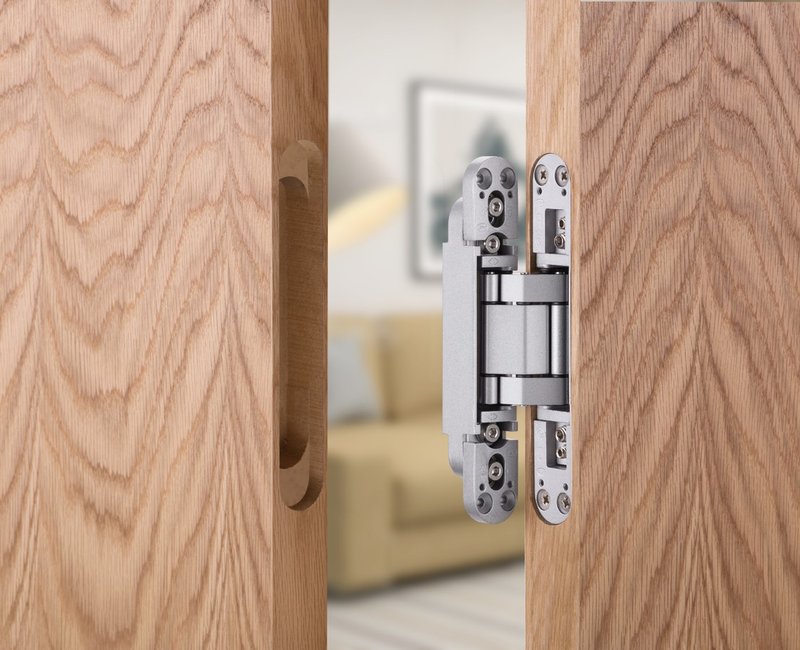
Concealed hinges, also known as hidden hinges, are hardware pieces that are mounted inside the door and the frame. This design keeps the hinges out of sight when the door is closed, creating a clean and seamless look. Unlike traditional hinges, which are visible from the outside, concealed hinges offer a minimalist appeal.
The main reason people opt for hidden hinges is for aesthetics. They make doors look more contemporary and can even enhance the overall design of your room. You might be wondering, “How does it work?” Well, the hinges are designed to fit into pockets routed into the edge of the door and the door frame, allowing them to operate smoothly while being completely hidden from view.
There are several types of concealed hinges. Some are designed for overlay doors, while others work for inset doors. Each type has features that accommodate different styles and functionalities. Understanding the specific needs of your door will help you choose the correct hinges for your project.
Why Retrofit Your Door with Concealed Hinges?
Retrofitting your door with concealed hinges has several advantages. First, it enhances the overall aesthetic of your space. With no visible hinges, your door blends seamlessly with the surrounding walls, creating a more polished look. This is particularly beneficial in modern and minimalist home designs.
Another reason to consider concealed hinges is durability. Many hidden hinges are made from high-quality materials that can withstand daily wear and tear. This longevity means you won’t have to replace them as often as traditional hinges, saving you time and money in the long run.
On top of that, hidden hinges often allow for smoother operation. Since they’re designed to align perfectly when mounted, you’re less likely to experience sticking or squeaking, which can be common with visible hinges. This leads to a quieter, more pleasant experience when using your door.
Tools and Materials You’ll Need
Before you start retrofitting your door with concealed hinges, gather the necessary tools and materials. Preparing ahead of time will help streamline the process. Here’s what you’ll typically need:
- Concealed hinges: Choose hinges that fit your door style—overlay or inset.
- Drill: A power drill is essential for creating holes for your new hinges.
- Screwdriver: A Phillips or flathead screwdriver will be needed to secure the hinges.
- Chisel: This will help you neatly cut out sections of wood for hinge placement.
- Measuring tape: Accurate measurements are crucial for proper hinge alignment.
- Pencil: Marking where you’ll drill and cut is essential.
- Wood filler: In case you need to patch holes from the old hinges.
Once you have everything, you’re ready to tackle the retrofitting project. Taking your time and following each step carefully will ensure the best results.
Step-by-Step Guide to Retrofitting Your Door
Let’s dive into the retrofitting process! Here’s a straightforward step-by-step guide:
1. Remove the Existing Door: Start by taking off the door from its hinges. You can do this by unscrewing the screws connecting the hinges to the door and frame.
2. Fill Old Hinge Holes: If your old hinges left holes, apply wood filler to those areas. Allow it to dry completely and then sand it down for a smooth finish.
3. Mark the New Hinge Placement: With your measuring tape, determine where the concealed hinges will go. Generally, one hinge should be placed about 7 inches from the top and another about 10 inches from the bottom. Mark these spots with a pencil.
4. Chisel Out the Hinge Pockets: Using your chisel, carefully create pockets for the hinges. Take your time to ensure a snug fit.
5. Install the Hinges: Align the concealed hinges in the pockets you just created. Use your drill and screwdriver to secure them in place. Make sure they are flush with the surface.
6. Rehang the Door: Once the hinges are installed, carefully rehang the door on the frame. Adjust if necessary to ensure it swings smoothly without any friction.
7. Test the Door: Give the door a few swings to ensure it opens and closes correctly. Make any adjustments as needed.
By following these steps, you’ll be enjoying your newly retrofitted door with concealed hinges in no time!
Common Problems and Troubleshooting
Sometimes, things don’t go as planned. Here are a few common problems you might encounter and how to troubleshoot them:
– Door Doesn’t Close Properly: If your door isn’t closing as it should, check the alignment of the hinges. You might need to adjust them slightly to ensure everything lines up correctly.
– Squeaking Noises: If you hear squeaking, it often indicates the hinges need lubrication. Apply a bit of silicone spray or similar lubricant to quiet things down.
– Misaligned Hinges: If the hinges seem misaligned, you may need to remove the door and adjust the hinge placement slightly.
– Door Sticking: If the door sticks when opening or closing, make sure the pockets you chiseled are deep enough and that the hinges are mounted flush against the wood.
By being aware of these common issues, you can quickly resolve them and enjoy the benefits of your retrofitted door.
Retrofitting a door with hidden hinges might seem like a daunting task, but it’s a wonderful way to enhance your home’s style and functionality. With the right tools and a bit of patience, you can achieve a clean, modern look that impresses your guests and makes everyday life a little nicer.
So grab your tools, follow the steps outlined, and enjoy your sleek, newly retrofitted door with concealed hinges. Not only will it elevate your home’s aesthetic, but it will also provide you with a sense of accomplishment knowing you tackled this upgrade on your own. Remember, every little detail counts, and sometimes the smallest changes make the biggest impact.