When we talk about replacing a latch, we’re usually referring to a standard latch, which is typically a simple mechanism that holds the door securely closed. But whether it’s been worn down from use or it just doesn’t quite fit anymore, knowing how to swap it out can save you a hassle down the line. Plus, doing it yourself can boost your confidence and keep your barn door functioning smoothly.
Let’s dive into this process step-by-step, put on our DIY hats, and get that latch replaced!
Understanding the Components of a Standard Latch
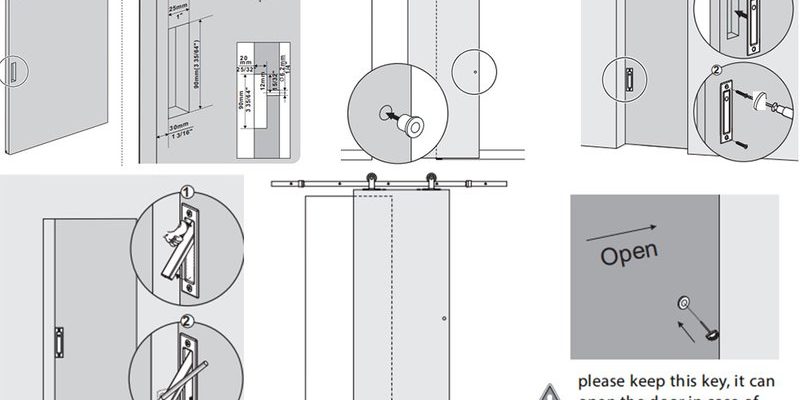
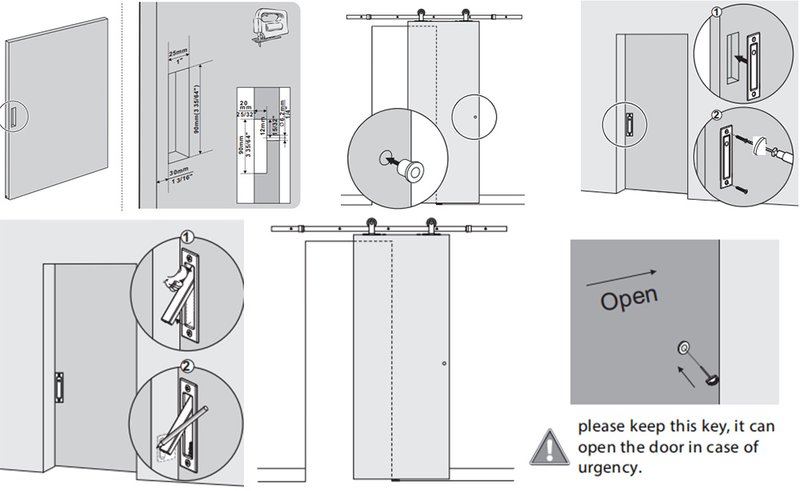
Before you rip out that old latch, it helps to understand what you’re working with. A standard latch on a sliding barn door usually consists of three main parts: the latch itself, the strike plate, and the mechanism to operate it.
– Latch: This is the metal piece that secures your door. It can either be a simple hook or a more complex mechanism.
– Strike Plate: This is the plate mounted on the door frame that catches the latch. It ensures the door stays closed when you engage the latch.
– Operating Mechanism: This could be a knob or lever that you use to open or close the latch.
By knowing these parts, you can identify what needs replacement and how to handle it effectively. If any part seems worn or damaged, it’s wise to replace the entire set for the best results.
Gathering Your Tools and Materials
Now that you understand the components, let’s get your workspace ready. Here’s a quick list of tools and materials you’ll need to replace the latch on your sliding barn door:
- New standard latch set
- Screwdriver (usually Phillips-head)
- Drill (optional, for new holes)
- Measuring tape
- Pencil
- Wood filler (if necessary)
- Sandpaper (if necessary)
You might be wondering why you’d need wood filler or sandpaper. If your old latch left unsightly holes or marks, a little touch-up goes a long way. It’s like giving your door a fresh face! Once you’ve gathered everything, you’re ready to get started.
Removing the Old Latch
The first step in this process is to remove the old latch. Here’s how you do it:
1. Inspect the Old Latch: Check how it’s mounted. Look for screws that hold it in place.
2. Unscrew the Components: Using your screwdriver, carefully unscrew the latch from both the door and the strike plate.
3. Remove the Strike Plate: Next, take off the strike plate that is attached to the door frame.
While you’re at it, think about cleaning the area where the old latch was attached. Dust or debris can affect how well your new latch operates.
Preparing for the New Latch Installation
Before you install your new latch, you need to prepare the area. This step ensures that your new latch fits perfectly.
– Check Alignment: Place the new latch next to the old holes to see if it aligns properly. If it doesn’t, you may have to drill new holes.
– Fill Old Holes (if necessary): If you find discrepancies, use wood filler to fill in the old holes. Let it dry and sand it smooth so everything looks neat.
– Mark New Holes: If you’re drilling new holes, make sure to measure and mark them precisely. Use a pencil for clear visibility.
This preparatory work is key. A few extra minutes spent here can prevent headaches later on.
Installing the New Latch
With everything prepped, it’s time to install the new latch. Follow these steps carefully:
1. Position the New Latch: Hold the new latch in place over your marked spots.
2. Attach the Latch: Use screws to secure the latch to the door, making sure it’s snug but not over-tightened.
3. Install the Strike Plate: Line up the strike plate with the latch and attach it to the door frame.
When securing the latch, you want it to be firmly in place without any wobble. A well-installed latch not only works better but also looks more polished.
Testing the New Latch
Once everything is installed, it’s time for the moment of truth: testing your new latch. Here’s how to check if it’s working properly:
– Close the Door: Shut the door gently, allowing the latch to slide into the strike plate.
– Engage the Latch: Try the knob or lever to engage the latch. See if it clicks into place securely.
– Test the Door: Open and close the door a few times to ensure the latch operates smoothly.
If you encounter any resistance or strange sounds, it might mean adjustments are needed, or that something isn’t aligned properly.
Final Thoughts on Maintaining Your Latch
Once your new latch is installed, it’s essential to keep it in good shape. Maintenance can go a long way in extending the life of your latch and enhancing the functionality of your barn door.
– Regular Inspections: Keep an eye on the latch and strike plate for any wear and tear.
– Lubricate Occasionally: A little lubricant can keep the latch mechanism operating smoothly.
– Tighten Screws if Necessary: Over time, screws may loosen. Regular checks ensure your latch stays secure.
By taking these simple steps, you’ll not only preserve the functionality of your sliding barn door but also keep it looking great.
In conclusion, replacing the latch on a sliding barn door is easier than it sounds. With the right tools, a bit of patience, and our straightforward guidance, you can tackle this DIY project like a pro. Remember, a well-functioning latch not only adds to the convenience but also enhances the overall aesthetic of your space—so get to work!