
Imagine opening your bathroom door, only to find that the knob spins without catching. Frustrating, right? This can happen for various reasons, from wear and tear to misalignment. When that happens, simply replacing the knob won’t do; you’ll need to change the entire assembly. Whether you’re dealing with a pesky jam or a stubborn latch, understanding how to replace the whole assembly can save you time and hassle in the long run.
When to Consider Replacing the Entire Door Knob Assembly
You might be wondering, “Isn’t just changing the knob enough?” Well, it all depends on the situation. If the door knob doesn’t turn, and it’s not a simple case of being stuck, you may need to replace more than just the outer part. Here are some signs that indicate it’s time for a full assembly replacement:
- Worn Out Mechanism: If you notice that the knob is hard to turn or feels loose, the internal mechanism might be worn out.
- Faulty Locking Mechanism: If your door doesn’t lock or unlock properly, it could point to a deeper issue within the assembly.
- Physical Damage: Sometimes, a knob can get damaged due to rough handling. If the base is cracked or the latch is broken, a full replacement is necessary.
If you find yourself fiddling with the knob often, it’s likely a sign you should take action. Think of it as a signal from your home that it needs a little TLC.
Understanding the Components of the Door Knob Assembly
Before diving into the replacement, it helps to know what makes up a door knob assembly. Essentially, it consists of several parts working together to make the knob function properly. Here’s a quick breakdown:
- Knob: The visible part you turn to open or close the door.
- Spindle: A metal rod that connects the two knobs and allows them to turn.
- Latch: The mechanism that secures the door when closed.
- Strike Plate: The metal plate on the door frame where the latch clicks into place.
Each component plays a vital role in the overall function. If one part is damaged, it can throw everything off. Just like a car engine, all the parts need to work in harmony for things to run smoothly.
Tools You’ll Need for Replacement
Getting ready to replace the door knob assembly doesn’t require a whole toolbox, but you will need some basic tools. Here’s what you’ll need:
- Screwdriver: Most door knobs are held in place with screws. A flathead or Phillips screwdriver will work, depending on your screws.
- Drill (if necessary): Sometimes, you may need to drill new holes if the existing ones are misaligned.
- Replacement Kit: Ensure you have the right assembly for your door type.
- Tape Measure: It’s handy to measure the distance between the holes, especially if you’re opting for a new style.
Having these tools on hand will make your job a lot smoother. You don’t want to find yourself halfway through and realize you’re missing a tool!
Step-by-Step Guide to Replacing the Door Knob Assembly
Now, let’s get into the nitty-gritty of replacing the assembly. It might sound daunting, but I promise it’s easier than it seems. Here’s a step-by-step guide:
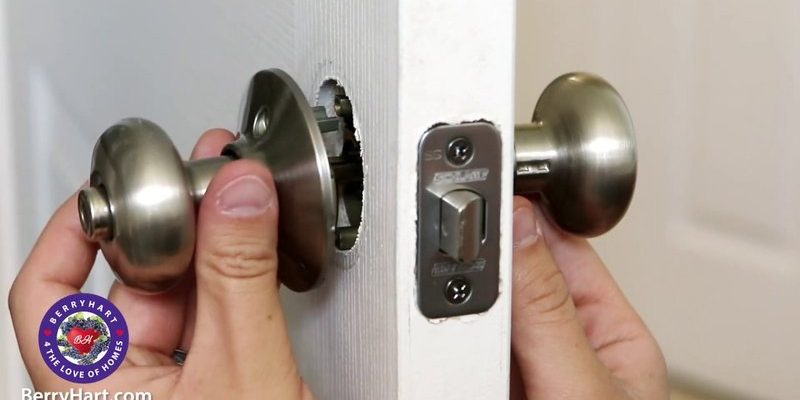
Step 1: Remove the Old Knob
Start by taking your screwdriver and loosening the screws on the knob. Depending on the design, you might need to unscrew both knobs on either side of the door. Once they’re loose, gently pull them apart.
Step 2: Take Out the Latch
With the knobs removed, you’ll see the latch mechanism inside the door. This can be unscrewed easily. Make sure to keep track of the screws so they’re not lost.
Step 3: Install the New Assembly
Now it’s time to install your new assembly. Insert the new latch into the door and secure it with screws. Then, attach the knobs, making sure the spindle fits snugly through both knobs.
Step 4: Test the Mechanism
Before sealing it all up, make sure to give the knob a test run. Turn it to see if it smoothly opens and closes the door. Also, check the locking mechanism to ensure it works properly.
Common Issues During Replacement and How to Fix Them
Like any DIY project, you might run into a few hiccups when replacing the door knob assembly. Here are some common issues and easy fixes:
- Misaligned Holes: If your new knob isn’t lining up, use a tape measure to ensure everything is centered correctly. You might need to drill new holes.
- Knob Is Stuck: If the knob won’t turn, double-check that the spindle is properly inserted. Make sure it’s not jammed against anything.
- Lock Doesn’t Engage: If the latch isn’t catching, check the alignment with the strike plate. You might need to adjust it slightly to get it in sync.
Most issues can be resolved by double-checking your work. Just take your time, and don’t rush the process.
Maintenance Tips for Long-Lasting Door Knob Assemblies
Now that you’ve successfully replaced your door knob assembly, you’ll want to ensure it lasts. Here are some simple maintenance tips:
- Regular Cleaning: Wipe down the knob and surrounding area periodically to keep dirt from building up.
- Lubrication: Every few months, apply a little lubricant to the latch mechanism. It’ll keep things moving smoothly.
- Check Tightness: Every now and then, give the screws a quick check to ensure they’re not getting loose.
Just like any other part of your home, a little regular care goes a long way in extending the life of your door knob assembly.
Replacing the entire interior door knob assembly may sound like a daunting task, but with the right tools and a step-by-step approach, you can tackle it easily. Understanding when to replace the assembly and how to do it properly ensures that your doors function smoothly and securely. Think of it as a small but significant step in maintaining your home. With a little effort, you’ll have a door that not only works well but also enhances the overall look of your space. So, roll up your sleeves and get started—you’ve got this!