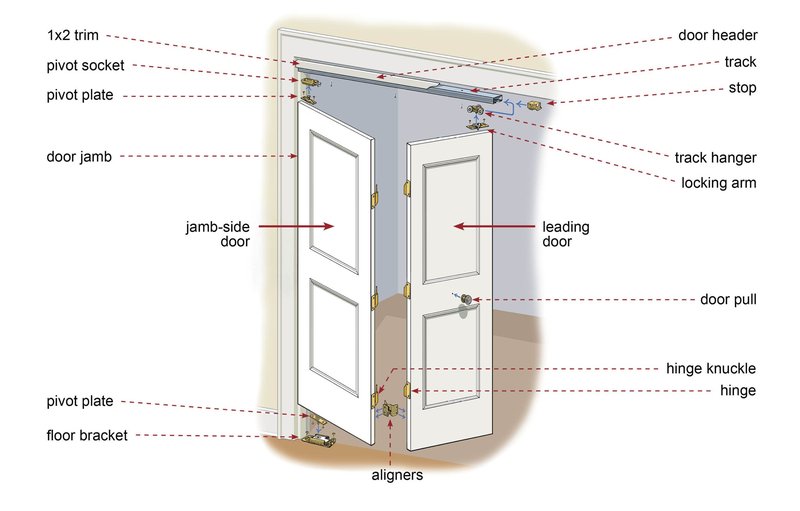
Adjusting the height of a bifold door involves replacing or repositioning some hardware to ensure a seamless operation. Whether you’re dealing with a specific brand like Masonite or any other bifold door system, the process is generally similar. Here’s how to get started.
Assessing the Situation
Before you dive into adjusting your bifold doors, take a moment to assess the current situation. Stand in front of the bifold door and check how smoothly it opens and closes. You might notice that it’s scraping against the new carpet, causing it to stick or even prevent it from opening fully.
Here’s the thing: If your door is out of alignment, it can often be fixed by adjusting the hardware. Grab a flashlight and check the hinges and rollers to see if they’re properly seated. Sometimes, simply repositioning these components can solve the issue without needing a complete replacement.
Also, keep in mind that the height of the bifold door frame itself may need to be considered. If the carpet was laid down thickly, you might need to account for that increase when making height adjustments.
Gather Your Tools
You wouldn’t want to start cooking a new recipe without gathering your ingredients first, right? The same goes for adjusting your bifold doors. Here’s a quick list of tools you might need:
- Screwdriver (flat and Phillips)
- Measuring tape
- Level
- Pliers
- New hardware (if necessary)
Having the right tools on hand can make the entire process much smoother. Honestly, there’s nothing worse than getting halfway through a project and realizing you need to run to the store.
Removing the Bifold Door
Now that you’ve assessed the situation and gathered your tools, it’s time to remove the bifold door. Begin by locating the hinges or pivot pins at the top and bottom of the door. Most bifold doors can be lifted out of their tracks, but if you encounter resistance, double-check to make sure that all screws are removed.
Once you’ve removed the door, it’s a good idea to set it down carefully to avoid scratching or damaging the door itself. Perhaps place it on a soft surface, like a blanket or carpet, until you’re ready to reinstall it.
Making Height Adjustments
Now for the main event: making the height adjustments. Depending on the design of your bifold door, this might involve adjusting the roller brackets, hinges, or even the entire door frame.
Here’s a simple approach to follow:
1. Measure the Height: Use a measuring tape to determine how much height you need to adjust. You want to ensure the bottom of the door clears the carpet by at least a half-inch.
2. Adjust the Rollers or Hinges: If your bifold door has adjustable rollers, you can turn them clockwise to raise the door height or counterclockwise to lower it. If it’s hinge-based, you may need to move the hinge screws to a different set of holes to achieve the desired height.
3. Test Fit: Before reinstalling, hold the door up to the frame to see if it fits well. It’s always better to check now, rather than wait until everything is screwed back together.
Doing these adjustments correctly can make your bifold door glide effortlessly, almost like it’s floating on air!
Reinstalling the Bifold Door
Once you’re satisfied with the height adjustments, it’s time to reinstall your bifold door. As you lift it back into position, make sure it’s aligned properly with the frame.
Start by placing the top pivot pin or hinge into its designated spot. Then, gradually lower the door until it sits comfortably on its bottom track. You might need a second pair of hands for this, especially if the door is large or heavy.
Once it’s in place, double-check to ensure that the door swings open and closed freely. If something feels off, don’t hesitate to go back and make additional tweaks.
Final Adjustments and Testing
After everything’s in place, it’s time for the final touches. Close the bifold door and ensure it seals properly against the frame without any gaps. Here’s a tip: if your door has a latch or lock, test it to see if it functions smoothly.
You might also want to run your hand along the floor where the door meets the carpet. It should glide without resistance. If you notice any dragging or sticking, you might want to revisit the earlier steps or check whether the carpet needs to be trimmed back slightly.
Maintenance Tips for Bifold Doors
To keep your bifold doors working smoothly long after your adjustments, consider a bit of maintenance. Here’s how you can keep them in top shape:
– Regular Cleaning: Dust and debris can affect how smoothly your doors operate. A quick wipe down can make a big difference.
– Lubricate the Hinges and Rollers: A little silicone spray or a dedicated lubricant can help reduce friction on moving parts.
– Check Alignment: Every few months, do a quick check to ensure that nothing has shifted. It’s easier to catch small issues before they become big problems.
Replacing hardware on a bifold door after carpet installation might seem daunting, but breaking it down into manageable steps can make it a straightforward task. By assessing the situation, gathering your tools, making adjustments, and reinstalling carefully, you can ensure your bifold door operates smoothly—enhancing both functionality and aesthetic appeal in your space.
So, the next time you notice your door dragging on the carpet, you’ll have the confidence to tackle those adjustments head-on. Happy DIY-ing!
