Replacing a pocket door hanger assembly, especially for heavy doors, might sound daunting at first. However, with the right tools and a bit of patience, this DIY project can be tackled even by beginners. Whether you’re dealing with a door that has gotten too heavy over time or one that simply needs a little TLC, this guide will walk you through the process step by step.
What Is a Pocket Door Hanger Assembly?
A pocket door hanger assembly is the mechanism that allows your door to slide open and closed within the wall. This assembly consists of several key parts, such as the rollers, track, and hangers that support the weight of the door. When these components start to wear out or break, your door can become difficult to operate.
Here’s the thing: heavy doors require a robust assembly. If your pocket door is solid wood or another heavy material, it’s crucial to have a high-quality hanger setup. It’s like trying to roll a boulder on a flimsy cart—ineffective and frustrating! Choosing the right replacement assembly designed for heavy doors will ensure that your door moves smoothly for years to come.
Signs It’s Time for a Replacement
You might be wondering when it’s time to consider replacing your pocket door hanger assembly. Here are some clear signs that you should take action:
- Sticking or Sticking Door: If your pocket door sticks as it glides along the track, that’s a telltale sign that the hanger isn’t functioning properly.
- Excessive Noise: Screeching or grinding sounds can mean the hangers or rollers are worn out.
- Visible Damage: Look for signs of wear on the rollers or track. If you see cracks or chips, it’s time for a replacement.
- Door Alignment Issues: If the door seems to sit unevenly in the frame or doesn’t close properly, check the assembly.
Recognizing these signs early can save you time and effort down the line. It’s always better to address issues sooner rather than waiting for them to escalate.
Gathering Your Tools and Materials
Before you dive into replacing the pocket door hanger assembly, you’ll need to gather a few tools and materials. Here’s a handy list to get you started:
- Replacement pocket door hanger assembly (designed for heavy doors)
- Screwdriver (flathead and Phillips)
- Drill with drill bits
- Measuring tape
- Pry bar or putty knife
- Safety goggles
- Level
Having everything at your fingertips will make the process smoother. You don’t want to be running to the hardware store in the middle of your project—trust me!
Removing the Old Hanger Assembly
Now that you’re all set, let’s get to the meat of the project: removing the old hanger assembly. Here’s how to do it step by step:
1. Remove the Door: Start by gently sliding the pocket door open. If it’s stuck, use a pry bar to lift it slightly off the track. Carefully pull it out of the pocket and set it aside.
2. Access the Hanger Assembly: With the door out of the way, locate the hanger assembly at the top of the pocket. You might need to remove some trim or a cover panel to access it fully.
3. Unscrew the Hangers: Use your screwdriver to remove the screws holding the hangers in place. Make sure to keep these screws in a safe spot, as you’ll need new ones for the replacement.
4. Take Out the Old Assembly: Once the screws are removed, gently pull the old hanger assembly out of the track. If it’s stuck, give it a slight wiggle to loosen it up.
Removing the old assembly might feel a bit like uncovering a treasure chest—exciting yet careful work!
Installing the New Hanger Assembly
With the old hanger assembly out, it’s time for the exciting part—installing the new one! Here’s how to do it:
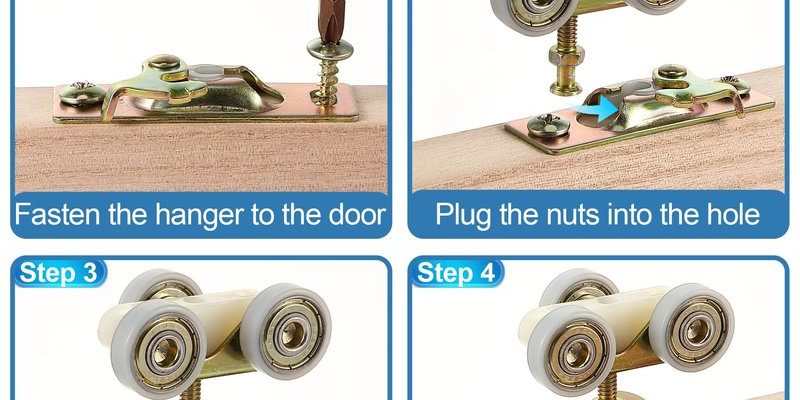
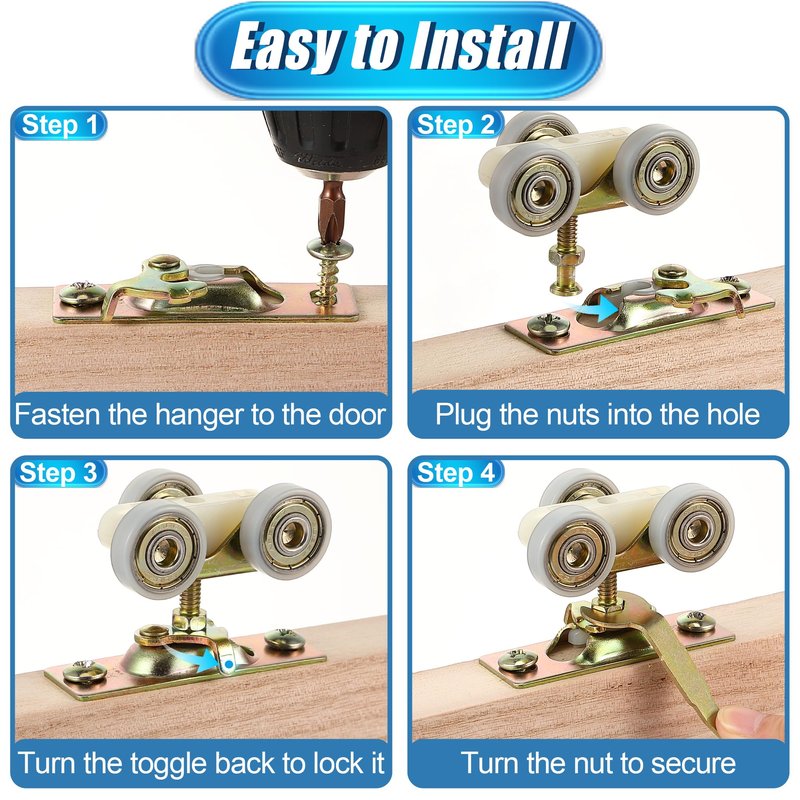
1. Position the New Assembly: Take your new pocket door hanger assembly and position it in the same place as the old one. Ensure it aligns well with the track.
2. Secure the Hangers: Insert and tighten the screws to secure the new hangers in place. Make sure they’re snug, but don’t over-tighten as this can damage the assembly.
3. Test the Rollers: Before reinstalling the door, test the rollers to make sure they glide smoothly along the track. You want to ensure there are no obstructions blocking the path.
4. Reinstall the Door: Carefully slide the door back into the pocket. Position it so that it hangs evenly, adjusting the height if necessary.
Honestly, it’s quite satisfying to see those rollers move smoothly again!
Final Adjustments and Testing
After you’ve reinstalled the door, it’s time for some final checks. Here’s what to do:
1. Check for Alignment: Use a level to ensure the door is hanging straight. If it’s not, you may need to adjust the height of the hangers for an even fit.
2. Test the Operation: Open and close the door several times to ensure it slides easily without any sticking or grinding. If you hear any strange noises, go back and make sure everything is securely fastened.
3. Replace Trim or Cover: Once you’re satisfied with the door’s operation, reattach any trim or cover panels you removed earlier.
4. Enjoy Your Smooth-Gliding Door: Step back and admire your handy work! A door that slides effortlessly back into the wall makes your space feel more open and inviting.
Common Troubleshooting Tips
Even after replacing the hanger assembly, you may encounter issues. Here are some troubleshooting tips:
- If the Door Is Sticking: Check for any debris or obstructions in the track. Cleaning the track can often solve the problem.
- Noise From Rollers: If you hear grinding sounds, the rollers might not be aligned correctly or may be defective. Ensure they’re seated properly in the track.
- Door Sagging: If the door starts to sag, double-check the hanger height and adjust as needed. Sometimes, a little tweaking can make a big difference.
Here’s the thing: regular maintenance of your pocket door can help prevent major issues down the road. A quick cleaning of the track and lubricating the rollers periodically can go a long way.
Replacing a pocket door hanger assembly for heavy doors doesn’t have to be a chore. With the right approach, tools, and a little patience, this DIY project can breathe new life into your sliding door. By knowing what to look for, gathering your materials, and following a step-by-step guide, you can ensure your door glides smoothly for years to come.
Remember, every time you slide that door with ease, you’ll feel a sense of accomplishment. So roll up your sleeves, and dive into the world of pocket doors—you’ve got this!