
Let’s say you’ve got a Peachtree door or a similar setup with a fin-type weatherstrip that’s seen better days. Maybe it’s sagging, cracked, or flattened to the point where it couldn’t stop a feather. Replacing it yourself might sound intimidating, but honestly, it’s one of those fixes you can handle with a basic toolkit and a little patience. And trust me, a snug new weatherstrip is a game changer—kind of like finally fixing that leaky faucet that’s been driving you nuts. Here’s how to tackle it step by step, even if you’ve never done anything like this before.
What Is a Fin-Type Weatherstrip—and Why Does It Matter?
You might be wondering what makes a *fin-type weatherstrip* so special. Well, regular weatherstripping comes in all shapes: foam tape, rubber bulbs, and even metal strips. A fin-style design has a slim “fin” or ridge running down the middle of a soft, flexible base. This fin bends and presses against the door every time it’s closed, creating a tight seal that blocks air, dust, and water better than many alternatives. It’s especially common on high-quality exterior doors, including those from Peachtree, Andersen, and several big-box brands.
Here’s the thing: when the fin or the base gets damaged—maybe from years of slamming, pets clawing, or just age—it can’t do its job. You end up with gaps where energy escapes, and suddenly you’re paying more for heating or cooling without realizing why. In my own house, I noticed the living room always felt drafty until I checked the bottom of the patio door. Sure enough, the fin-type weatherstrip was smooshed and torn. I replaced it and, honestly, it was like shutting the door on the whole problem—literally.
Not every door uses this kind, so check before you start. Look for a groove or slot in the door frame where the strip sits, and see if there’s a thin blade-like fin running along it. If that matches what you’re seeing, you’re in the right place.
Tools and Materials You’ll Need Before You Start
Before you jump in, gather your tools. Nothing’s worse than realizing you’re missing something with the door half-taken apart. Most of the time, you’ll only need a few simple items:
- Replacement fin-type weatherstrip—measure your old one for length and profile
- Flathead screwdriver or putty knife—to pry out the old strip
- Scissors or utility knife—to cut new weatherstrip to size
- Tape measure—for precise measurement
- Isopropyl alcohol and rag—for cleaning the frame groove
- (Optional) Adhesive—if your strip style calls for it
Here’s a tip: Always buy a little more weatherstrip than you think you’ll need. Mistakes happen, and it’s easier to trim off extra than come up short. If you have a Peachtree or other specific brand, some hardware stores can match the exact profile using a small piece of the old one. Bring a sample if you’re unsure.
Removing the Damaged Fin-Type Weatherstrip
Honestly, this is the part where beginners get nervous, but it’s usually pretty straightforward—sometimes a little messy, but never hard. Start by opening the door wide so you’ve got access to the top and sides. Look for the edge of the weatherstrip tucked into a groove around the frame. If it’s stuck, use your flathead screwdriver or putty knife to gently pry up one end. Be careful not to gouge the wood or metal beneath.
Once you get an edge free, grip it firmly and pull along the length of the frame. Most fin-type strips slide out pretty easily, but if yours is old and brittle, it might break apart. In that case, just go slow and pick out any leftover bits using the screwdriver. It’s a bit like picking out a stubborn sticker—tedious, but doable.
With the strip removed, check the groove for debris, adhesive residue, or old bits of rubber. Wipe it out with a rag and some isopropyl alcohol. A clean surface helps the new strip fit snugly and last longer. Don’t skip this step—think of it as prepping a canvas before painting.
Measuring and Cutting the New Weatherstrip
Now comes the detail work. Lay out the old weatherstrip and the new one side by side. Compare their profiles—particularly the base width and the height of the fin—to make sure you’ve got the right match. Trust me, a millimeter can make a difference in how well it seals.
Measure the length you’ll need for each side of the door frame. If the frame has a continuous groove, you’ll want one long piece for each section—usually top, left, and right. Mark your new strip with a pencil or just hold it up to the frame and snip off any extra with scissors or a sharp utility knife.
When cutting, go slow and keep the cut as straight as possible. A jagged edge can leave a tiny gap, and even a little gap defeats the entire purpose. If you mess up, don’t panic—just cut a new section using the leftover material. This is why that extra length comes in handy.
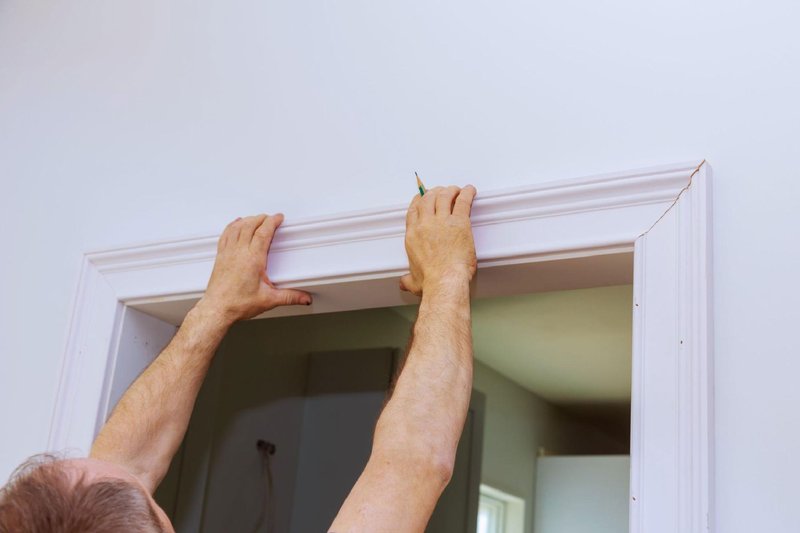
Installing the New Fin-Type Weatherstrip
This is actually the most satisfying part: sliding the new weatherstrip into place. If your door is a Peachtree or another well-made brand, the groove should fit the base of the fin-type strip precisely. Start at one end of the frame and line up the base of the weatherstrip with the groove.
With firm, even pressure, press the weatherstrip into the groove. Some people find it’s easier to pinch the base slightly as you go, making sure the fin points outward toward where the door will close. You might hear a soft click or feel a little resistance as it locks into place.
It’s a bit like snapping Legos together—the fit should be snug, but not forced. If you’re struggling, back up and check for any debris in the groove or if you’re using the wrong size strip.
Keep going until the whole length is seated, then repeat for each side. Double-check that the fin is straight and isn’t twisted or bunched anywhere. If your strip style uses adhesive, peel off the backing and press it down firmly for a few seconds to help it stick.
Testing the Seal and Troubleshooting Common Problems
Now that your new fin-type weatherstrip is installed, it’s time to test your work. Close the door slowly and listen for any scraping or resistance. The door should close firmly, but without too much extra effort—kind of like closing a well-made fridge.
Next, check for gaps. If you see light leaking through or feel a draft, see if the weatherstrip is fully seated. Sometimes a section might not have clicked in all the way or got twisted during installation. Gently adjust as needed, pressing the strip deeper into the groove or pulling it out to reseat.
You might run into a few problems:
- Door won’t shut easily: The strip might be too thick. Double-check that you’ve got the right size, or consider trimming down the fin slightly if possible.
- Gaps or loose fit: The strip is too small or not pressed in firmly enough. Try a thicker profile, or go back and press the base deeper into the groove.
- Sticking or bunching: Sometimes weatherstrips shift during installation—just pull them out gently and try again.
Don’t stress if you need to tweak things a couple of times. Getting a perfect seal is worth a little extra effort.
Comparing Fin-Type Weatherstrips to Other Options
Here’s where a little context helps. Not every door frame uses a fin-type weatherstrip. Some older doors might have a foam tape with adhesive, a bulb-style strip, or even a simple felt edge. Each has its pros and cons.
- Fin-type weatherstrips are flexible, create a tight seal, and are great for modern exterior doors.
- Foam tape is easy to apply but wears out faster, especially in high-traffic doors.
- Bulb seals offer excellent insulation for large gaps, but can make doors hard to close if mis-sized.
- Felt strips are cheap and easy but not very durable or weather-resistant.
If you have a Peachtree door or another premium brand, it likely came with a fin-type weatherstrip for a reason. But universal options exist for doors with unusual or discontinued profiles. Just know that “universal” isn’t always a perfect fit, and you might have to experiment a little.
Keeping Your Weatherstrip in Good Shape Long-Term
Here’s something folks rarely mention: even the best weatherstrip wears out eventually. You can extend its life by doing a quick visual check every few months. Look for cracked sections, missing pieces, or a fin that’s flattened and no longer “springs” back when pressed.
A light cleaning now and then doesn’t hurt—just a damp rag to wipe away dust or debris that might chew away at the material over time. If you notice a spot consistently getting damaged (say, the bottom corner where feet or pets hit), consider reinforcing it with a threshold sweep or kick plate.
If you ever repaint or refinish your door frame, remove the weatherstrip first and reinstall afterward. Paint build-up in the groove can keep the strip from seating properly, which leads to—you guessed it—drafts all over again.
When to Call a Pro or Consider a New Door
Sometimes, no matter how carefully you replace the weatherstrip, the door frame itself might be warped, rotten, or otherwise damaged. If you notice the new strip just won’t seal or keeps popping out, it might be time for a closer inspection.
Serious issues like:
- Cracked or split door frames
- Loose hinges causing misalignment
- Water damage around the threshold
might require more than a simple weatherstrip swap. In those cases, don’t hesitate to call in a pro for advice. They might suggest fixing the frame itself or—if the door is truly beyond saving—installing a new unit entirely.
But honestly, for most folks with a solid Peachtree or similar door, a new fin-type weatherstrip will do the trick and extend the life of your entryway for years.
Wrapping Up: Enjoy Your Draft-Free Door
Replacing a damaged fin-type weatherstrip on your door frame might sound like a small job, but it makes a world of difference. You’ll notice a quieter home, fewer drafts, and maybe even a lower energy bill. The process is straightforward—even kinda satisfying—and it’s a real confidence booster for any DIY newcomer.
Just remember to check your door’s profile, measure twice, and take your time installing the new strip. It’s not about perfection—it’s about making your space more comfortable, one upgrade at a time. And hey, the next time you close your door and feel that snug, silent seal, you’ll know you did it right.