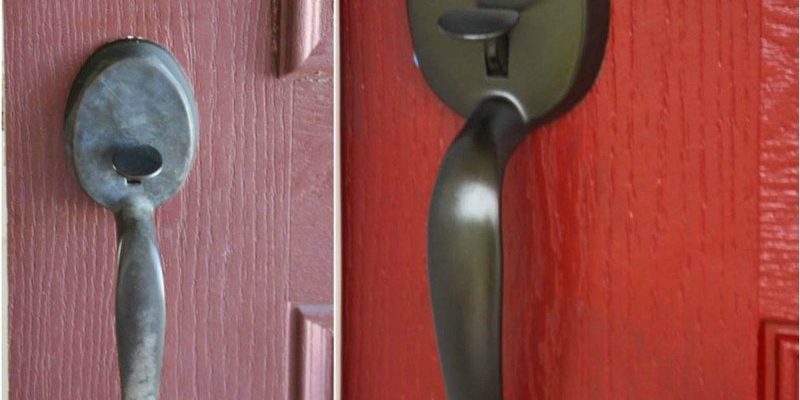
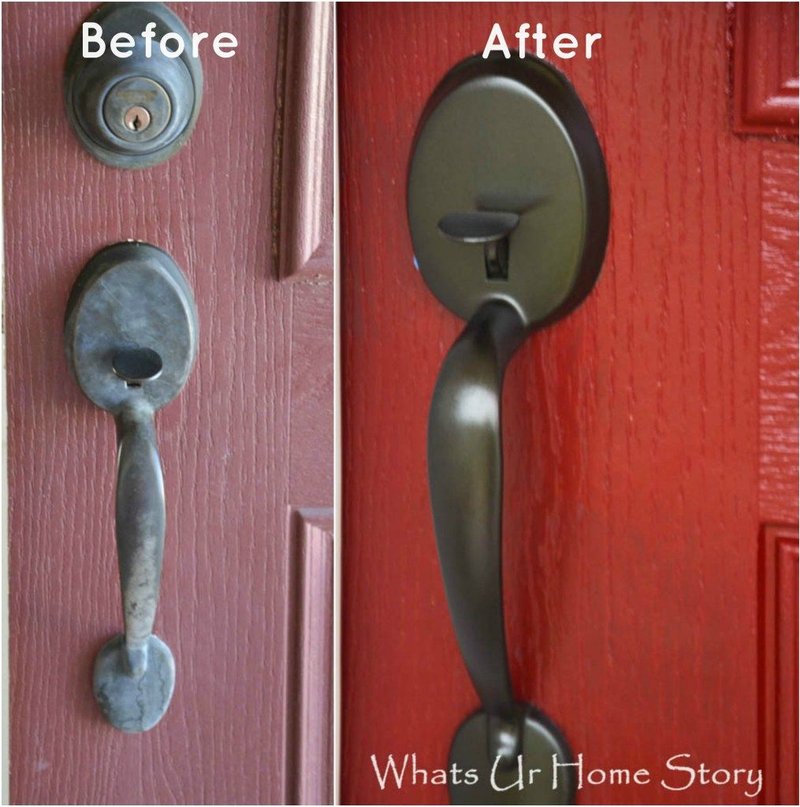
Repairing faded paint on door hardware is simpler than you might think. It’s not just about aesthetics; it’s about preserving the uniqueness and personality of your home. Whether your hardware is made of metal, wood, or plastic, the right approach can bring it back to life. Here’s the thing: with a few tools and a little patience, you can restore that original charm without having to replace the entire hardware. In this guide, we’ll go step-by-step through the process of reviving your custom-painted door hardware, whether it’s a doorknob that needs love or hinges that have lost their shine.
Understanding the Causes of Faded Paint
Before diving into repairs, it helps to understand why your paint has faded. Various factors contribute to this issue, including UV exposure, moisture, and wear from daily use.
- Sunlight: Just like leaving a colored shirt out in the sun can cause it to fade, so can exposure to sunlight on your door hardware. UV rays break down the paint’s pigments over time.
- Moisture: If your hardware is in a humid area, like a bathroom or kitchen, moisture can interact with paint and promote fading or peeling.
- Physical Wear: Frequent touching, cleaning, and the friction between moving parts can gradually wear away the paint finish.
Recognizing these causes helps set the stage for effective repairs. When you know what led to the fading, you can choose the right materials and techniques for the job.
Gathering Your Supplies
Before you start, make sure you have everything you need on hand. Trust me, running to the store mid-project isn’t fun. Here’s a list of what you might need:
- Paint Stripper: Use a gentle one to avoid damaging the hardware.
- Sandpaper: Get a variety from coarse to fine for a smooth finish.
- Primer: This helps new paint adhere and can prevent future fading.
- Acrylic Spray Paint: Choose a color that matches or complements the existing hardware.
- Clear Coat: A protective finish that adds durability.
- Cleaning Supplies: Soap, water, and rags for prepping the hardware.
Having everything ready allows you to work efficiently, making the repair process smoother and more enjoyable.
Preparing the Hardware for Repair
Now that you’ve got your supplies, let’s get into the nitty-gritty. Start by removing the hardware from the door. This step is crucial because it allows you to work on a flat surface, reducing the chance of drips and uneven application.
1. Clean Thoroughly: Use a mixture of soap and water to scrub away dirt and grime. This isn’t just about looks; proper cleaning ensures better paint adhesion.
2. Remove Old Paint: If the paint is peeling or chipping, use a paint stripper according to the product instructions. Once the old paint is removed, sand the surface lightly to create a rough texture for the new paint to stick.
3. Rinse and Dry: After stripping and sanding, rinse the hardware with clean water to remove any residue. Make sure to dry it completely before proceeding.
Taking these steps prepares your hardware for a successful repainting, making a huge difference in the final outcome.
Primer: Why It’s Important
You might be wondering whether primer is really necessary. The short answer is yes! Primer acts like a foundation for your paint. It helps with adhesion, improves the durability of the finish, and can even help prevent future fading.
When applying primer:
– Choose the Right Type: Select a primer designed for the material you’re working with. For metal hardware, a metal-specific primer works best.
– Apply Evenly: Use a spray can or a brush to apply a thin, even coat. Try not to overdo it; you just need enough to cover the surface.
– Dry Completely: Allow the primer to dry according to the instructions. This often takes a few hours. Patience here pays off!
Remember, a solid start with primer can extend the life of your newly painted hardware.
Painting Your Hardware
Once the primer is dry, it’s time to bring back the color. Here’s an important tip: use acrylic spray paint for a smooth finish. It dries quickly and provides a lovely sheen without requiring a lot of effort.
1. Shake the Can: Follow the instructions on the paint can. Shaking helps mix the paint, ensuring even color.
2. Apply in Thin Coats: Hold the can about 6-12 inches away from the surface and spray in short bursts. It’s better to do several light coats than one heavy coat.
3. Let Each Coat Dry: Allow the paint to dry for the time specified on the can. This could be anywhere from 15 minutes to an hour depending on the product.
Keep your workspace well-ventilated. You want to enjoy the process, not get a headache!
Finishing with a Clear Coat
After your final coat of paint dries, applying a clear coat is essential. This protective layer helps seal your hard work against scratches, moisture, and UV rays.
1. Choose the Right Clear Coat: Look for a product that is compatible with acrylic paint. It often comes in satin or gloss finishes, so pick one that matches your style.
2. Apply Evenly: Use the same technique as before, applying several thin coats for best results. This will help avoid bubbles and drips.
3. Cure Time: Allow the clear coat to cure completely before reinstalling your hardware. This could take anywhere from a few hours to a full day, so try to resist the temptation to rush.
By taking this extra step, your custom-painted door hardware will not only look fantastic but will also stand the test of time.
Reinstalling Your Hardware
Once everything is dry and cured, it’s time to put everything back together. This part is straightforward, but it’s worth going slow to prevent damage.
– Align Carefully: Make sure the door hardware aligns properly. Check that screws go into the right holes and everything fits snugly.
– Tighten Firmly but Not Too Tight: Over-tightening can crack the paint, ruining all your hard work. Make it secure without going overboard.
– Inspect Your Work: Double-check that everything looks good and operates smoothly. A final inspection is a great way to show off your newly restored hardware!
By following these steps, you’ll bring new life to your custom-painted door hardware, making it a focal point rather than a faded afterthought.
Maintaining Your Newly Painted Hardware
Now that your hardware looks fabulous, you’ll want to keep it that way. Here are some tips for maintaining your newly painted door hardware:
– Regular Cleaning: Wipe down your hardware regularly to avoid the buildup of dirt and grime. Use a soft cloth and a gentle cleaner.
– Avoid Harsh Chemicals: Stay away from abrasive cleaners that can scratch the surface or damage the paint.
– Inspect Periodically: Check for any signs of wear or fading every few months. Catching issues early means you can do minor touch-ups instead of full repairs.
By incorporating these maintenance tips into your routine, your custom-painted door hardware will look vibrant for years to come.
In conclusion, repairing faded paint on custom-painted door hardware can be a rewarding DIY project. With the right tools and techniques, you can restore your hardware’s original charm. Remember to take your time, prepare well, and protect your work. Soon, your door hardware will be back to its stunning best, adding personality and beauty to your home. Happy painting!