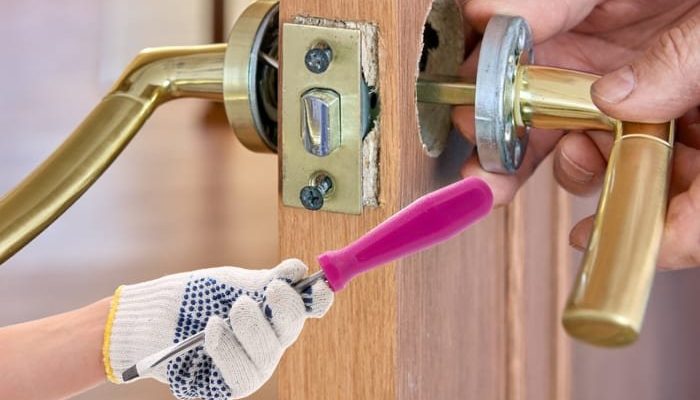
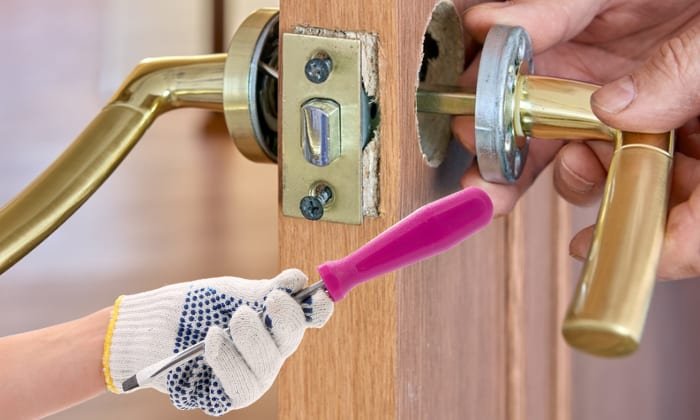
Here’s the thing: repairing exterior door hardware that’s loose on a fiberglass door isn’t just about tightening a few screws. Fiberglass doors have unique quirks—they can crack if overtightened or fail to hold screws if the original holes are stripped. Fixing it right takes a little patience (and maybe a second cup of coffee), but it’s totally doable for most homeowners. Let’s walk through how to diagnose the problem, gather the right tools, and shore up your door so everything is safe, sturdy, and working smoothly.
Common Causes of Loose Door Hardware on Fiberglass Doors
You might be wondering—why does hardware come loose in the first place? Honestly, it’s usually a mix of wear and tear, installation quirks, and the properties of fiberglass itself. Unlike solid wood, fiberglass doors have a composite structure that flexes and expands with temperature changes. This flexing can slowly work screws loose or even widen the holes they fit into, especially if they weren’t properly sized or installed to begin with.
Another culprit is the way exterior hardware gets used. Think about how many times a day you open and close your front door. Over months or years, even the best quality brands like Yale or Kwikset aren’t immune to a bit of wiggling. If you notice the lock cylinder spinning, the handle flopping around, or the entire lockset shifting on the door face, that’s a clear sign something needs attention.
Sometimes, the issue is internal. Deadbolts, for instance, often have hidden screws or mechanisms that loosen up—but since most of us only see the outside, those problems can creep up unnoticed. Fiberglass can make things trickier, too, because screws don’t bite into the material as firmly as they do in wood, leading to stripped holes or cracked surfaces if you’re not careful.
Checking for Damage Before Starting Repairs
Before you even reach for your screwdriver, take a good look at the door and hardware. It’s easy to jump straight to “tighten everything up,” but if there’s already damage—like a split or hairline crack in the fiberglass—or if the screw holes are totally stripped, you’ll want to address those first. Otherwise, you’ll just be repeating the repair in a few months.
Start by gently wiggling the handle and lock. Is there any movement where the hardware meets the door? Sometimes, it’s just a single loose screw. Other times, the entire plate or lock cylinder moves, which usually means a more serious attachment issue. Check the area around the screws for cracks or chips in the fiberglass. If anything looks suspect, snap a few photos with your phone for reference—trust me, it helps to see the before-and-after.
If you notice the holes are stripped out—where the screws spin freely but won’t tighten—don’t panic. There are a few simple fixes, like using longer screws or filling the holes with wood glue and toothpicks (yes, really) before reinstalling. For larger cracks or severe damage, you may need a fiberglass repair kit, but most hardware issues can be fixed without getting too messy.
Gathering the Right Tools and Materials for the Job
You don’t need to be a pro, but a few basic tools make this repair a lot smoother. At minimum, you’ll want:
- Screwdrivers—both Phillips and flathead, since hardware sets can be picky.
- Drill and bits—for reaming out holes or driving in new screws if needed.
- Replacement screws—ideally, ones slightly longer than the originals (but always check the depth first).
- Toothpicks or wooden dowels—for filling stripped holes.
- Wood glue or epoxy—to fix holes so screws hold tight.
- Fiberglass repair kit—only if you find cracks or big chips.
- Allen wrench—some brands (like Schlage) use these to secure set screws.
Honestly, most folks already have what they need in a basic toolbox. For specific brands like Kwikset or Yale, check the hardware manual or look up the model online—some use proprietary screws or require a unique driver. And if you’re dealing with an electronic lock, don’t forget fresh batteries before reassembly. Nothing’s worse than putting your door back together and finding your code pad unresponsive.
How to Tighten Loose Door Handles and Locks on a Fiberglass Door
Let me explain how to actually get hands-on. If the hardware is simply loose but otherwise in good shape, here’s what you do:
- Remove the handle/lockset: Most exterior door hardware has mounting screws on the interior side. Carefully unscrew these and set them aside. If you have a lever-style handle, you may need a small Allen wrench to loosen the set screw.
- Check screw holes: Look where the screws pass through the fiberglass. If the holes look tight, you’re in luck! If they’re wide or stripped, fill them with toothpicks dipped in wood glue (or use wooden dowels for larger holes). Let the glue dry fully before continuing.
- Reinstall and tighten: Place the hardware back in position. Install the screws, tightening them gently but firmly—don’t overtighten, or you could crack the fiberglass. If the hardware still feels loose, try slightly longer screws for a stronger grip, but be careful not to pierce through the other side of the door.
- Test function: Once secure, make sure the handle turns freely, and the lock engages without sticking. If everything feels snug, you’re good to go.
If the hardware stubbornly refuses to tighten, chances are the holes are too far gone. Don’t force it—move to the next section on more advanced fixes.
What to Do When Screw Holes Are Stripped or Damaged
Here’s where things get a little creative. Stripped holes are annoyingly common on fiberglass—mainly because the screws rely on a thin skin of composite material to hold. But don’t give up yet. There are a few tricks to give those screws a second life.
- Toothpick method: Stuff a few wooden toothpicks (coated in wood glue) into the stripped hole. Snap them off flush, let the glue dry, then reinstall the screw. This gives the threads something solid to bite into. It works surprisingly well for moderate damage.
- Wooden dowel method: For larger holes, drill out the stripped area slightly and glue in a short piece of dowel. Once the glue sets, drill a new pilot hole for your screw and reinstall the hardware.
- Epoxy or filler: For stubborn cases—especially where screws keep spinning—use a high-strength epoxy or a fiberglass filler to pack the hole. Let it cure fully, then re-drill a pilot hole and try again.
If you end up cracking the fiberglass during repair, use a fiberglass patching compound (from any home center). Sand the area lightly, apply the patch, let it cure, and sand smooth. It’s a little more involved, but it’ll keep your door strong and weather-resistant.
For maximum security, always use screws that are long enough to anchor into the inner wood blocking of the door if it exists. But never use screws so long that they poke out the other side!
Tips for Reinstalling and Maintaining Door Hardware
Once you’ve tightened everything up, it’s worth spending a few extra minutes on proper reinstallation. That way, your hardware stays tight, and you’ll avoid repeat repairs down the line.
- Align everything carefully: Hardware should sit flush on the door surface. If it’s crooked, the screws will pull unevenly and work loose again.
- Don’t overtighten: Especially with fiberglass, a gentle touch is better. Tighten each screw just until the hardware is snug—excess force can crush or crack the door skin.
- Check operation: Test the handle and lock before closing the door. If something feels stiff or doesn’t line up, loosen and adjust as needed.
- Regular maintenance: Once a season, give all exterior door hardware a quick check. Tighten any loose screws and lubricate the lock mechanism with a graphite-based spray if needed.
If you use a keyless or electronic lock, like a modern Schlage or Yale keypad, check the battery while you’re in there. Weak batteries can make locks act flaky—a quick reset or battery swap often solves weird issues.
Dealing With Persistent Problems or Replacing Hardware
If you’ve tried everything and the hardware still won’t stay tight, or if you spot serious structural damage to the fiberglass, it may be time for new hardware—or even a bigger repair. Sometimes, older doors simply lose their grip due to years of use, or you might have a mismatch between the hardware brand and the door’s design.
Here’s the thing: Not all hardware is universal. Manufacturers like Schlage, Kwikset, and Yale make locks in slightly different shapes, sizes, and mounting patterns. If you’re replacing hardware, bring the old set (or at least detailed measurements) to the store for a match. Look for heavy-duty options labeled specifically for fiberglass or composite doors—they usually have features like beefier mounting plates or expandable anchors.
If large sections of the door are cracked or spongy, it’s worth pricing out a professional repair or considering a replacement panel. But in most cases, new or properly reinstalled hardware is enough to keep things solid and secure.
How to Prevent Loose Hardware in the Future
Let’s talk prevention. The easiest way to avoid this headache is to install hardware that works well with fiberglass doors in the first place. That means:
- Using the right screws: Always choose screws long enough for a secure grip, but not so long that they go through the door.
- Checking the fit: Make sure the hardware sits flush from day one. No gaps, no wobble.
- Regular touch-ups: Every few months, check for signs of movement, and give everything a quick tighten as needed.
- Weatherproofing: Install or replace weatherstripping so water doesn’t sneak in and weaken the fiberglass around the screw holes.
Some folks add a drop of thread-locking compound to the screws. It’s not strictly necessary, but can help in high-traffic households where the door gets a real workout.
Closing Thoughts: Keeping Your Fiberglass Door Secure
Fixing loose exterior door hardware on a fiberglass door is one of those chores that seems intimidating, but usually boils down to a few careful steps and a little patience. By understanding why hardware works loose, inspecting for damage, and using the right repair techniques—like the toothpick trick or a dab of epoxy—you can make even wobbly handles and locks feel sturdy again.
Taking time to do the job right means your door will stay secure, your home stays protected, and you’ll avoid bigger headaches down the road. Whether you’re dealing with a classic Schlage deadbolt, a modern keypad, or a well-worn Kwikset handle, these fixes work across brands and styles. With everything tightened down, you might even enjoy using your front door a little more—confident it’s as solid as the rest of your home.