Here’s the thing: a too-deep pre-drilled hole may not sound like a disaster, but it can make your door hardware loose, shift out of alignment, or even compromise security. It’s a common goof for even seasoned DIYers, especially with dense fiberglass or busy porch distractions. But don’t rush to buy a new door or resign yourself to a janky fix. With a little patience and the right materials, you can *repair an exterior door that was pre-drilled too deeply for hardware*—and make it sturdy enough to trust.
Why a Too-Deep Hole Is a Problem for Door Hardware
Let me explain what’s really going on here. Exterior door hardware—think deadbolts, knobs, smart locks—needs to anchor firmly into the door. When you drill a hole that’s deeper than the hardware allows, the screws or mounting bolts might not “bite” into anything solid. Instead of gripping the door, they spin or sink without holding.
You might be wondering, “Can’t I just use longer screws?” Sometimes that helps, but if the hole is too wide or deep, even longer screws won’t fix wobbly hardware. Over time, doors get slammed, twisted, and yanked. If the lock’s not secured against solid material, it’ll work itself loose, and in some cases, the lock can even fall out. For smart locks (like August or Yale), a firm fit is especially important to avoid glitches, battery drain, or sync issues.
Another issue lurks beneath the surface. Weather can sneak into any gaps left by a loose-fitting lock, which messes with insulation and can cause water damage. And from a security standpoint, a poorly anchored deadbolt isn’t much better than a locked screen door.
How to Inspect and Confirm the Damage
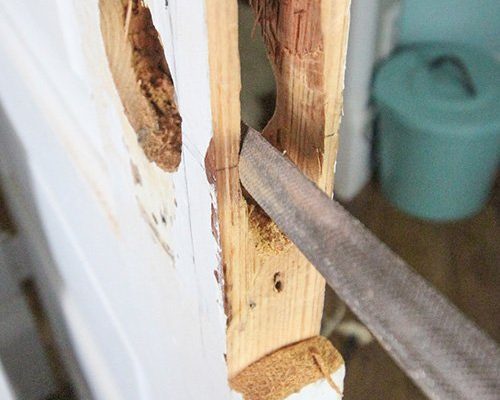
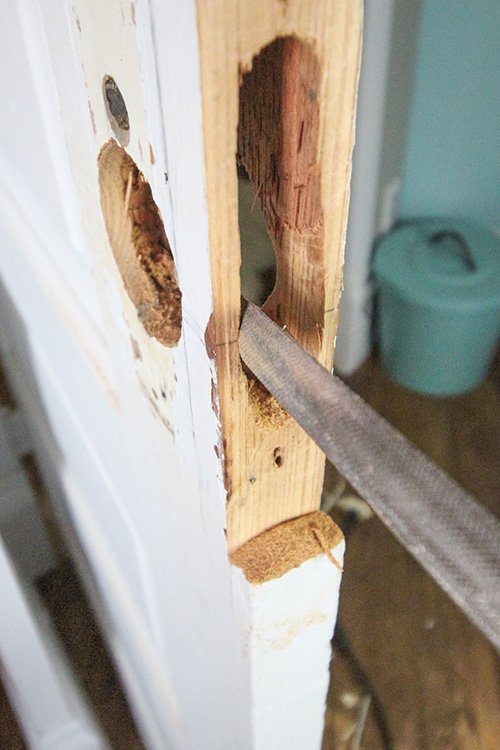
Before you fix anything, it helps to know *exactly* what you’re dealing with. Sometimes it just looks like the hole is too deep—but hardware can be forgiving if you catch the problem early.
First, remove the hardware from your door. Set aside all screws, plates, and the lock itself. Now, look closely at the hole:
- Is the hole deeper than the length of the screws that came with your lock?
- Does the hardware “sink” in or rattle when set in place?
- Can you see daylight or gaps all the way through the door material?
- Is the edge of the hole ragged or unusually wide?
Try fitting the screws by hand. If they spin easily or don’t grip, that’s a sure sign the hole’s too deep (or too wide). Sometimes, the issue is even worse with doors made from materials like hollow-core steel, fiberglass, or composite; these can be tricky to repair, but don’t panic.
If you notice sawdust, splinters, or crumbling wood inside the hole, you’ll need to patch it up before reinstalling your lock or handle.
This whole inspection might feel like overkill, but trust me—knowing the exact depth and size of the hole means you’ll pick the right fix the first time.
Materials and Tools You’ll Need for the Repair
Let’s get your toolbox ready. The good news is, repairing an exterior door that was pre-drilled too deeply for hardware doesn’t require pro-level gear. In fact, most people already have a few of these items handy.
Here’s what you’ll need:
- Wood filler or epoxy putty: Look for products rated for exterior use. Minwax is a classic, but PC-Woody or automotive-grade epoxy putties work too.
- Wooden dowels or shims: Especially for larger holes or if you need extra support in hollow or composite doors.
- Utility knife or chisel: Used to shape or trim filler and dowels for a snug fit.
- Sandpaper (medium and fine grit): For smoothing after the patch cures.
- Drill with appropriate bit size: You’ll need this to re-drill the hole to the correct size and depth.
- Screwdriver: To reinstall the hardware (manual is better than power for this part, so you don’t strip threads).
- Paint or touch-up finish (if needed): To seal the patch and match the door’s color.
Some folks swear by using toothpicks and wood glue for smaller screw holes, and that can work for interior doors. But for exterior doors and heavy-duty hardware, you’ll want something more robust. Water, temperature swings, and security are all bigger concerns here.
Step-by-Step: How to Repair a Deeply Drilled Door Hole
Let’s take this one step at a time. If you’re repairing a wood, fiberglass, or composite door, this process covers most situations—just adjust your filler type as needed.
1. Clean Out the Hole
Start by clearing away any loose wood, dust, or debris. Use a brush, can of compressed air, or even the edge of a screwdriver to gently scrape out rough spots. The filler needs to grab onto solid material, so don’t skip this step.
2. Test-Fit Your Dowel or Filler
If the hole is wide or deep, fit a wooden dowel or shim into the space and trim it so it sits flush with the edge of the hole. This gives your patch strength and helps the filler hold up over time. For smaller gaps, skip to the next step.
3. Apply Wood Filler or Epoxy
Mix your wood filler or epoxy putty according to package instructions. Press it firmly into the hole, filling all gaps around the dowel (if used) and up to the edge of the door. Don’t worry if you overfill a bit; you’ll sand it down later.
4. Let the Patch Cure
Give the patch plenty of time to harden—overnight is best for most wood fillers, but check your product’s label. Don’t rush, even if you’re itching to reinstall the hardware.
5. Sand Flat and Re-Drill
Once the filler is rock-solid, sand it smooth and level with the door’s surface. Then, using the manufacturer’s template, carefully re-drill the hole to the correct depth and width. Go slow, checking depth as you drill—you don’t want a repeat of last time.
6. Reinstall Your Hardware
Set the lock, handle, or smart lock in place. Hand-tighten the screws to make sure everything feels sturdy. If you’ve patched everything well, your hardware should sit snug and firm, just like new.
Tips for Repairing Different Door Materials
Not all doors are created equal, and some types need a little extra care. Here’s how to handle the most common materials.
Wood Doors: These are the easiest to repair, since wood filler and dowels bond well and sand down flush. If there’s any splitting or cracking around the hole, force a little glue into the cracks before filling.
Fiberglass or Composite Doors: These are a bit trickier, since standard wood filler may not adhere. Use a high-strength epoxy or fiberglass-reinforced filler. Sanding can take longer, and you may need to paint or seal the area again to protect against moisture.
Steel Doors with Wood Cores: If you’ve drilled too deep in a steel door, you’ll need to patch the core like a wood door, but use auto body filler (like Bondo) for the metal shell. Be careful not to jamb filler between the metal and wood layers, as this can cause bulging.
Always match your patching material to your door. Using the wrong type of filler can lead to a weak patch, and you might have to start over in a few months.
If you’re not sure what your door is made of, check the inside edge for labels or ask at your local hardware store—it’s worth getting right the first time.
Alternative Fixes: When Patching Isn’t Enough
Sometimes, a patch just won’t cut it. If the hole is too large, or the door is hollow with little structure to anchor into, you might need to consider other options.
- Reinforcement plates or conversion kits: Some brands (like Schlage or Defiant) make metal plates that bridge oversized holes and add strength for new hardware. These aren’t always the prettiest, but they get the job done.
- Door hardware with wider bases: Upgrading to locks or handles that come with large escutcheon plates can cover and secure even awkward patches.
- Filling and re-drilling in a new location: If the damage is too extensive, you might need to fill the original hole completely and drill a fresh hole slightly above or below the old one.
- Replacement: As a last resort, replacing the door slab might save more time and frustration, especially if security is compromised or the door is already showing its age.
Honestly, I’m all for a clever repair job, but sometimes starting over is the smarter—and safer—option in the long run.
How to Prevent Drilling Too Deep in the Future
Once you’ve wrestled with a repair like this, you’ll want to make sure it never happens again. Prevention is pretty simple, but it’s easy to overlook in the heat of a home improvement project.
- Use a depth stop: Many drill bits come with adjustable collars that stop the bit at a set depth. If yours doesn’t, a short piece of masking tape wrapped around the bit works in a pinch—just drill until the tape touches the surface.
- Check hardware templates: Every brand, from Yale to Schlage, includes a template showing exactly how deep and wide to drill. Don’t wing it, even if you’ve installed dozens of locks before.
- Measure twice, drill once: It’s classic advice, but it really helps. Double-check your markings and measure against the longest screw or mounting bolt your hardware uses.
- Start small and work up: Drill a pilot hole first to guide your main drill bit and avoid wandering into deeper trouble.
Let’s be honest—DIY mishaps happen. But a little slow and steady patience saves way more time than emergency repairs.
When to Call a Pro for Exterior Door Repairs
Most folks can handle this repair with a little guidance, but sometimes it’s smarter to bring in help. If you’ve got a custom or antique door, or there’s electronic hardware (like a keypad or smart lock) involved, a locksmith or carpenter can make sure everything lines up and works right. Same goes if the hole cuts into a crucial part of the door, like the edge near the weatherstripping or hinge.
A pro can also check for hidden problems, like rot, moisture damage, or issues with the door frame itself. Sometimes the “too-deep hole” is just the tip of the iceberg. And let’s be real—having someone else take responsibility for the job can be a huge relief, especially if you’re worried about security or warranty coverage.
If you’re ever in doubt, there’s no shame in asking a pro. It might save you hours of frustration and help your door hardware last for years.
Wrapping Up: A Sturdy Door, A Fresh Start
Repairing an exterior door that was pre-drilled too deeply for hardware might feel like a chore at first, but it’s also a chance to make things right—and stronger than before. Whether you’re patching with wood filler, fitting a dowel, or upgrading to a smart lock, what matters is making sure your door is secure, weather-tight, and ready for years of trouble-free use. Take your time, follow the steps, and don’t be afraid to improvise a little if your situation calls for it. Nothing beats the satisfying click of hardware that fits just right—especially when you fixed it yourself.