
Here’s the thing: repairing a small rotten patch around your door hardware isn’t as scary as it sounds. You don’t need a pro, and you don’t have to replace the whole frame. With a little patience and a few basic tools, you can clean out the rot, patch the area, and get back to a sturdy, weatherproof frame. Whether you’ve got an old, reliable Schlage handle set, a modern Yale smart lock, or just basic hardware, the steps are basically the same.
Let me walk you through what causes this kind of rot, what you’ll need, and, most importantly, how to make the repair last. By the end, you’ll know exactly how to fix your exterior door frame and why it matters, so you can stop the rot from spreading and peace-out on future headaches.
What Causes Rot Around Door Hardware?
Rot around door hardware usually comes down to one thing: moisture sneaking in and hanging around. When water gets trapped between your hardware and frame—maybe from rain, snow, or just condensation—it soaks into the wood. Over time, that moisture softens the wood fibers until they literally break down, becoming a buffet for fungi and bacteria. That’s wood rot in a nutshell.
If you’ve got an old storm door, a jammed-up weatherstrip, or a threshold that’s seen better days, that water finds a way in. Throw in humid summers or a shady porch where things don’t dry quickly, and you’ve got a recipe for trouble. Even high-end doors from brands like Andersen or Pella aren’t immune; it’s just part of living with real wood and hardware.
You might be wondering: doesn’t the paint or sealant protect the frame? It helps, but any tiny crack or nick—from a screw installing a smart lock, a slipped screwdriver, or general wear—creates an entry point for water. And once rot starts, it spreads beneath the surface, making a small fix urgent before things get worse.
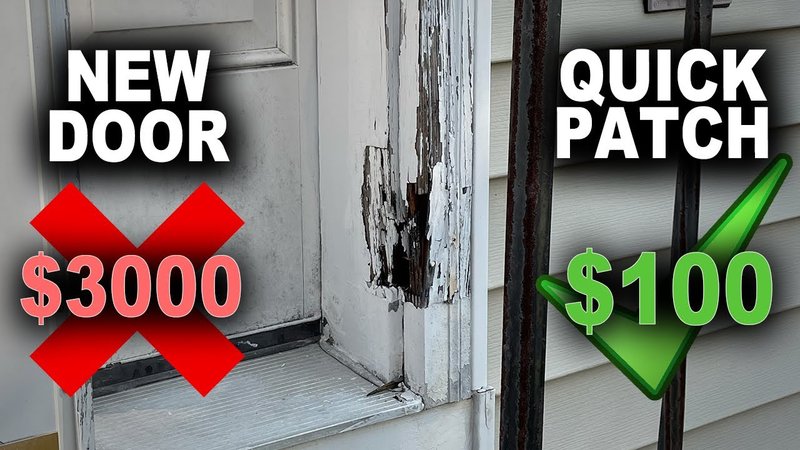
How to Identify Rotten Spots Around Exterior Door Hardware
Spotting rot early makes a huge difference. Honestly, catching it before it ruins the whole frame can save you a weekend job and a few hundred bucks. Here’s how you can tell if you’ve got a problem brewing around your door lock or hinges.
- Soft or spongy wood: Press a screwdriver or your finger around the hardware. If it sinks in or feels “mushy,” that’s a red flag.
- Discoloration: Look for darker patches, grayish streaks, or paint that’s bubbling and peeling—signs moisture has gotten underneath.
- Crumbles or flakes: If wood breaks up or splinters off with just a little pressure, it’s probably rotten.
- Loose hardware: Screws, latch plates, or hinges that wobble often mean the wood behind them isn’t holding tight anymore.
Take a close look at the spots around locks, deadbolts, and strike plates. Sometimes, you’ll see the damage as soon as you remove the hardware—yellow-brown wood dust, fragments, or an odd smell. If the rotten area isn’t much bigger than a couple of quarters, you can fix it yourself and avoid replacing the whole frame.
What Tools and Materials You’ll Need for Small Rot Repairs
Before you start, grab everything you’ll need—nobody wants to be running to the hardware store mid-project with a half-patched door. Here’s your core list:
- Safety gear: Gloves, mask (if the rot is moldy), and glasses
- Basic hand tools: Screwdriver (for removing hardware), chisel, small pry bar, putty knife
- Cleaning tools: Wire brush, vacuum, or canned air
- Wood hardener: This soaks into the damaged wood and makes it solid again—key for small jobs
- Epoxy wood filler: Two-part filler is best for patching and rebuilding missing chunks
- Sandpaper: Medium and fine grit (80, 120, 220) to smooth the patch
- Paint and primer: Exterior-grade is a must to seal the repair
If you’re fixing rot near a smart lock or a specialty brand (like Kwikset or Yale), keep the hardware code handy. Some brands use unique screws or mounting plates, so make sure you have the right driver bits.
Step-by-Step Guide: Repairing Rotten Door Frame Around Hardware
Let’s tackle this one step at a time. Restoring a rotten exterior door frame around a lock or hinge with small rot patches isn’t hard, but you’ve got to do it right to avoid having to redo it next year.
Step 1: Remove the Hardware
Start by unscrewing the lock, strike plate, deadbolt, or hinge that’s closest to the rot. This gives you clear access to the damaged area. If the screws are stripped or stuck (common with old locks or after years of humidity), a little penetrating oil and careful prying should loosen them up.
Step 2: Dig Out the Rotten Wood
Use a chisel or a flat-head screwdriver to gently scrape and pry away all the soft, rotten wood. Be thorough—any wood that crumbles easily or feels soft to the touch needs to go. Let me explain why: leaving rotten bits means the patch won’t bond well, and the rot might keep spreading.
Vacuum out the debris and brush out dust with a wire brush. You want the surface as clean and dry as possible before moving to the next step.
Step 3: Apply Wood Hardener
This is like giving your frame a backbone. Brush or squirt wood hardener onto the exposed wood, making sure it soaks in everywhere you’ve dug out. It seeps into the remaining wood fibers, hardening them and stopping future rot. Let it cure—usually about an hour, but check the brand’s instructions.
Step 4: Fill with Epoxy Wood Filler
Mix the two-part epoxy filler and press it firmly into the cleaned-out spot. Shape it to match the door frame as best you can; don’t worry about perfection on the first swipe, since you’ll sand it smooth later. Epoxy bonds tightly to the wood and cures rock-hard—way better than regular spackle for exterior repairs. Let it harden according to the label.
Step 5: Sand and Prime
Once the patch is hard, sand it down with progressively finer sandpaper. Your goal is a smooth, flush surface that feels like the original frame. Wipe dust away, then brush on a layer of exterior-grade primer. If you want a long-lasting repair, don’t skip this step—primer seals the wood and blocks future moisture.
Step 6: Paint and Reinstall Hardware
Finish with at least two coats of exterior paint, allowing drying time between layers. Once the paint feels dry and tough, reinstall your lock or hinge. If any screw holes feel loose, fill those with epoxy or a wooden toothpick slathered in wood glue before screwing hardware back in.
How to Prevent Future Rot Around Door Hardware
Now that you’ve cured one spot of rot, let’s keep it from coming back. Prevention is less work—and less frustrating—than fixing new patches every year.
- Seal and paint: Regularly check that paint and caulk are intact around the door frame. Any crack—even a hairline one—can let water in.
- Check the weatherstrip: If the rubber gasket at the bottom of your door is cracked or missing, replace it. This keeps rain and bugs out.
- Inspect hardware: Every few months, wiggle the lock or hinge. If you feel any looseness, retighten or fill holes before water sneaks in.
- Clean drainage areas: Make sure your exterior step or threshold doesn’t hold standing water; sweep away debris after storms.
For smart locks or remotes, keep them synced and reset if you notice any malfunction, since moisture can sometimes mess with electronics as well. Don’t ignore a sluggish keypad or a lock that suddenly stops responding—sometimes the issue is just a dying battery, but water damage is a sneaky culprit.
When Should You Call a Professional?
Honestly, most small rot repairs you can handle with a free afternoon and some elbow grease. But if you find the rot covers more than six inches, goes deep into the jamb, or has reached the subfloor or wall framing, stop and consider calling a pro. Big repairs could mean hidden water leaks or structural issues that need more experience.
If you’re dealing with an expensive or high-security lock—think keyless entry, Wi-Fi enabled, or major brand systems like Schlage Encode or Yale Assure—don’t force anything. Sometimes these locks need special pairing or reset procedures after removal, and a locksmith can help avoid headaches.
Alternatives to DIY Repairs: Pre-Made Repair Kits and Universal Frame Solutions
If you’re not into mixing epoxy or shaping filler, there are pre-made repair kits available. These often include moldable wood putty, wood hardener, and sometimes even “universal” frame reinforcement plates that screw right in over small rotten spots. Brands like Minwax, Abatron, and Ronseal make solid kits.
Some folks opt for universal strike plates or “wrap-around” door frame pieces that cover minor damage and reinforce the area. This can be a quick fix if you’re worried about security, especially if you have a remote-controlled deadbolt or smart lock that’s tough to reset or sync after removal.
Just remember: even with a universal repair, you’ll still need to remove all rot before installing anything new, or you’re just covering up a problem that’ll come back.
Final Thoughts: Keeping Your Doorway Strong for the Long Haul
Fixing a small patch of rot around your exterior door hardware isn’t just about appearances. It’s about keeping your home safe, your lock or smart remote working right, and making sure you don’t end up with a much bigger, costlier repair down the line. Take it a step at a time, use the right materials, and don’t rush—your door frame will be as solid as ever.
If you stick to regular checks, seal up any cracks, and stay on top of maintenance, you can avoid most rot for years. And if you ever notice your handle gets wobbly or your smart lock stops responding after a storm, you’ll know what to check first. Here’s to sturdy, rot-free entryways and hardware that works like new—no matter what the weather throws your way.