Repairing an exterior door frame drilled for the wrong hardware isn’t just about looks—it’s about security, too. Those extra or misaligned holes can create weak spots, let in drafts, or even cause your remote lock or smart deadbolt to fail at pairing properly with the strike plate. Let me explain how you can fix this, step by step, so your door is strong, neat, and ready for whatever code or security system you want to install next.
Why Hardware Fit Matters for Exterior Doors
Here’s the thing: your exterior door is often the main line of defense for your home. If the door frame is drilled for the wrong hardware, you won’t get a snug, secure fit. Think about when you try to pair a remote to your smart lock system—if the physical parts aren’t synced up perfectly, the electronics won’t work right, either. Even the best Yale or August smart locks can’t compensate for a wobbly latch or gaps around the strike plate.
Besides security, there’s the issue of weather. Gaps or misaligned holes can let in cold air, moisture, or even pests. Over time, this can lead to rot or swelling around your frame, making the problem worse. That’s why it’s so important to repair any holes left from the wrong drill pattern before mounting new hardware.
Finally, resale value matters. If you’re thinking about selling, a clean and properly repaired door frame signals to buyers that you take care of your home—even down to the details like resetting and syncing your smart remotes.
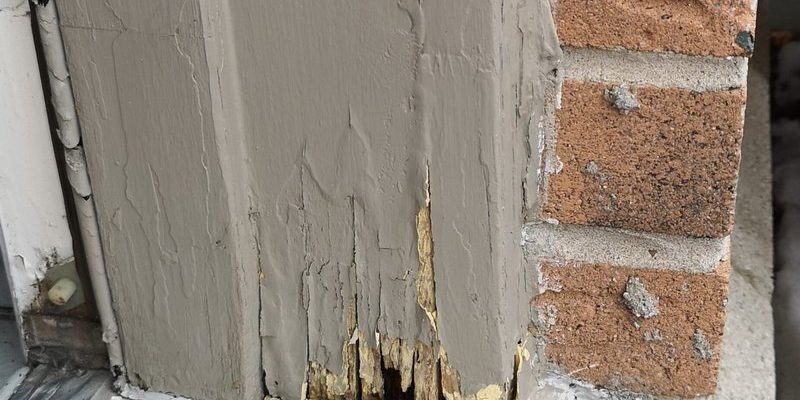
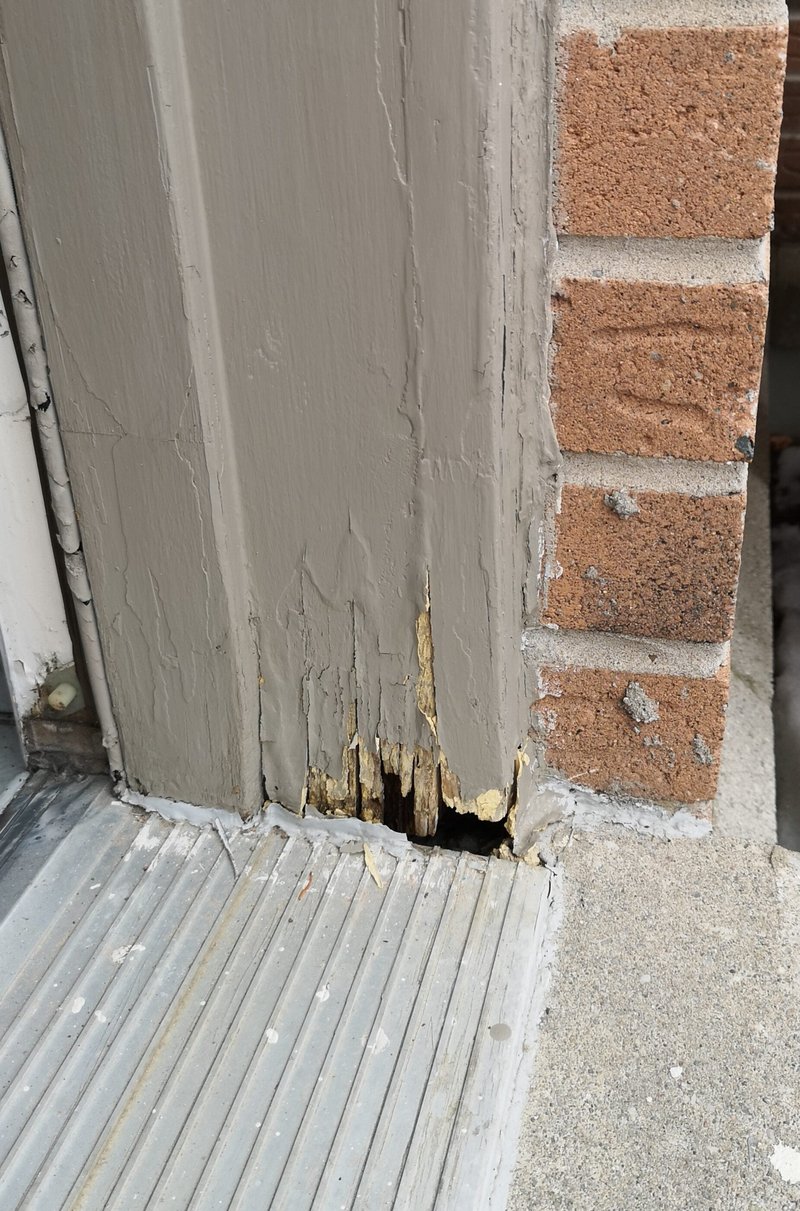
Assessing the Damage: What To Look For
Before you grab a tube of wood filler or your favorite repair kit, stop and take a good look at the door frame. Are the old holes just slightly off, or are they way out of place? Did someone drill a hole for a code-entry touchscreen when you actually need a simple latch? Here’s what you need to check:
- Location and size of each hole: Is it too close to the edge, or does it overlap with the new hardware?
- Depth: Some hardware—especially electronic deadbolts—needs extra depth for batteries or sync wiring. An old, shallow hole might mean you need to drill deeper, but only after you repair the original mistake.
- Condition of the wood: If the area around the hole is split, chewed up, or spongy from moisture, you’ll need to reinforce or even replace part of the frame.
If you spot any electrical wiring from a smart lock or a keypad system, handle with extra care—never just slap on filler. Shut down the system or battery, and double-check everything before you start repairs.
Choosing the Right Repair Materials
There’s a world of difference between a quick patch and a lasting fix. For exterior door frames, you want something that stands up to weather, resets strong, and lets you pair your hardware securely. Here are the main options:
- Wood filler or epoxy putty: These are great for small-to-medium holes. Once they dry, you can sand and paint them to match the frame. Some epoxies bond so tight, you can actually screw hardware back in.
- Wood plugs or dowels: Perfect for larger holes, especially if they go all the way through. Glue a snug-fitting dowel in place, let it set, and then sand it flush with the frame.
- Replacement wood pieces: If the area is badly damaged—or if part of the frame is missing—you’ll need to cut and attach a new piece of wood. It’s a bit more work, but honestly, sometimes there’s no good shortcut.
For weather resistance and strength, look for products labeled as “exterior grade” or “structural.” Steer clear of cheap lightweight fillers—they may shrink, crack, or make future hardware pairing tricky.
Step-by-Step: How To Repair the Wrong Holes in Your Door Frame
Let’s dive into the process. Grab your tools, some patience, and follow these steps:
- Clean the area: Remove any old screws, chips, or debris. Lightly sand around the damage so your repair material sticks well.
- Prep large holes: For holes wider than a pencil, glue in a wood dowel or plug that fits snugly. Tap it flush with a hammer. Let dry according to the glue instructions.
- Fill and shape: Use exterior wood filler or epoxy to fill gaps around your plug or any smaller holes. Overfill just a bit, since most fillers shrink as they dry.
- Sand smooth: Once dry, sand the area flush with the rest of the frame. This makes your repair invisible under paint or finish, and ensures your new hardware sits flat.
- Prime and paint: For best results, seal your repair with primer before painting. This protects against moisture and blends everything together for a clean reset.
If you’re working around any smart strike plates or battery-powered remotes, double-check that your repair doesn’t block any wiring channels or mounting holes. Mistakes here can make troubleshooting a nightmare later on.
Redrilling and Installing the Correct Hardware
Once your repairs are dry, smooth, and painted, it’s finally time to drill the new holes for your hardware. Here’s how to get it right:
- Measure twice, drill once: Place the new hardware (like your Schlage keypad or Kwikset deadbolt) against the frame. Use a pencil to mark exactly where every screw and latch hole needs to go. Don’t guess.
- Pre-drill pilot holes: Using a small drill bit, create starter holes for your screws. This helps prevent splitting the wood or damaging your repair work.
- Install the hardware: Attach everything carefully. Test the lock, latch, or remote feature to make sure it’s synced and working right. If you’re pairing a smart deadbolt or troubleshooting battery issues, now’s the time to check all functions.
If something doesn’t line up, go slow and check your work. Forcing screws into a new filler patch can weaken the repair and set you back to square one.
Tips for Matching Paint and Finish on Door Frame Repairs
You might be wondering how to make your repair disappear—especially if your door frame is stained, painted, or has a unique finish. Matching paint or wood stain can be tricky, but there are a few tricks:
- Prime first: Always use a primer on filled spots. Otherwise, your top coat might absorb and dry differently over the patch.
- Feather your paint: Use a small brush to blend the new paint into the old. Long, light strokes help hide where the repair starts and ends.
- Match sheen, not just color: Even if your color is perfect, mismatched gloss levels will stand out. If your frame is satin, don’t touch it up with glossy paint.
- Test in a hidden area: Try out your paint or stain on a part of the frame that’s not visible, just to be sure you like the result before you tackle the repair spot.
Don’t stress if your first coat doesn’t look perfect. Sometimes you’ll need two or three passes to reset the look fully. In the end, a careful finish job is what really pairs your repair with the rest of the door frame.
When To Call a Pro (and When to DIY)
Here’s my honest take: fixing small holes or shallow damage is a solid DIY project, even if you’re more used to syncing universal remotes than swinging a hammer. But there are times to call in a pro:
- Major structural damage: If big chunks of wood are rotted, split, or missing, it’s smarter and safer to have a carpenter reset the frame, especially for high-traffic exterior doors.
- Complex smart locks: Some electronic locks, especially if they use special wiring or pair with alarm systems, need a certified installer. That way, you avoid making the problem worse during troubleshooting.
- Historic homes: If your door frame is antique or part of a historic facade, matching materials and finishes can be tough. Specialized restoration pros have tricks and tools that regular hardware stores just can’t provide.
For anything else, with a little planning and attention to detail, your repair will hold strong and keep your door hardware — standard or remote, code-based or classic — synced and secure.
Comparing Patch Materials: Wood Filler vs. Epoxy Putty vs. Replacement Wood
Choosing the right patch method really matters for strength and looks. Here’s a quick comparison:
| Wood Filler | Best for shallow holes and surface repairs. Dries fast, easy to sand, but not as strong as new wood. Good for painted frames. |
| Epoxy Putty | Very strong, weatherproof, and bonds tightly. Handles larger gaps or when you need to screw hardware back in. Harder to sand and shape, but long lasting. |
| Replacement Wood | Ideal if area is badly damaged or missing. Involves cutting and fitting new wood, plus finishing work, but creates the strongest, “like new” result. |
Tip: For keyless remotes or smart locks, epoxy is often best for filling old mounting holes, since it won’t flex and will hold screws tight even with repeated battery changes or code resets.
Wrapping Up: Moving Forward With a Fixed, Secure Door Frame
Fixing an exterior door frame that was drilled for the wrong hardware can feel daunting at first—but breaking it down step by step, you’ll find it’s a manageable project. The key is patience and using the right materials for the job. Whether you’re installing a simple handle or a battery-powered smart lock with remote sync, a strong, properly patched frame sets you up for success.
Taking your time with the repair not only keeps your home secure, it makes sure everything from lock resets to future upgrades goes smoothly. If you ever get stuck, remember: there’s no shame in reaching out to a professional who can troubleshoot tricky issues or match a tricky finish. In the end, your door will look sharp, function perfectly, and give you one less thing to worry about—no matter what hardware you choose next.