The *inner fin* is that soft, flexible flap tucked inside many weatherstrips—especially on brands like GM, Toyota, or Ford. It creates an extra seal between your door and the frame, blocking moisture, noise, and drafts. When it tears, it’s tempting to ignore it. But honestly, that tiny rip can let in a surprising amount of trouble over time—from soggy carpets to mysterious electrical gremlins. Let me walk you through why fixing a torn inner fin matters and how you can tackle it without requiring a whole new weatherstrip or a costly trip to the shop.
Why the Inner Fin Matters More Than You’d Think
You might be wondering, “It’s just a little tear—how bad can it be?” Here’s the thing: the inner fin acts like a goalie, blocking everything from water and dust to wind and weird smells. Even a small rip can let water crawl into places it shouldn’t go. Over time, this moisture can do real damage—rusting metal, soaking carpets, and confusing the electronics hidden under your seats.
Manufacturers include these inner fins for a reason. Whether you drive a Honda Civic or a Chevy truck, this thin strip makes a big difference in comfort and longevity. Think of it as the silent MVP of your car’s door seal. Ignoring a tear doesn’t just make your ride noisier or less cozy—it can mess with things you can’t see, like wiring or paint. And if you’re someone who loves troubleshooting little annoyances before they turn into big repairs, patching up that inner fin is totally worth your time.
How to Identify a Torn Inner Fin on Your Weatherstrip
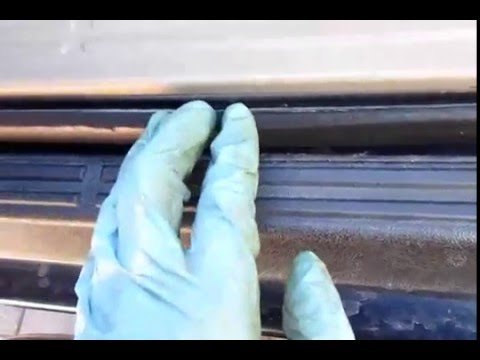
Some tears are easy to see; others play hide-and-seek. First, open your door and look closely at the weatherstrip all along the frame. On most cars, vans, or SUVs, the inner fin is just inside the main rubber seal, facing inward. If you gently flex or squeeze the weatherstrip, you’ll notice this thin blade-like piece tucked inside.
Common signs you’ve got a torn inner fin:
- Visible rip or gap in the soft inner flap
- Water leaks after rain or car washes, often near the floor or door panel
- Whistling or wind noise at highway speeds
- Mildew smell or dampness inside the cabin
Sometimes, the tear is small—no bigger than a fingernail. Other times, the fin might be hanging loose like a broken zipper. If you’re unsure, try sliding a piece of paper between the door and the frame where you suspect the damage. If it moves freely, you’ve found your trouble spot.
What Causes Inner Fin Tears?
Inner fins usually don’t tear out of nowhere. They’re designed to flex every time you open or close the door, so age and use eventually wear them down. Here are the main culprits:
- Frequent door slamming or forcing the door shut
- Extreme temperatures, which make rubber brittle
- Exposure to harsh chemicals during cleaning
- Improper installation after previous repairs or DIY attempts
If you park outside all year round, the weatherstrip faces more stress from sun and frost. Over time, the rubber can dry out and lose its bounce. Sometimes, even a sharp edge on your keys or a seatbelt buckle can nick the inner fin if you’re not careful.
Should You Patch, Replace, or Ignore the Torn Fin?
Let’s be honest—not every torn inner fin needs a full weatherstrip replacement. The answer depends on the damage:
- Tiny tears, under an inch long, usually patch up well with the right products.
- Medium rips (an inch or two long) might need a combination of patching and extra adhesive support.
- Huge gaps, or if the fin is mostly missing, usually mean it’s time to replace the entire weatherstrip.
For most daily drivers, a careful patch gets the job done, especially if you’re handy and a little patient. Universal weatherstrip repair kits are available, but make sure you’re picking the right shape and size for your specific model—whether you own a Toyota Camry or a Ford F-150. Universal kits can work in a pinch, but a brand-specific kit usually gives a more seamless fit and finish.
Materials and Tools You’ll Need for Weatherstrip Inner Fin Repair
You don’t need a garage full of tools, but having the right stuff makes things smoother. Gather these before you start:
- Automotive weatherstrip adhesive (the 3M black stuff is a favorite)
- Rubber patch material (salvaged from an old weatherstrip or from a kit)
- Rubbing alcohol and a clean rag for cleaning
- Small brush or applicator for glue
- Painter’s tape or clips to hold the patch in place while it sets
- Scissors or a craft knife for trimming the patch to size
Optional but handy: latex gloves, cotton swabs, and a heat gun (for tricky curves or older brittle weatherstrips). Honestly, most folks already have half this stuff in their toolbox or junk drawer. The real secret is patience—rushing makes a mess.
Step-by-Step: How to Repair a Torn Inner Fin on a Weatherstrip
Let me walk you through it like you’re right here in the driveway. Here’s what you do:
- Clean the area thoroughly. Use rubbing alcohol on a clean rag to wipe both the torn spot and the surrounding rubber. Dirt and old adhesive are the enemy here.
- Trim the torn edges if needed. If the tear is ragged or has loose rubber strands, tidy it up with scissors so the patch will sit flat.
- Cut your patch. Using similar rubber, cut a patch just a little bigger than the tear. Some repair kits come with pre-cut rubber, but a flap from an old weatherstrip works too.
- Apply weatherstrip adhesive. Use a small brush to spread glue on both the patch and the fin. Wait a few minutes for it to get tacky—just like gluing two pieces of paper together.
- Press the patch into place. Line up the patch along the torn inner fin, pressing firmly. Use painter’s tape or small clips to hold it while the adhesive cures (usually an hour or two).
- Peel away any tape and clean up excess glue. Once dry, gently remove supports and wipe away stray adhesive with a dab of rubbing alcohol.
Take your time. A neat repair will last longer and look better than one done in a rush. If it’s cold out, a hairdryer can help the adhesive set faster.
Double-Checking the Seal: How to Make Sure Your Fix Worked
No one likes doing the whole job twice, so let’s make sure your repair did the trick. Once the adhesive is fully set, shut the door gently and check all along the weatherstrip. Press on the door frame outside and feel for any soft spots or wiggle in the repaired area.
Here are a few simple tests:
- Run a flashlight along the repair from the inside; if you see light peeking through, your patch isn’t sealing fully.
- Pour a cup of water down the outside of the repair zone. Watch for drips or dampness inside. No leaks? You’re golden.
- Go for a short drive and listen for extra wind noise. If you still hear whistling, the patch may need a little more adhesive or a new try.
Sometimes, the first patch is good—but not perfect. Don’t sweat it. This is how you learn. Adjust as needed, and remember: perfection isn’t always the goal—a weather-tight seal is.
Alternatives If the Repair Doesn’t Hold
Let’s say your patch keeps peeling up, or the tear is just too big to fix. Don’t worry—you’ve got options. A full weatherstrip replacement is straightforward on most cars, and you can often find the right part at your local auto store or online. It’ll cost more than a patch, sure, but you’re getting a factory-grade seal and a fresh start.
If you’re in a pinch, universal weatherstrip tape (like the kind used for home doors) can stand in for a few weeks—but it’s not a forever fix. If you’ve already tried code, sync, reset, or re-pair tricks for your keyless entry system because of water intrusion, sometimes only a new weatherstrip solves the issue. Water and electronics are a bad mix, especially around remotes and batteries hiding in door panels.
The bottom line: patch repairs are great for small tears and when you want to squeeze more life out of your current seal. At some point, replacing is smarter for safety and peace of mind.
How to Prevent Future Weatherstrip Fin Tears
Once you’ve handled this repair, let’s not end up back here anytime soon. Here’s how you can keep your new—or newly patched—inner fin in good shape:
- Keep it clean. Wipe the weatherstrips every month or so with a damp cloth to remove dirt and grit that causes abrasion.
- Treat the rubber. Use a silicone-based conditioner every few months. It keeps the rubber supple and helps prevent cracking.
- Be gentle closing doors. No slamming! Just a firm push or pull.
- Avoid harsh chemicals. Stick to mild soap and water if you’re cleaning the door jamb.
Also, every time you open the door—maybe when you’re checking the battery in your key fob or syncing your remote—give the weatherstrip a quick glance. Early troubleshooting always beats dealing with a big repair later.
Final Thoughts: Keeping Your Ride Quiet, Dry, and Comfortable
Repairing a weatherstrip’s inner fin that’s torn can sound intimidating, but in reality, it’s a hands-on fix that almost anyone can handle with the right steps. Taking care of this small detail pays off with less noise, fewer leaks, and a more comfortable drive—no matter if you’re rolling in a trusty Toyota or a classic Ford. Like most car repairs, it’s all about catching small issues before they become big headaches.
So next time you spot that tiny tear, don’t put it off. With simple tools, a bit of patience, and a few careful steps, you’ll keep your car’s seal in top shape and your peace of mind intact—rain, wind, and drafts kept firmly outside where they belong.