Here’s the thing: a ripped weatherstrip can easily go from a small annoyance to a big problem. That little gap can let in cold air, rain, and even tiny critters. And if you’ve got a major brand storm door or car, like a Ford or Anderson, the original weatherstripping can seem pricey or complicated to deal with. But, honestly, fixing it yourself isn’t as overwhelming as it sounds—even if you’ve never done any kind of home repair before.
Let me explain how to handle a torn weatherstrip, what you’ll need, and why it’s absolutely worth a little effort—especially when keeping your home (and wallet) comfortable is on the line.
Why Weatherstrips Matter More Than You Think
You might be wondering, “Can a little damage really cause that much trouble?” The answer is yes. Weatherstrips form a critical barrier between your home and the outside world. When one is compromised—even just a small tear or rip—air can sneak in, and that affects both comfort and energy bills.
Think about it like wearing a raincoat with a hole in it. Sure, most of you stays dry, but that little rip means water can get in. The same goes for your house or car. A damaged weatherstrip lets conditioned air leak out, and outside air creep in, which makes your HVAC system or car’s climate controls work much harder.
With brands like Therma-Tru, Pella, or Toyota, those engineered seals are designed for a snug fit. When you repair or replace a weatherstrip the right way, you keep noise, moisture, and dirt where they belong—outside. It’s a small fix that packs a big punch for your daily comfort.
Spotting the Damage: Signs Your Weatherstrip Needs Help
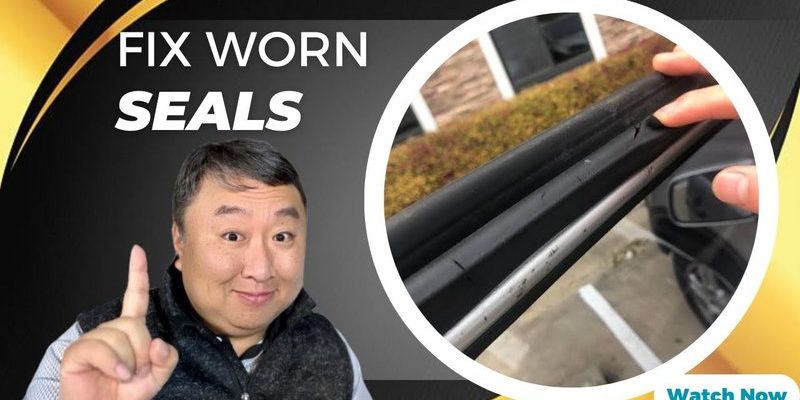
Sometimes a ripped weatherstrip is obvious—a big chunk is missing, or you see a torn flap flapping in the breeze. But other times, the signs are subtle, especially after a toy incident that didn’t look too dramatic at first. Here’s what to look for:
- Visible tears or holes: Any gap, rip, or missing section is a problem.
- Drafts or wind noise: Feel a cold spot near doors or windows? That’s a giveaway.
- Water spots: After rain, check for dampness or puddles near the weatherstrip area.
- Hard-to-close doors or windows: A misaligned or damaged seal can make things stick or jam.
If you’ve got a sliding patio door, modern SUV, or even just a standard front entry, these clues mean it’s time for a fix. Don’t ignore “little” damage—it can lead to bigger headaches (and higher bills) if left unchecked.
Gathering Tools and Supplies: What You’ll Need
Before you start, it pays to gather the right materials. For most home or car weatherstripping jobs, you’ll want:
- Replacement weatherstrip: Match type, size, and brand as closely as possible. Bring a sample to the hardware store if you’re unsure.
- Adhesive: Most seals use a strong, weather-resistant glue (look for automotive or door/window grade).
- Scissors or utility knife: To trim the seal so it fits perfectly.
- Rubbing alcohol or cleaner: To prep the surface and remove old adhesive.
- Pry tool or flathead screwdriver: For removing stubborn, stuck-on strips.
If you’re working on a major brand like an Andersen patio door or a Honda car door, the process is usually the same—but double-check your owner’s manual or look for a code inside the door frame for the correct replacement. Getting the right fit makes all the difference for a long-lasting repair.
Step-by-Step: Fixing a Ripped Weatherstrip at Home
Here’s where we get practical. Whether your weatherstrip is foam, rubber, or vinyl, the basic steps are similar. Let’s walk through it together:
- Remove the damaged strip: Gently pull off the ripped section. If it’s stuck, use your pry tool to loosen it. Clean off any old adhesive with rubbing alcohol.
- Measure and cut the new strip: Lay the new weatherstrip next to the old one to match length and shape. Cut precisely using scissors or a utility knife.
- Apply adhesive (if needed): Some strips are self-adhesive, while others need glue. Follow the instructions on your product—don’t go overboard. Too much glue can ooze out and make a mess.
- Press into place: Line up the new strip and press it firmly into the track or groove. Hold for 30–60 seconds, or longer if the instructions say so.
- Let it set: Avoid slamming doors or windows for an hour or two while things bond. If it’s a car door, keep it closed for a bit to help the seal form.
Honestly, even if you’ve never done any kind of home fix, this is one of the more forgiving repairs. Take your time, and remember—the fit matters more than perfection. A snug seal is your goal.
What If the Rip Is Small? Repair vs. Full Replacement
You might be staring at a tiny tear and thinking, “Do I really need to swap the whole strip?” Here’s my take:
- If the rip is less than an inch and not near the ends, you can try a patch solution. Use weatherstrip adhesive as a glue “band-aid” and gently press the torn sides together. Hold until dry.
- If the damage is longer or flaps open easily, or if the strip’s starting to crumble elsewhere, go for a full replacement. Patching buys time, but it’s rarely a permanent fix.
For car weatherstrips, especially on luxury or newer models, you can sometimes find brand-specific patch kits. But almost always, full replacement lasts longer and delivers better results.
Even a small gap lets in moisture, dirt, and noise, so if you’re unsure, replacing is usually the smartest bet.
Weatherstrip Repairs by Brand: Are There Differences?
Not all weatherstrips are created equal. If you’re dealing with a particular brand—like a Ford truck door, an Andersen storm door, or a Pella window—you’ll notice differences in material, thickness, and attachment type.
- Ford/GM/Toyota car doors: Automotive seals are often more robust, with special clips or ridges. Always check the code printed inside the existing strip to match replacements.
- Andersen/Pella/Marvin doors and windows: These usually use grooved vinyl or foam “spline” strips. The fit is critical, so bring a sample or look up your model number online for a match.
- Generic/home weatherstrips: Self-adhesive foam strips are common on older homes. Modern versions tend to be stronger and easier to install.
Let me be honest: universal replacement seals do work in a pinch but might not last as long or fit as snugly as brand-specific versions. If you want a truly “like new” fix, using the right part for your device or door makes a real difference.
When to Call a Pro: Tough Cases and Big Gaps
Most ripped weatherstrips are totally DIY-friendly. But there are a few times when it pays to get help:
- Frame damage: If the toy wrecked more than just the seal—say, there’s a bent door frame or dented metal—you’ll want a pro to check alignment and sealing.
- Electric or automated doors: Some car doors and modern patio units have sensors or wiring along the weatherstrip. If you see wires, don’t poke around. Call a specialist.
- Leaks won’t stop: Tried a repair but still getting water or wind? There may be a bigger issue. A trained eye can pinpoint the real cause.
It’s sort of like troubleshooting a remote that won’t sync or a battery that won’t hold a charge—sometimes the fix is simple, but other times, there’s a deeper problem. Don’t hesitate to ask for help if you hit a wall.
Keeping Your Weatherstrips Safe from Curious Kids
Let’s talk prevention. If you’ve got little ones who love sending remote-controlled trucks or chunky bricks down the hallway, small changes can go a long way.
- Add a door sweep: These attach to the bottom of doors and provide extra armor for the weatherstrip.
- Play zones: Encourage indoor race tracks or “driveways” away from doors and windows. Even a simple rug can help cushion toy impacts.
- Teach gentle closing: Kids love to slam doors. Show them how a tight seal helps keep the house cozy (maybe make it a superhero shield?) to spark some buy-in.
It’s a bit like pairing a universal remote: put in the effort now, and you’ll save headaches later. Weatherstrips are tough, but a little love keeps them doing their job for years—even in the busiest, toy-filled homes.
Finishing Up: Why Fixing That Ripped Weatherstrip Matters
A torn weatherstrip may look like a small problem, but letting it linger can cause more trouble than you’d think—higher bills, unwanted moisture, and extra wear and tear on your doors or windows. The good news is, repairing or replacing it isn’t rocket science. With a few tools, a bit of patience, and the right replacement strip, you can make things good as new—even if the damage started with a toy gone wild.
So next time your home or car’s seal gets caught in the crosshairs of playtime, don’t stress. You’ve got the know-how to handle it—and maybe even a story to tell about the day a toy truck tried to “break in.”