Here’s the thing: whether your entry door is a classic wooden model with push-in rubber stripping or a modern steel style with adhesive, brands like Frost King and M-D Building Products all work pretty much the same way. The job isn’t about brute force or fancy tools—it’s about slow, careful steps. If you can sync a remote or change a battery, you’ve got the skills for this. Let’s break down how to troubleshoot and repair a weatherstrip that’s started to peel away, and get your door sealing like new again.
Why Weatherstripping Matters for Your Home
If you’re wondering whether a floppy or missing weatherstrip is really a big deal, the answer is a strong yes. The *weatherstrip* acts as a tight seal between your door and the frame, stopping outside air and moisture from sneaking in. Without it, your home’s heating and cooling system works overtime, making your utility bills creep up. It’s like wearing a puffy jacket with the zipper stuck open—not very effective.
Beyond comfort and energy savings, a proper seal around your door also keeps out *bugs*, *dust*, and even the occasional *sound* from noisy neighbors or passing cars. That pulled-away bit of weatherstrip is usually easy to spot: maybe it’s sagging, cracked, or completely loose in one section. Sometimes, you’ll feel the draft before you even see the problem.
Let me explain something people sometimes miss: even a small gap can cause big headaches. It doesn’t take much for damp air or rain to find its way through, and repeated leaks can rot your door frame or mess with your flooring. That’s why it’s worth taking the time to repair the weatherstrip on your door stop, even if you think it’s just a “tiny” problem.
Spotting the Problem: Signs Your Weatherstrip Needs Repair
Most people notice something’s off only when they feel a chilly breeze near the door or see daylight peeking where it shouldn’t be. But there are more subtle clues to look for when troubleshooting your weatherstrip. Start by closing the door and running your hand along the edge. If you find a cold spot, or feel a little gust, that’s a dead giveaway.
Visually, you might spot:
- Gaps or cracks: Any visible space between the weatherstrip and the door stop is a sign it’s not sealing.
- Peeling or sagging: If the strip droops down or pulls away from one end, it’s probably lost its grip.
- Sticky or brittle spots: Older weatherstrips can harden, especially if they’re rubber. This makes them less flexible and more likely to pull away.
- Odd noises: Whistling, rattling, or a faint tapping during wind can mean the seal is loose.
You might be wondering—does it matter if only a small section has pulled away? The answer is yes, because even a one-inch gap can let in enough air or water to cause issues. If your door has brand-specific weatherstripping (like Schlage or Frost King), it’s usually easy to find a matching piece for repairs.
Tools and Supplies You’ll Need Before You Start
Honestly, this is one of those repairs where less is more. You don’t need a garage-full of tools—just a few basics and maybe a quick trip to your local hardware store. Here’s what you’ll want to have ready:
- Replacement weatherstrip (if yours is too damaged to reset)
- Strong adhesive (silicone or construction adhesive for glue-on types)
- Small pry bar or putty knife (to lift the old strip, if needed)
- Scissors or utility knife (for trimming the new weatherstrip)
- Measuring tape
- Rag and rubbing alcohol (for cleaning the surface before reinstallation)
- Finishing nails or staples (if your weatherstrip is the nailed-in type)
Let me explain: not every door uses the same kind of weatherstrip. Some snap in; others stick with adhesive; some are nailed or stapled. Take a look at how yours attaches before you start—this will save you time and frustration later. Modern brands like M-D Building Products often make universal weatherstrips that fit most standard doors, but it’s always best to match the original style if possible.
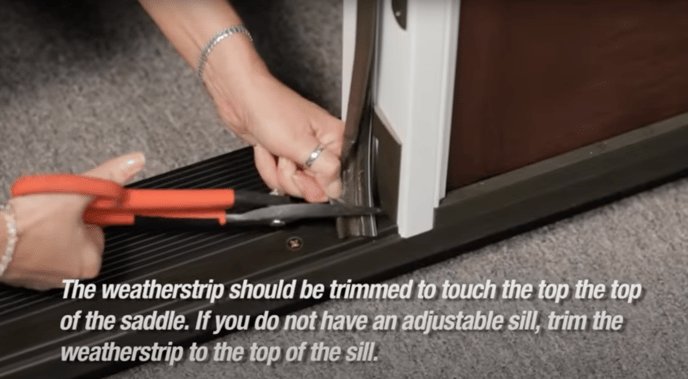
Step-by-Step Guide: Repairing a Pulled-Away Weatherstrip
So, you’ve spotted the problem and gathered your gear. Here’s a clear, slow walk-through for fixing your weatherstrip so it hugs the door stop like it should.
1. Remove or Reset the Weatherstrip
If the strip is just hanging out of place but not damaged, you might be able to press it firmly back in. For adhesive types, though, you’ll often need to remove the loose section and clean away old glue using a rag dampened with rubbing alcohol. For push-in or snap-in styles, gently pry the strip out with a putty knife, being careful not to damage the groove or the strip itself.
2. Clean the Surface
A clean surface is your best friend for this repair. Wipe down the door stop where the weatherstrip sits. Any dust, old glue, or grime left behind will weaken the new bond. If your weatherstrip had nails or staples, pull those out gently with pliers.
3. Reinstall or Replace the Strip
Line up the weatherstrip with the groove or edge. For adhesive types, spread a thin, even bead of glue along the back. For snap-in types, press until you feel or hear it click into place. If you’re using a universal replacement, trim to length with scissors so it fits snugly end to end.
4. Secure and Test the Seal
Hold the weatherstrip in place for a few minutes so the adhesive sets, or add finishing nails if needed. Close the door slowly and check for any remaining gaps. If you see daylight or feel a draft, adjust the strip or gently reposition it until the seal is tight.
Don’t rush. This isn’t a race, and a bit of patience now saves you from having to redo the job later.
Why Weatherstrips Pull Away—and How to Prevent It
Here’s a detail that gets skipped: most weatherstrips pull away over time because of simple wear and tear. Doors get slammed, weatherstrips dry out or shrink, or adhesive loses its stickiness. If your house shifts with the seasons (and honestly, most do), the door frame can move just enough to push the strip out of place.
Humidity is another big culprit. Rubber and foam weatherstrips can swell, shrink, or get brittle if the weather swings from hot to cold. And let’s not forget about curious pets or kids who love to pull on anything that sticks out.
To prevent future issues:
- Check your door seal every season. Give it a quick once-over and fix any small gaps before they get bigger.
- Use high-quality adhesive if you’re replacing a stick-on type. Cheap glues dry out faster and don’t hold up as well.
- Keep the area dry and clean. Water leaks or heavy dirt can break the seal over time.
- Don’t slam the door. It sounds basic, but a gentle close is much easier on the weatherstrip.
Comparing Weatherstrip Types: Which One Works Best?
You might be wondering—do you really need to match the exact brand of your old weatherstrip, or can you use a universal fit? The good news: most weatherstrips are pretty forgiving. Brands like M-D Building Products, Frost King, and even generic “universal” options can work as long as you match the type (adhesive, snap-in, or nailed).
Let’s break down the main types:
- Adhesive weatherstrips are easy to install but tend to pull away over time if the adhesive isn’t top-notch.
- Snap-in weatherstrips are durable and rarely pull away unless the groove wears out or the strip gets brittle.
- Nailed or stapled weatherstrips offer a tight hold, but installation is a bit more involved and leaves tiny holes in the wood.
Here’s a tip: if you’re replacing the weatherstrip, take a small chunk of the old piece with you to the store. It’s much easier to match size, shape, and material in person. And if you’re using a universal option, make sure it compresses enough to form a tight seal but isn’t so thick that you have to slam the door to close it.
Troubleshooting Common Issues After Repair
Let me explain what sometimes happens: you fix the weatherstrip, but now the door won’t close easily, or there’s still a draft. Don’t panic—most of these problems are easy to solve.
- Door won’t close or latch: The new weatherstrip might be too thick. Try a thinner model, or let the door compress the strip a few days so it settles.
- Still feeling a draft: Check for small gaps, especially at the corners. Sometimes the strip needs to be longer, or the groove needs cleaning.
- Adhesive isn’t sticking: Use rubbing alcohol to clean the surface completely, and be sure the area is dry before installing. If it’s still not holding, try a different, stronger construction adhesive.
Pairing the right weatherstrip with proper installation almost always solves the problem. But if after all this you still have issues with leaks, rattles, or drafts, it’s possible your door is warped or the frame is out of alignment. In that case, you may need to reset or shim the door stop (a slightly bigger job, but not impossible for DIYers).
When to Replace Instead of Repair
Here’s the honest truth—not every weatherstrip can be saved. If yours is torn, crumbling, or has lost its shape, replacement is your best bet. Trying to reset or glue old, brittle material is basically putting a band-aid on a flat tire. Modern replacement strips aren’t expensive, and they’re easy to find for almost any door brand or style.
Signs you need a new weatherstrip:
- Cracks, splits, or missing sections that can’t be firmly reattached
- Loss of flexibility, so the strip won’t spring back after being compressed
- Persistent drafts or leaks even after repairing
Installing new weatherstripping is almost the same process as repairing—just take your time measuring and cutting for a snug, gap-free fit. And if matching the color or profile is tough, universal kits are a safe bet for most home doors.
Don’t let a small weatherstrip problem ruin your comfort. Fixing it just takes a little patience, the right tools, and a willingness to slow down and do it well.
Wrapping Up: Keep Your Door’s Seal in Top Shape
A pulled-away weatherstrip can be an annoying, energy-wasting problem—but fixing it yourself is totally doable, even if you’re new to home repairs. The trick is to pay attention to the details: spot issues early, clean surfaces before repairing, and match the right type of strip to your door. Whether you’re working with a brand-specific model or a universal fit, the steps for troubleshooting and repairing are basically the same.
Don’t be afraid to get hands-on—saving a bit of money and feeling that tight, draft-free seal is worth it. And next time you close your door on a stormy night and feel nothing but cozy silence, you’ll know you did it right. Your home (and your utility bills) will thank you.