Honestly, slamming doors and weatherstrips are like oil and water. Even high-quality brands like Pemko or Frost King, known for tough and long-lasting seals, aren’t immune from the kind of damage a forceful door can do. You might not realize how important your weatherstrip is for energy savings, warmth, and comfort until it gets mangled and your door doesn’t close right or a draft creeps in. Let me walk you through what to look for and how to fix it, step by step, in language anyone can understand.
Why Door Slamming Damages Weatherstrips
You might be wondering, “Why does a little slam cause so much trouble?” Here’s the thing: weatherstrips are made from flexible materials—usually rubber, foam, or vinyl—that are designed to compress gently as the door closes. This gentle compression makes the perfect seal and helps with insulation. But when a door is slammed shut, it’s like hammering a soft pad against a hard frame. Over time, this repeated impact can:
- Flatten the weatherstrip so it loses its springy shape.
- Tear or split the material, especially at the corners or latch area.
- Pop the strip out of its channel, making it sit unevenly or hang loose.
Think of it like squishing a marshmallow between two books over and over—eventually, it’s not bouncing back. Once your weatherstrip is deformed, air and moisture sneak in, your heating or AC works harder, and even bugs might get a free pass indoors. That’s why fixing it matters more than you’d think—not just for comfort, but for your home’s long-term health.
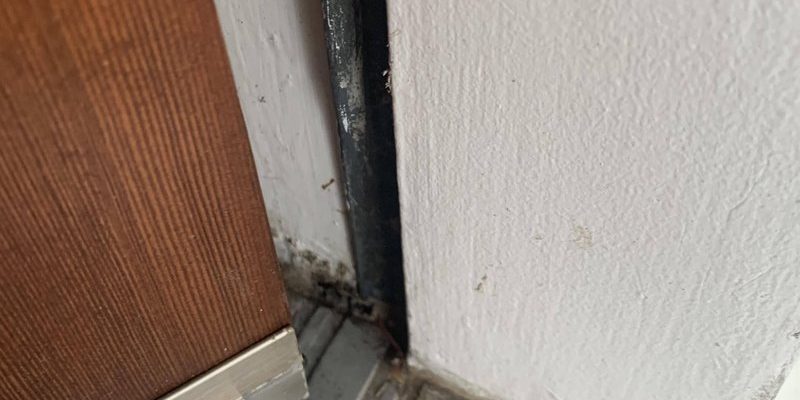
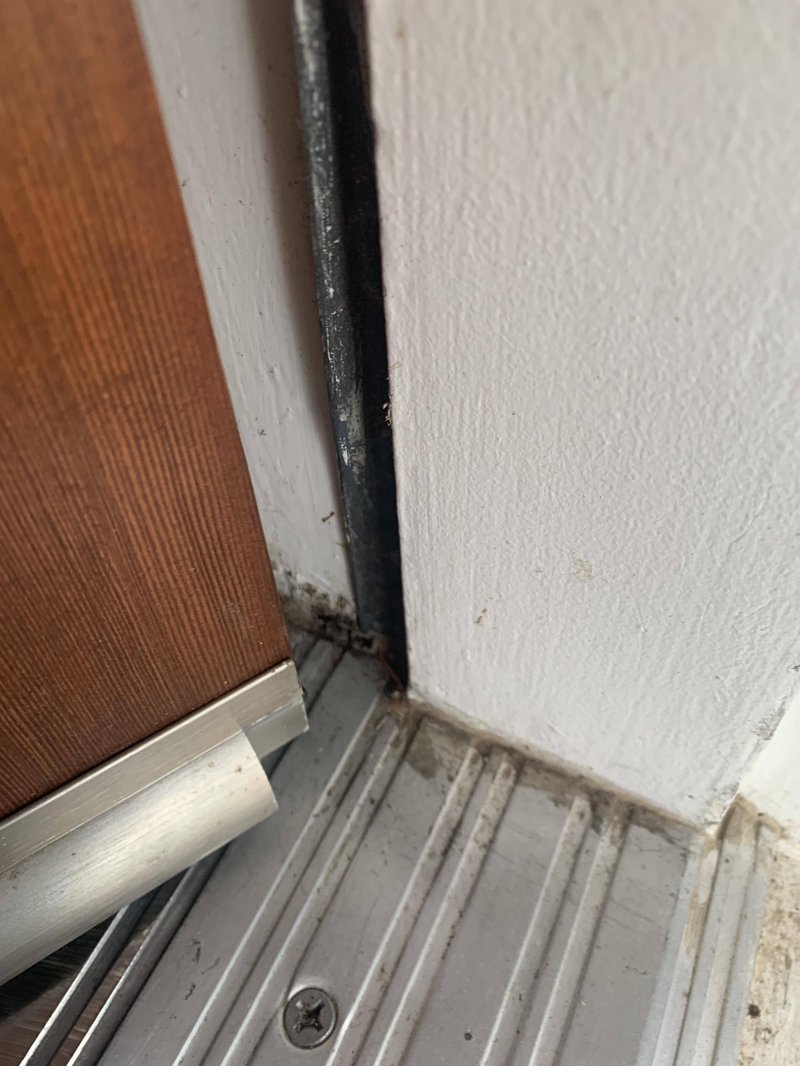
Spotting Weatherstrip Damage After a Slam
Catching the problem early is key. Sometimes, you’ll see obvious damage—a chunk torn away, part of the strip dangling, or a visible gap when the door is closed. But not all damage is so easy to spot. Here’s what to check for:
- Drafts: Stand near the closed door. Feel a chill or breeze? That’s air sneaking past a gap.
- Light leaks: At night, switch on a room light and step outside. If you see light around the edges, the seal’s not working.
- Difficulty closing: Doors that suddenly stick or don’t latch may be pushing back against a twisted or misplaced strip.
- Visual wear: Look for flattened, cracked, or crushed spots—especially at the point where the door usually slams shut.
If you’re thinking, “It looks fine, but my energy bill’s gone up,” don’t ignore your instincts. Even small gaps can make a big impact on your comfort and costs.
Choosing the Right Weatherstrip for Repair
Once you know you need a repair, you’ll want to grab the right replacement. Here’s where folks sometimes get stuck—there are a lot of shapes, sizes, and materials out there.
First: Check if your door uses a standard kerf-in strip (that pops into a groove), an adhesive-backed foam tape, or a screw-on rubber seal. Most residential doors use kerf-in; brands like Pemko and Frost King offer universal options that fit most modern doors.
- For a quick fix: Foam tape is easy to install and cheap, but won’t last as long.
- For long-term durability: Vinyl or silicone kerf-in strips hold up best to heavy use and slamming.
- Matching thickness: Use your fingernail or a ruler to measure the old strip. The new one should be just as thick, but no thicker, or the door might not latch.
Always bring a leftover piece of your damaged weatherstrip to the hardware store. It’s much easier to match the profile and color in person.
If you end up with a choice between a universal weatherstrip and a brand-specific one, it’s usually safest to go with the match from your door’s manufacturer. But honestly, most good-quality universals fit just fine.
Steps to Remove a Damaged Weatherstrip
Ready to start? Here’s how to remove your damaged weatherstrip—no fancy tools or professional skills are required. It’s a little like popping out an old shoelace before you put in a new one.
1. Open the door fully: Give yourself enough room to work around all sides.
2. Locate the weatherstrip’s starting point: If it’s a kerf-in type, look for the end that’s loose or easiest to grab. For adhesive types, you may need to peel from the top corner.
3. Pull slowly: Start tugging gently. If it’s stuck, work a flathead screwdriver or putty knife under the strip to loosen it—but take it slow. You don’t want to tear the groove or scratch your paint.
4. Remove leftover debris: For adhesive weatherstrips, scrub away sticky residue with a little rubbing alcohol on a rag. For kerf-in strips, clear out dust or fragments in the channel.
5. Inspect the frame: If the door frame is cracked or splintered where the strip sits, fill it with wood filler and let it dry before you continue.
That’s it—the hardest part is usually getting all the old gunk out. Take your time here so your new strip will sit snug and straight.
How to Install a New Weatherstrip After Door Slamming Damage
Now for the main event: getting that fresh, springy weatherstrip in place. This is where a steady hand and some patience pay off.
1. Align the strip: Start at the top corner of the door frame. For kerf-in types, push the “T” shaped edge into the groove—use your thumb or a blunt tool (never something sharp!).
2. Work your way down: Insert the strip gradually, pressing every few inches so it seats evenly. Don’t stretch it; let it sit naturally, or it’ll shrink back later and leave a gap.
3. Check the fit at corners and latch: If the strip bunches up or feels too tight, pull it back and reseat. If using adhesive tape, peel off the backing as you work, sticking it in place.
4. Trim to length: Use scissors or a utility knife to cut off any excess at the bottom. Make sure the strip meets flush at corners, with no gaps or overlaps.
5. Test the door: Close it slowly. You should feel gentle resistance, not a hard push. If the door won’t latch, the strip may be too thick, or not seated deeply enough.
Don’t rush—taking time to seat the strip evenly will save you the headache of repeating the job later.
If you hear a soft “whoosh” when you shut the door, congratulations—your seal is back!
Weatherstrip Repair: Quick Fixes vs Full Replacement
Sometimes, you might only need a quick patch, not a full replacement. For example, if just an inch or two is torn by repeated door slamming, a small repair can get you by.
- Foam weatherstrip tape: Cut a piece to size and stick over the worn spot for a temporary seal.
- Super glue or rubber cement: For minor splits in rubber or vinyl strips, a dab can hold things together until you have time for a proper fix.
- Silicone caulk: If you notice a gap between the strip and frame, a thin bead of caulk helps block air leaks.
But here’s my two cents: if more than a few inches are crushed, torn, or stiff, you’re better off just replacing the whole weatherstrip. Patch jobs are fine in a pinch, but a full swap means better energy savings and fewer drafts.
How to Keep Your Weatherstrip Healthy
You’ve fixed the damage—but how do you keep it in good shape from now on? It’s easier than you’d think.
- Close doors gently: Remind everyone in the house to avoid slamming. Even the best weatherstrip can’t handle constant hard impacts.
- Check your door alignment: Sometimes slamming happens because the door latch or hinges are out of sync. Tighten loose screws and make sure the door sits evenly in the frame.
- Routine inspection: Every few months, run your hand along the weatherstrip. Look for cracks, flattening, or gaps.
- Clean regularly: Wipe with a damp cloth to remove dust and debris that can wear down the material.
A little prevention goes a long way—keeping your weatherstrip healthy means fewer repairs down the road.
If your house is especially prone to door slamming (kids, pets, or heavy-footed guests), you might consider a soft-close hinge or a door stopper. These don’t just protect the weatherstrip—they also keep your whole door system in sync and working smoothly.
Universal vs. Brand-Specific Weatherstrip: Which to Choose?
Here’s a choice you’ll face at the hardware store: should you buy a universal weatherstrip or stick with your door’s original brand? (Say, Pemko or Frost King.)
Universal weatherstrips are designed to fit most modern doors. They’re great when you need a fast fix or your door brand is out of stock. A lot of homeowners find these work perfectly for foam and vinyl applications.
Brand-specific strips match your door’s exact profile and thickness. They’re best if your door is custom, older, or has an unusual shape. If you’re in doubt, check the door’s edge for a label or code—sometimes you’ll find a model number you can use to order the correct part.
Here’s a quick comparison:
| Universal | Brand-Specific |
| Fits most doors | Perfect fit for your door model |
| Easy to find and cheaper | Costs more, may need to be ordered |
| Good for temporary or quick repairs | Best for long-term durability |
Honestly, most folks never notice a difference. But if you want that factory-perfect seal—or your door has a trickier profile—brand-specific is worth the extra effort.
What to Watch For After Repair
You’re done! But before you put away your tools, double-check everything to make sure your repair is solid.
- Open and close the door a few times: Make sure it latches smoothly, without sticking.
- Feel for leaks: Move your hand around the frame—if you feel cold, re-seat the strip.
- Listen for rattling: If the weatherstrip is loose and makes noise, press it in deeper.
- Watch for quick wear: If the new strip shows signs of flattening right away, you may need a thinner type or to realign your door.
Sometimes, a new weatherstrip can affect how well your door syncs up with electronic deadbolts or smart locks. If your battery-powered lock seems sluggish, it could be because the weatherstrip is too thick. Always test all features—including code pads or remotes—after your repair to avoid future troubleshooting.
A little patience and a careful hand make a world of difference when you’re learning to repair weatherstrips for the first time.
Final Thoughts on Fixing Weatherstrips Damaged by Door Slamming
Repairing a weatherstrip that’s damaged by door slamming might sound intimidating, but really, it’s a straightforward task once you understand what to look for and the steps involved. The right repair brings your door back in sync, saves you money on energy bills, and keeps your home quiet and comfortable. Plus, you’ll get that satisfying feeling every time you close your door and feel the gentle “click” of a solid seal.
Whether you go with a top brand like Pemko, a simple Frost King foam strip, or a universal option, just remember—take your time, check your fit, and don’t be afraid to troubleshoot as you go. A little care now can save you a lot of hassle later. Happy sealing!