Honestly, fixing a loose threshold (no matter if it’s the simple kind you find in older homes or a click-and-fit piece from a modern kit) isn’t rocket science. But the details matter. If you rush, you might end up with a poor fit, loose screws, or—worse—a chunk of wood that splits the next time someone stomps through. Let’s walk through what causes a threshold to loosen, how to prep and repair it, and why this job is worth doing right. We’ll talk about tools, screws, adhesives, and even how to troubleshoot persistent issues—so you leave with zero wobbles underfoot.
Why Thresholds Loosen and Why It Matters
Thresholds seem pretty sturdy, but the truth is, they take a surprising amount of abuse. Over time, foot traffic, temperature changes, and moisture can all cause the threshold to shift or the screws to back out. If you’ve ever watched someone drag a heavy box across a door saddle, you know it only takes a few good bumps for things to start moving. Some thresholds have metal channels or covers, but most residential jobs use wood or composite materials that are more prone to loosening when the subfloor below swells, shrinks, or flexes.
Here’s the thing: repairing a threshold that’s loosening from the subfloor isn’t just about keeping your house pretty. If you ignore it, you’re inviting squeaks, tripping hazards, and even water leaks—especially near exterior doors. The gap can also let drafts or insects sneak in. Maybe that’s not a huge concern today, but it will be when you’re trying to keep your heating or cooling bill under control. So, fixing the problem early is smart—and saves you from bigger headaches later.
You might be wondering: is this a problem with the remote type of threshold, or does the brand matter? Honestly, most thresholds—even between big-box brands—use similar fastening systems. What’s different is the style of the threshold (flat, angled, or stepped), and sometimes, the code for how it seals or transitions between different floors. But the main solution—getting the saddle tight to the subfloor—is universal.
How to Check for a Loose Threshold
Before you grab your toolbox, it’s important to understand what you’re dealing with. Start by pressing firmly on different spots along the threshold. Does it move, creak, or feel spongy in any places? If so, there’s your trouble spot. Sometimes, only the ends or the middle sections are loose. Other times, the entire thing is ready to pop free with a tug.
Take a close look for gaps between the threshold and subfloor, or between the threshold and the door frame. A flashlight can help here—shadows will show even the tiniest lift. In some cases, the old screws or nails have backed out, and you’ll see the heads sticking up or lying nearby. If your threshold is covered by a plate or vinyl strip, gently pry it up to see the fasteners underneath.
If you notice rotten wood, crumbling subfloor, or signs of insect damage, pause: you’ll need to replace or repair those issues before resetting the threshold. There’s no shortcut—fastening into bad wood won’t last. But if it’s just loose hardware or minor wood wear, you’re probably clear to continue. Note which screws look stripped, and check if any adhesives have failed or turned brittle.
Tools and Materials You’ll Need
Let me explain—this is a job where the right tools can mean the difference between an annoying afternoon and a smooth, satisfying repair. Here’s a simple checklist for repairing a threshold that’s loosening from the subfloor:
- Electric drill and driver bits
- Screw extractor kit (if old screws are stripped)
- Wood screws (longer than the originals, if possible)
- Construction adhesive (like Liquid Nails or similar)
- Wood filler or epoxy (for minor subfloor repairs)
- Hammer and small pry bar (for removing the threshold, if needed)
- Utility knife or chisel (for trimming or cleaning up edges)
- Vacuum or shop vac (to clear debris)
- Replacement threshold (if the original is damaged or warped)
Pro tip: If you’re repairing a threshold near an exterior door, look for fasteners and adhesive rated for exterior use—they’ll handle moisture and temperature swings better than indoor-only products. And don’t skip the vacuuming step; dirt or dust under the threshold acts like tiny ball bearings, making everything feel loose again, no matter how tight you drive the screws.
Step-by-Step: Repairing a Loose Threshold
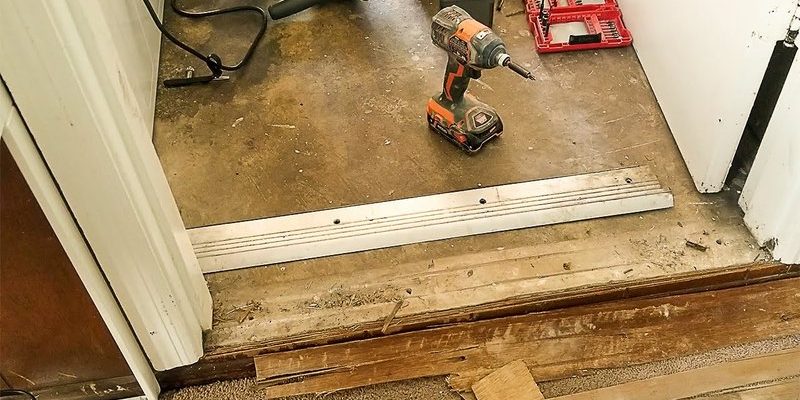
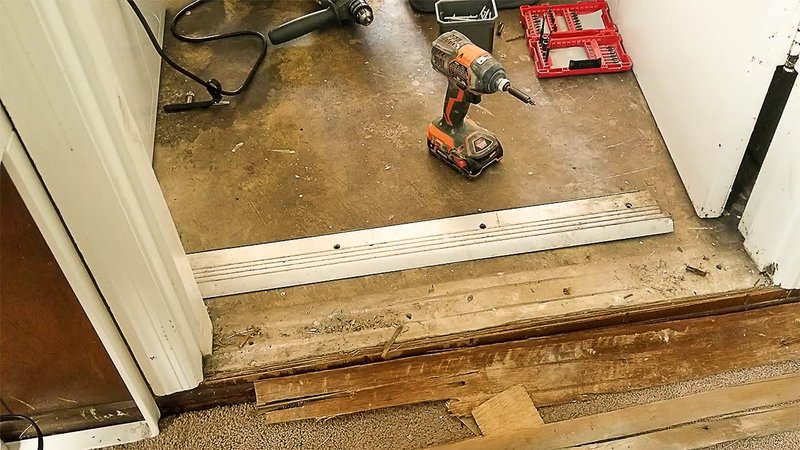
Fixing a threshold that’s loosening from the subfloor is usually a one-afternoon job, but going step by step will make sure you don’t miss any details. Here’s how to do it:
1. Remove the Old Fasteners
Start by taking out any old screws or nails holding the threshold down. If they’re stripped, use a screw extractor—don’t just pry them up or you’ll damage the threshold. If you’re working with a remote-type threshold (the kind that snaps or slides into place), check for hidden clips or retaining screws before lifting.
2. Lift and Inspect the Threshold
Carefully lift the threshold. If it’s stuck, use a pry bar and a block of wood to avoid marring the surface. Check the subfloor for damage—look for rot, mold, or signs of water. If the subfloor is solid but worn, you can fill minor gouges with wood filler or epoxy and let it cure completely.
3. Clean and Prep the Area
Vacuum thoroughly, especially under the threshold area. You want a perfectly flat, dust-free surface. If the underside of the threshold has old adhesive, scrape it off with a chisel or utility knife.
4. Reattach With Screws and Adhesive
Apply a strong construction adhesive to the bottom of the threshold. Set the threshold in place, making sure it fits tightly and lies flat. Drill new pilot holes through the threshold and into solid subfloor (avoid putting screws in the exact old holes if possible). Drive in new, longer wood screws for a stronger grip.
5. Test and Clean Up
Once installed, press on the threshold to test for movement. If all’s tight, replace any covers or plates you removed, and tidy up. If you used wood filler or epoxy, sand and touch up any exposed wood to blend with the surrounding floor. Done right, your threshold should feel rock solid—with no “give” underfoot.
Common Problems and Troubleshooting Tips
Thresholds can be stubborn. If you finish your repair and the threshold still feels loose, don’t panic. Here are a few troubleshooting tips:
- Subfloor is too damaged: No amount of screw torque will hold if the subfloor is crumbling. You’ll need to cut out and patch that section before refastening the threshold.
- Threshold is warped: Sometimes, a wooden threshold will bow or flex with changes in humidity. If it won’t sit flat after cleaning and prepping, it’s better to replace it—don’t force it into place.
- Adhesive didn’t cure: Construction adhesive needs pressure and time to bond. If you rush and walk on it too soon, it may slip. Let it cure fully per the manufacturer’s code before putting furniture or heavy traffic on it.
- Mismatched hardware: Mixing screw types or using oversized heads can make the threshold stand off from the floor, defeating the repair. Match screws to your threshold’s brand or style for the cleanest look.
And here’s something that often gets missed: thresholds that sit between two different flooring types (for example, carpet and tile) may need specific transition strips or ramps. Don’t just reuse the old saddles if they’re not the right fit for both surfaces—otherwise, you’ll always have movement.
Alternative Fixes: When to Replace the Threshold
In some cases, no matter how careful your repair, the threshold just won’t hold. Maybe the wood is split, the metal is bent, or previous repairs have stripped out all the good wood in the subfloor. If so, it’s time to replace the entire threshold.
Replacement thresholds aren’t expensive, and honestly, the installation process is almost the same as a repair—just add a few extra steps for measuring and cutting. Bring your old piece to the local hardware store to match profile, width, and height. Some universal thresholds can be trimmed with a saw to fit odd doorways.
When installing a new threshold, take the time to seal the edges with caulk or weatherproofing if it’s an exterior doorway. This keeps water from finding its way under the threshold and damaging your fresh work. And as always, use the right screws and adhesives for your flooring type.
Extra Tips for Longevity and Durability
Everyone wants their repair to last. Here are a few ways to get the most life out of your newly reattached threshold:
- Seal the ends: Especially for exterior thresholds, apply a thin bead of caulk at the ends where the threshold hits the door frame. This keeps moisture out.
- Use longer screws than the originals: The deeper the screw bites, the more stable everything feels. Just make sure you’re not popping out the other side of the subfloor.
- Check your work every season: Changes in weather can loosen things up. Give your thresholds a wiggle a couple of times a year, and retighten as needed.
- Choose the right materials: For high-traffic or wet areas, consider composite or metal thresholds over wood for better long-term performance.
If you’re dealing with a remote code, syncing issues, or need to pair a threshold for a smart home system—which I admit sounds far-fetched, but the way “smart” everything is going, who knows—be sure to follow the manufacturer’s troubleshooting steps. For good old-fashioned wooden and metal thresholds, though, old-school repairs work best.
When to Call a Pro
Let’s be real. Most DIYers can handle repairing a threshold that’s loosening from the subfloor. But if the job reveals serious subfloor rot, water damage, or structural problems with your doorway, it’s time to phone a pro. The cost of a quick consult now is way less than fixing a sagging door, mold issues, or major floor repair later.
A professional can also tackle tricky situations—like stone thresholds, transitions over radiant heating, or custom heights. If you’re not sure your repair will hold, or you’re stumped after a couple of attempts, don’t be shy about getting help.
“A good threshold repair should disappear underfoot—you shouldn’t have to think about it for years to come.”
Wrapping Up: Enjoying a Secure Threshold
At the end of the day, a tight, solid threshold is one of those small home details that makes a big difference. It’s easy to overlook until it loosens, but once you fix it, you’ll feel the difference every time you walk through the door. Take your time, pick the right tools and materials, and follow each step for a repair that’ll last. You don’t need fancy skills—just some patience, a basic toolkit, and a willingness to banish wobbles for good. Now your floors, feet, and heating bill can all rest a little easier.