Think of your door frame like the quarterback of your home’s exterior—if it’s injured around a crucial play (the lock or hinge), the whole team is at risk. A split frame around hardware isn’t just a cosmetic issue; it’s a weak spot you’ll want to fix before it gets worse. Luckily, you don’t have to be a master carpenter or own a truckload of tools. With a few supplies and a bit of patience, you can repair a split door frame so it’s sturdy, secure, and weather-tight again.
Let’s break down exactly how to handle a split door frame—especially around those tricky installation points where the hardware goes. Whether you’ve got a classic wooden entry door, a steel-clad frame, or one of those composite models from major brands like JELD-WEN or Masonite, the process is pretty similar. Here’s what you need to know (and do).
Why Do Door Frames Split Around Hardware?
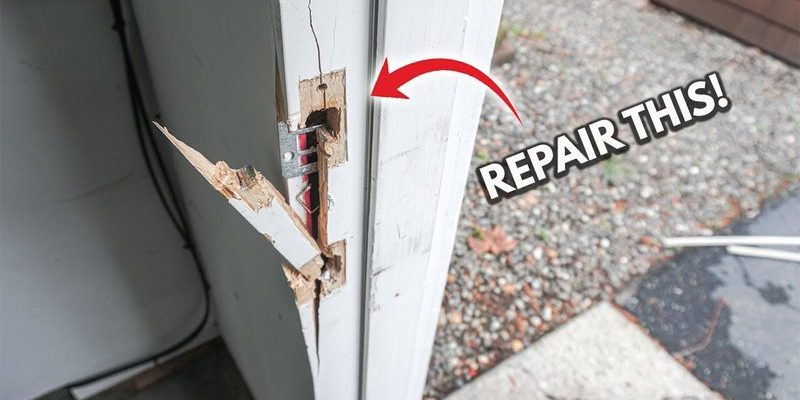
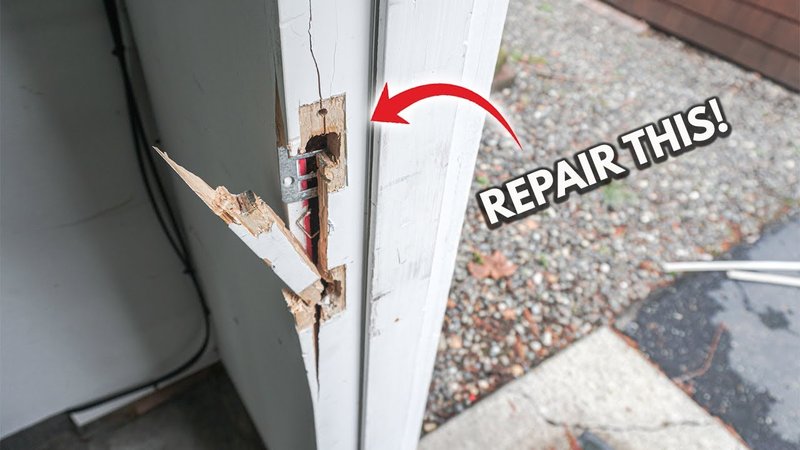
Hardware installation points—like where your lock, latch, or hinges live—take a beating. Every time you open, close, or yank on the door, you’re putting stress on those spots. Over time, especially if you use longer or thicker screws (or maybe over-tightened something during install), the wood around the screws can split open. Honestly, it’s a pretty common DIY problem, especially with older, softer wood or if you didn’t predrill holes.
You might be wondering: is this really that big a deal? Here’s the thing: a split frame isn’t just ugly. If the crack gets worse, the hardware can loosen up, making your door wobbly or hard to close. Worse, it can be a security risk—making it easier for someone to force the lock. The frame is supposed to transfer force and hold everything together. When it’s split, it can’t do its job.
With exterior doors, exposure to rain or humidity can make splits worse. Water can sneak into those gaps, swelling the wood or even causing rot. That’s why it’s smart to tackle the repair sooner rather than later, especially before you start troubleshooting bigger problems like leaks or jammed locks down the road.
What You’ll Need: Supplies and Tools for the Job
Let me explain what you really need to fix a split door frame—no need for fancy gear. Most repairs call for basic supplies you can find at any hardware store. Here’s a quick rundown:
- Wood glue: Look for waterproof, exterior-rated glue (like Titebond III). That’ll hold up to weather and give you a strong, lasting bond.
- Clamps: These will squeeze the split shut while the glue dries. If you don’t have specialty clamps, a sturdy rope or even heavy-duty tape can sometimes work.
- Wood filler or epoxy: For gaps that won’t squeeze shut completely, or to reinforce around screw holes.
- Sandpaper (medium and fine grit): To smooth everything out before painting or staining.
- Drill (with bit set): For cleaning out or re-drilling pilot holes if needed.
- Wood screws: Sometimes you’ll want to swap in new screws (longer, if possible) to try to reach fresh wood deeper in the frame.
- Paint or exterior touch-up finish: To seal up the repair and keep out moisture.
Honestly, you don’t have to spend big. The most important part? Quality glue and a way to clamp the joint tightly while it dries. If the split is especially bad—let’s say the wood has chunks missing or there’s rot—you might need a small wood patch or even a replacement piece. But for most splits around door hardware, this basic list will cover you.
Step-by-Step Guide: How to Repair a Split Door Frame Around Hardware
Ready to get hands-on? Here’s how to handle a split exterior door frame, especially right around those hardware points.
- Remove the hardware: Pop out the screws holding your lock, latch, or hinge in place. Set the hardware aside—this gives you room to work and lets you see the full extent of the split.
- Clean the split: Use a stiff brush or a blast of compressed air to clear out any dust or debris inside the crack. If there’s old glue, scrape it away with a utility knife.
- Apply wood glue: Squeeze a bead of glue deep into the split. Use a thin stick or toothpick to push glue into every nook and cranny. Don’t be stingy—the glue is what’ll hold this together for years to come.
- Clamp and wait: Press the split shut as tightly as possible. Use clamps, rope, or even strong tape to keep pressure on the joint for as long as the glue instructions say (usually 4–8 hours minimum).
- Fill and sand: If there are small gaps left, or damaged screw holes, fill them with wood filler or epoxy. Once dry, sand the area smooth so it blends in.
- Redrill pilot holes (if needed): If the screw holes are loose or damaged, drill new pilot holes—slightly deeper or slightly over—from the old spot.
- Reinstall the hardware: Reattach your hardware using fresh screws if possible. For extra strength, go with screws a half-inch longer than before (as long as they don’t poke through the other side).
- Paint or seal: Finish by touching up with matching exterior paint or stain to protect the wood from weather and keep the repair hidden.
If you take it step by step, this whole project usually takes less than a day—including drying time.
Tips for Strengthening Your Repair (So It Lasts)
No one wants to fix the same split twice. If you want your door frame repair to last, a little extra effort goes a long way. Here’s what I always do when I’m dealing with a troublesome area:
- Use longer screws: In places like hinge or deadbolt mounts, longer screws bite into the wall framing—not just the door frame. That gives your hardware a much sturdier hold.
- Double up on glue: If the crack is especially stubborn or the fit isn’t perfect, try a two-part wood epoxy instead of regular glue. It’s tougher and fills gaps better.
- Reinforce with a metal plate: For really bad splits, a small mending plate (hidden under the strike plate or hinge) can make the area nearly bombproof. Just screw it across the split before reinstalling your hardware.
- Seal, seal, seal: Paint or exterior caulk around the repair helps keep out water, which is the real enemy of any exterior wood.
If you’ve got a fancy door brand (like Andersen, Therma-Tru, or Pella), the basic steps still work—but double-check the manual, since some models have extra layers or composite materials under the wood veneer. Never force oversize screws into composite or steel-clad frames; use brand-approved hardware so you don’t void warranties or mess up the integrity of the door.
Dealing With Larger or Old Splits: When a Simple Fix Isn’t Enough
Sometimes a split around a hardware point is more than just a clean crack. Maybe the wood’s crumbly, or a chunk fell out when the old screw came loose. At that point, your best bet is to do a slightly more involved repair.
- Patch with wood: If there’s a missing section, cut a small piece of matching wood and glue it into place, shaping it to fit the gap. Clamp until dry, then sand smooth.
- Try wood epoxy: For big gaps or rot, a two-part epoxy can be molded to fill the area. Once cured, it sands and drills just like real wood—perfect for mounting hardware again.
- Check for deeper problems: If you keep getting splits in the same place, or if the frame feels mushy (signs of water damage or rot), you may need to replace a whole section of the frame. Not fun, but sometimes necessary to restore security and weatherproofing.
Here’s the thing: if the split is longer than 6–8 inches, or the hardware keeps coming loose even after repair, don’t be afraid to call in a pro. Especially if your door frame is load-bearing or connected to security features like smart locks or alarm sensors.
Fixing Split Frames on Modern vs. Older Doors
Honestly, fixing a split on a modern exterior door frame isn’t much different than on an old-school wood frame, but there are a couple quirks. Many newer doors from brands like JELD-WEN or Masonite use layered construction—wood veneer over a core of composite or even metal. In this case, a split in the face layer is mostly cosmetic, but you’ll want to use a glue that bonds well with both wood and whatever’s underneath.
Older, solid-wood doors tend to split a bit deeper, and you’ll often need to mount longer screws or reinforce more aggressively. On very old frames where the wood is soft or brittle, sometimes the repair is just buying time until you can swap out for a new jamb or threshold. But a careful repair can easily give you another few years of solid use.
When you’re troubleshooting what kind of frame you have, check the cross-section around the split (like near the lockset or hinge mortise). If you see layers, go easy—don’t drive screws past the wood and into foam or composite. If you see solid wood, you’ve got more “meat” to work with.
How to Prevent Future Splits Around Hardware
If you’ve gone through all the work to repair a split exterior door frame, you don’t want to end up doing it all over again. Here’s a little advice from experience, so your fix actually sticks:
- Pilot holes are your best friend: Always predrill screw holes before installing hardware, especially in hardwoods or near the edge of the frame. This prevents the wood from splitting under pressure.
- Don’t overtighten screws: It’s easy to “muscle” the hardware, but once you feel resistance, stop. Stripping out the hole or wrenching the screw too tight can crack the frame.
- Use the right screws: Match the screw length and type to the frame material. If in doubt, take a sample or hardware model number to the store.
- Seal exposed wood: Even a small dab of paint or sealer around a new screw hole shuts out water and helps prevent swelling or splitting in the future.
Think of this as basic home security and maintenance—it only takes a few extra minutes, but it’s worth it to avoid another split (and another repair session).
When Should You Replace Instead of Repair?
Sometimes, a patch job just isn’t enough. Here’s how you’ll know it’s time to swap out your exterior door frame instead of fixing another split:
- Splits keep coming back: If you’ve repaired the area two or three times and hardware still loosens up, the wood may be too weak or rotted for glue to hold.
- Multiple splits or rot: If you see lots of splits up and down the frame, especially near the bottom where water collects, replacement beats repair.
- Frame out of alignment: If the door doesn’t close right, or you see daylight around the edges, fixing a split won’t solve the bigger problem.
- Security concerns: If you’re installing smart hardware, deadbolts, or alarms, you want max strength. Sometimes, a new jamb or steel reinforcement is worth the investment.
Most hardware stores sell pre-primed jamb kits that can be cut to fit and installed in a single afternoon. This is a bigger DIY, but if your frame is shot, it’s the safest move.
Closing Thoughts: A Simple Fix That Makes a Big Difference
Repairing a split exterior door frame around hardware installation points might seem intimidating, but it’s a totally doable project for most homeowners. With a little glue, some patience, and the right approach, you can restore strength, security, and looks to your door way faster (and cheaper) than replacing the whole thing. Remember, tackling the problem early is key—waiting only lets moisture, bugs, or worse, more splits, creep in.
If you keep up with maintenance—check your frames for splits, use proper screws, and seal up exposed wood—you can avoid bigger headaches down the line. Whether you’re using a classic wood entry or a modern composite frame, a sturdy repair means less troubleshooting, better security, and peace of mind every time you lock the door.