Let’s say you’re dealing with a GM-brand car door weatherstrip. This classic “bulb” style rubber seal—a tube-shaped strip with a hollow middle—runs around the edge of the door. When it’s in good shape, you barely notice it. When it rips or compresses, it’s a constant annoyance. Maybe you’re slamming your car door harder, or you feel cold air sneaking in on your morning drive. Honestly, fixing or repairing this little rubber bulb isn’t as intimidating as it might sound. With a bit of know-how and a careful touch, you can bring that seal right back to life—or at least buy yourself some time before a full replacement.
How a Bulb Weatherstrip Works and Why It Fails
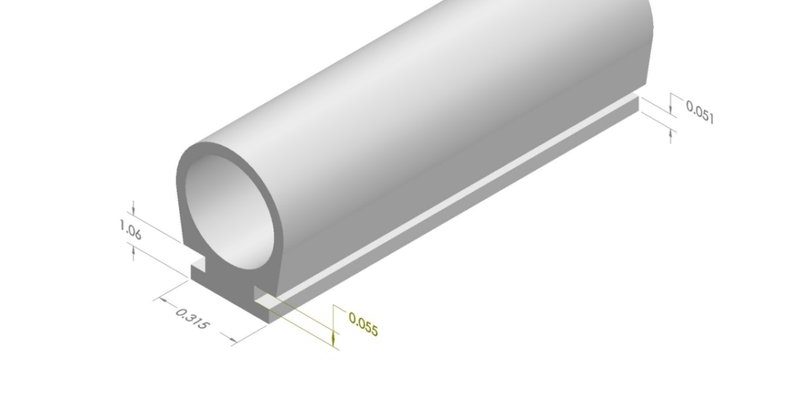
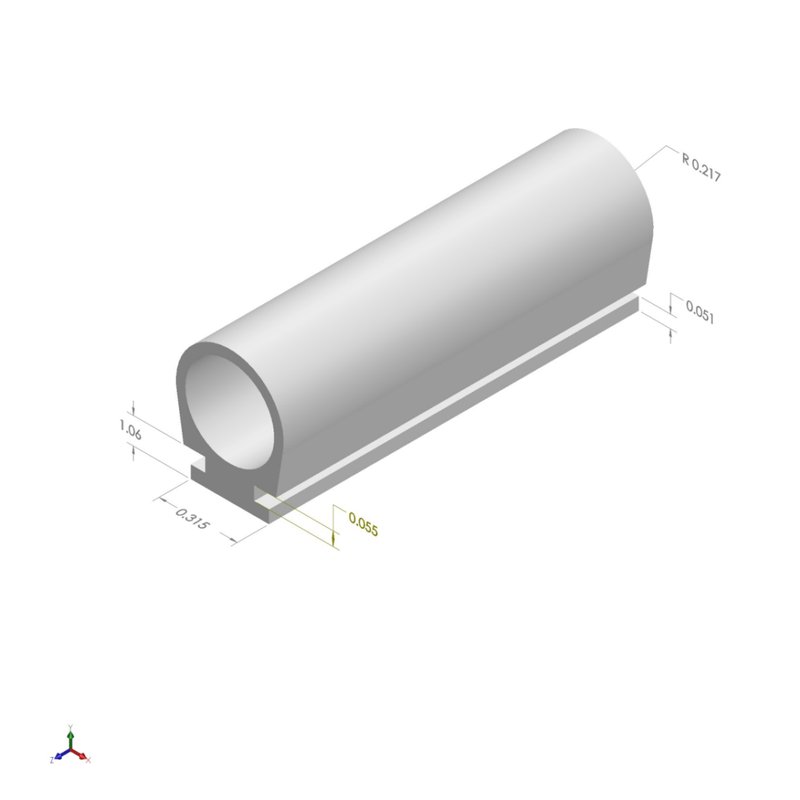
You might be wondering what makes these rubber bulb weatherstrips special compared to other door seals. The magic is in their shape: imagine a thin, flexible tube—kind of like those long balloons you twist into animals, but a lot sturdier. The “bulb” refers to the rounded, air-filled part. When the door closes, the strip compresses, making a tight barrier against the outside world.
Over time, though, rubber bulb weatherstrips run into some common problems. Sunlight, freezing temperatures, and everyday use cause the soft rubber to break down. It might get brittle and crack, flatten out from being squished, or even come unglued from the frame. On a GM car, you’ll often see the lower portions—where water sits or people kick the door—start to wear out first.
When the weatherstrip fails, it’s not just about comfort. Water leaks can cause mildew and rust, while lost insulation means you’re fighting harder to keep your space warm or cool. Even annoying squeaks or wind noise while you drive can be traced back to a tired rubber seal. Let me explain: you’d be shocked how much peace and quiet comes from that simple bit of squishy rubber doing its job right.
Diagnosing Damage: Signs Your Weatherstrip Needs Repair
Before you start hunting for supplies or tools, it pays to check if your bulb weatherstrip really needs repair. Here’s the thing: not every problem is obvious at a glance. Go slow, use your hands and eyes, and you’ll spot issues a casual look might miss.
- Visible cracks or splits: Run your fingers along the strip. If you feel rough edges, see splits, or spot holes, those are clear warning signs.
- Compressed or flattened areas: Does the rubber pop back after you press it? If it stays flat, it’s lost its spring—and its sealing power.
- Loose or peeling adhesive: Gently tug at the weatherstrip. If it pulls away from the metal or frame, the glue’s failing.
- Leaks, drafts, or noise: Listen and feel as you drive or during a rainstorm. Are you noticing extra wind noise, water on the floor, or cold spots?
Sometimes you’ll notice a “whistling” sound at highway speeds, or you might have to slam your door harder than usual. If you see black streaks on your windows, that’s rubber residue left behind—another subtle clue. Diagnosing early means you can patch things up before they get any worse (or more expensive).
What You’ll Need: Tools and Materials for a DIY Repair
Before jumping in, make sure you’ve got the right tools and supplies. You don’t need a full mechanic’s kit, but a few basics will make life a lot easier. Here’s my usual shortlist for fixing a GM rubber bulb weatherstrip:
- Replacement adhesive or weatherstrip glue: GM recommends a special trim adhesive for a strong, flexible bond.
- Rubbing alcohol or mild cleaner: Clean off old glue and grime so the patch sticks.
- Scissors or a utility knife: You’ll need a clean cut for patches or trimming the strip.
- New rubber strip (optional): If a section is really bad, you might replace just a small part, rather than the whole thing.
- Small brush or rag: For applying glue and cleaning up.
- Masking tape or clamps: Handy for holding things in place while the glue dries.
Some repair kits even come with tiny rubber “inserts” that fit inside the hollow bulb to restore its bounce. If you’re just patching a split, you might only need a bit of adhesive and tape. For bigger jobs, having extra weatherstrip on hand means you’re ready for anything.
Step-by-Step Guide: Repairing a Damaged Bulb Weatherstrip
Let’s walk through the actual repair. Whether it’s a split in the rubber or a loose section, you’ll want to work slowly and keep things tidy. Here’s how I approach it on a GM car door weatherstrip:
- Clean the area first. Use rubbing alcohol to wipe down both the weatherstrip and the metal frame. This removes dirt, old glue, and oils so the new adhesive can grab on tight.
- Trim away the damage. If you spot a hole or tear, cut a clean line around it using your scissors or knife. For just a split seam, you can skip this step.
- Apply adhesive. Squeeze a bead of weatherstrip glue inside the split or along the cleaned area. Be careful not to gob it on—less is more here. Gently press the rubber edges together.
- Hold it tight while it sets. Use masking tape, a clamp, or your fingers to keep the strip in place while the glue cures. This usually takes 30 minutes to an hour, but check your glue’s label for exact times.
- Patch or reinforce if needed. For bigger holes, you might cut a small piece of new weatherstrip and glue it in as a patch. Some people tuck a small bit of foam or a rubber rod inside the bulb to “plump up” sunken spots.
- Let it dry completely. Don’t slam the door or handle the strip until everything’s fully set—usually overnight.
Take your time, especially with the glue. Rushing here is what leads to messy repairs and sticky doors later on.
Pro Tips: Getting the Best, Longest-Lasting Repair
Here’s the thing—weatherstrip repairs don’t have to be perfect, but a little extra care goes a long way. If you want your fix to last (and not have to redo it in a few weeks), keep these tips in mind:
- Use the right adhesive. Generic super glue is tempting, but it can harden and crack. Automotive or weatherstrip-specific glue stays flexible.
- Work in warm, dry weather. Cold or humidity can mess with how well the adhesive cures.
- Support the bulb shape. For flattened areas, gently fill the inside of the bulb with a small foam strip or weatherstrip insert before gluing it shut. This helps it bounce back.
- Don’t overstretch the strip. When replacing a section, let the rubber rest at its natural length. Pulling it tight can cause early failure.
If you’re dealing with a door you use constantly—like a driver’s side car door—be ready to check the repair after a week or so. Sometimes it needs a little extra glue or a retouch.
When To Replace, Not Repair
Repairs can work wonders for small splits or loose edges, but sometimes, replacing the whole bulb weatherstrip is just easier—and smarter for the long run. Here’s when you should consider a full swap:
- Lengthy, crumbling cracks: If the rubber is falling apart along most of its length, little patches won’t hold up.
- Major water leaks or drafts: No matter how many repairs you make, if you’re still dealing with moisture or cold air, replacement is the best fix.
- Loss of flexibility: If the strip is stiff and doesn’t compress at all, time’s up; the foam or air inside can’t be revived.
GM (and other brands) sell OEM replacement strips that are cut and molded to fit. While aftermarket or universal bulb weatherstrips are available, be careful—they might need trimming or extra glue and may not match the original “snap” that a custom-fit part gives. Replacement takes a little more time and money up front, but you save on endless patch jobs.
Alternative Fixes: Universal Weatherstrips and Quick Hacks
Sometimes finding a matching weatherstrip for your old GM car is like hunting for a unicorn. If you’re stuck or waiting for a special order, universal weatherstrips can hold you over. These are generic rubber bulb strips sold in rolls at auto parts stores or online.
Here’s what to know: Universal strips can work in a pinch, but usually need trimming for length and a careful hand with the glue. They don’t always have the exact “fit” of the original, especially in corners or around latch areas. But if you line them up, press them on firmly, and let the adhesive cure, they can do a surprisingly good job sealing out wind and water.
For quick fixes on the road, I’ve even seen people tape over a split with strong weatherproof tape, or stuff foam rod into the bulb and cover it with glue. These hacks aren’t pretty or permanent—but in a storm or a pinch, they can save the day until you can do a real repair.
Maintaining Your New or Repaired Weatherstrip
You finally fixed (or replaced) your bulb weatherstrip—now, let’s talk about keeping it in good shape. Here’s a thing most people skip: a little care every so often makes that soft rubber last a whole lot longer.
- Clean it gently. Wipe dust, dirt, and de-icing salt off with a damp cloth. Mild soap works if things get grimy, but avoid harsh chemicals or abrasives.
- Condition the rubber. Products like silicone spray or rubber protectant help keep the strip soft and flexible. Apply a light coat and buff off any excess.
- Check for wear periodically. Once a month, run your fingers along the strip, especially after storms or car washes. Catching small cracks early means quicker, easier fixes.
- Mind the door slam. If the door feels stiff or you notice resistance, check the alignment before forcing it closed—sometimes a shifted strip is misaligned rather than stuck.
Take a few minutes with each season change to inspect and condition the weatherstrip. That way, you’re ahead of leaks, noise, and all those little annoyances before they turn into big headaches.
Wrapping Up: Why Weatherstrips Deserve Your Attention
Repairing a rubber bulb weatherstrip—like the ones on a GM car door—might seem small, but it can make a world of difference in comfort, quiet, and even how your vehicle (or home) ages. With the right tools, a bit of patience, and a careful touch, you can patch, reinforce, or replace a worn-out weatherstrip without breaking the bank. And if you keep your eye on the condition of these little rubber barriers, you’ll avoid most of the leaks, rattles, and drafts that can sneak up on you.
So, next time you hear a whistle of wind or spot a drip after rain, check that weatherstrip. Honestly, taking a little time for repair now can save you a lot of hassle in the long run—and that’s a fix worth making.