Here’s the thing: fixing a scratched exterior door frame around the strike plate isn’t just about keeping things pretty. It can also prevent moisture, bugs, and even more serious damage from sneaking in. Most exterior doors (think: classic wood, steel, or fiberglass in popular brands like Jeld-Wen, Masonite, or Andersen) have frames with paint or stain. That finish is their first line of defense. When it gets worn, the frame can start to rot or rust underneath if you ignore it for too long.
So, what’s the best way to repair a scratched door frame by the strike plate—without making a mess or paying for a whole new door? Let’s walk through the process step by step, from figuring out what you’re dealing with to getting your frame looking fresh (and protected) again.
Spotting and Understanding Door Frame Scratches Around the Strike Plate
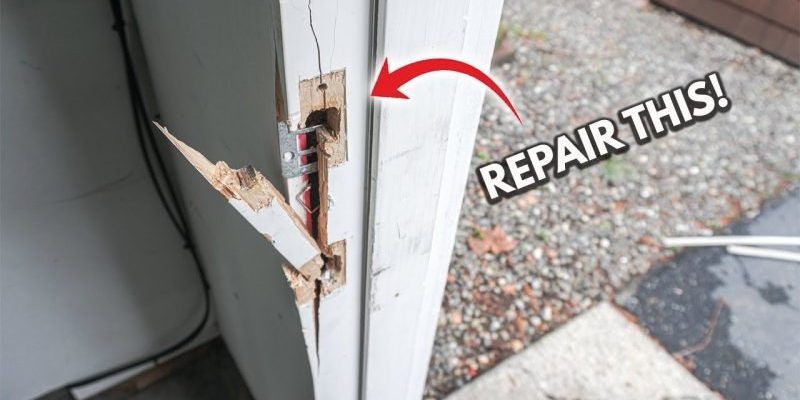
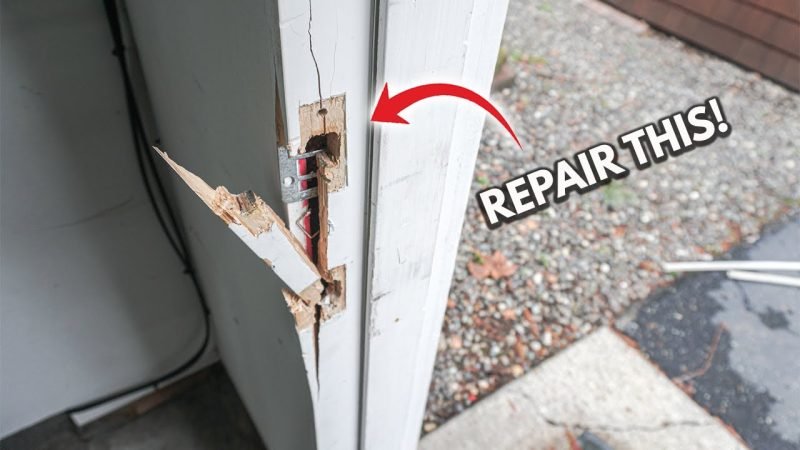
Before you jump into fixing anything, it helps to know what you’re working with. Scratches and gouges around the strike plate are incredibly common, especially on exterior doors where the frame meets the heavy metal plate. Sometimes, it’s just a surface scratch from keys, rings, or the deadbolt missing its mark. Other times, you’ll spot deeper chips or even crushed wood if the door has been forced or kicked.
Honestly, I’ve seen folks panic over a scratched frame when it’s just paint, and others ignore something serious—only to find out later that moisture had started creeping in.
Take a good look in natural light. Ask yourself:
- Is the scratch shallow, just in the paint or stain?
- Does the wood itself feel soft or splintered?
- Is there bare wood, rust, or signs of water?
- Has the strike plate come loose or shifted?
If you see any soft or rotten wood, or the strike plate is loose, you’ll want to address that before simply slapping on some paint. For most minor to moderate scratches, though, you’ll be able to make it look good as new with a little patience and the right steps.
Gathering the Right Tools and Materials for the Job
You don’t need a full workshop to fix a scratched exterior door frame around the strike plate, but having the right tools on hand will make everything smoother. Here’s a checklist for most jobs:
- Fine-grit sandpaper (220–320 grit for smoothing paint or surface scratches)
- Wood filler or putty (for deeper gouges)
- A putty knife (metal or plastic—either works)
- Primer (exterior-grade, especially if you see bare wood)
- Exterior paint or stain (matched to your door frame’s color)
- Painter’s tape
- Clean rag or tack cloth
- Screwdriver (in case you need to remove the strike plate)
Let me explain why each is important. Sandpaper evens out rough edges, while wood filler closes up deeper dings so they won’t just suck up paint and stay visible. Primer is the key to a lasting repair—especially with exterior doors (rain, sun, and wind will quickly ruin a shortcut here). And don’t forget, matching paint or stain matters more than you’d think. A color mismatch can make your fix stand out even more than the original scratch.
Prepping the Door Frame for Repair
The prep stage is where most people try to rush—and it shows in the finished result. Trust me, those five extra minutes up front will save you a lot of repainting (or re-sanding) later.
Start by removing the strike plate if possible. Most are held in with two screws. This lets you sand and paint right up to the edge without leaving globs of material behind the plate. If your frame has sensors, wiring, or anything connected to a smart lock, be careful not to damage or disconnect them. Sometimes, just loosening the plate and taping it out of the way is enough.
Next, use your sandpaper to gently smooth out the scratched area. Wipe away all dust with a damp cloth or tack cloth so nothing gets trapped in the next layers. If you find a gouge deeper than a fingernail, now’s the time for wood filler. Scoop a little in with your putty knife and press it flush with the surface. Let it dry as the package says (usually at least 20–30 minutes for small fixes).
Once dry, sand the filled area smooth again. You want it to be as flat as the rest of the frame—no bumps or dips. Finally, run a strip of painter’s tape along the edge where the frame meets the door or wall. This keeps everything neat and makes sure you don’t spread primer or paint where you don’t want it.
Applying Primer and Paint for a Lasting Fix
Here’s where you lock in the repair—and your color matching skills come into play. For exterior door frames, you always want to use exterior-grade primer and paint, since they’re built to handle weather and sunlight. Apply a thin layer of primer over any bare wood, filler, or sanded spots. A small brush works best, so you don’t accidentally streak over the undamaged areas.
Let the primer dry fully. This can take an hour or more (read the can). Don’t rush it! Primer helps the paint stick and blocks out any future moisture, so skipping or skimping here means you’ll be right back fixing the same spot six months from now.
Once the primer is dry, grab your color-matched paint or stain. Brush on a thin, even coat, feathering it out at the edges so there’s no hard line. If you’re working with stain instead of paint (lots of wood frames use this to show off grain), use a clean rag for a more natural look.
For most jobs, two coats is the sweet spot. Let the first coat dry, check for color match, then add a second if needed. Once everything’s dry to the touch, carefully peel away the painter’s tape. If you removed the strike plate earlier, reattach it and check that everything lines up as it should—no extra gaps or misfires.
What to Do If You Spot Deeper Damage or Rot
Sometimes, scratches are just the tip of the iceberg. If you dig in and discover that the wood feels spongy, discolored, or crumbly, you’re likely dealing with rot or water damage. In this case, quick patching won’t solve the underlying problem.
You might be wondering: Do I have to replace the whole frame? Not always, but deeper repairs do take a bit more elbow grease.
First, use a screwdriver or awl to gently poke around the suspect area. Soft, crumbling wood needs to be removed completely. Scrape out all the bad material until you reach solid, dry wood.
Fill the gap with a two-part wood epoxy or exterior wood filler designed for rebuilding damaged areas. Some brands let you mold and sand once dry, almost like clay. Let it cure fully—this might take a few hours or overnight. Then, sand smooth, prime, and paint just like with basic scratch repairs.
If you find significant rot that extends several inches into the frame, or if you see daylight through any gaps, it’s safer to call a carpenter or contractor. They can replace the damaged frame section and make sure your door still closes securely. Major repairs might also be covered under your home warranty or insurance, especially if it’s caused by a leaky door or storm damage.
Tips for Preventing Future Scratches Around the Strike Plate
Now that you’ve fixed up the scratched door frame, you probably want to keep it looking that way. Honestly, prevention is way easier than repair. Here’s how you can keep those scratches from coming back:
- Check for loose hinges or misaligned doors. When the door and strike plate don’t line up, the latch or deadbolt can scrape the frame every time you close the door.
- Add a thin rubber or felt pad behind the strike plate. This cushions the metal-to-wood contact without messing up security.
- Teach kids and guests to use the handle, not slam or force the door shut.
- Touch up paint or stain at the first sign of wear. Don’t wait for scratches to get deep—quick fixes keep everything sealed.
If you’ve got a smart lock, keypad, or any battery-powered remote entry system, make sure all the hardware is snugly attached. Wiggling or slamming can worsen both cosmetic scratches and Bluetooth sync or code issues (annoying, right?). Regular maintenance helps the lock AND the frame stay in good shape.
Comparing Paint, Stain, and Clear Finishes for Exterior Door Frames
Maybe you’re curious—should you stick with what’s on the frame now, or try something new during your repair? Here’s how the big finish options compare, especially when it comes to future scratches and repairs:
- Paint (oil- or latex-based): Gives full coverage, hides filler well, usually lasts longest outdoors. Easy to spot fix, but color matching can be tricky, especially if sun-faded.
- Stain (oil- or water-based): Shows off wood grain, so repairs need careful color blending. Scratches are more visible but easier to blend in step by step.
- Clear exterior polyurethane or sealer: Usually used on beautiful hardwoods. Great for moisture, but not forgiving if you have to patch up damage. Every scratch will show until you re-coat the whole area.
If your door frame takes a lot of abuse (think: pets, bikes, or heavy foot traffic), paint is usually the most forgiving. Stains are best for minimal wear areas where you love the wood’s natural look.
When in doubt, take a small chip to a local hardware store. They can help you match colors, finishes, and even recommend easy-to-repair brands if you’re planning a bigger refresh.
When to Call in a Pro—and How to Save Money on Repairs
You might be tempted to DIY every repair, but sometimes it makes sense to call in a carpenter or handyman—especially with big or tricky scratches around the strike plate. If the frame is cracked all the way through, shifting, or letting in drafts and bugs, it’s usually cheaper to let an expert handle it before things get worse (and more expensive).
That said, basic scratch repairs and touch-ups are totally doable for most folks with a steady hand and a bit of patience. Here are a few ways to keep costs down:
- Buy paint testers or sample pots instead of full gallons for small jobs.
- Borrow or rent tools you don’t use often, like sanders or mini hand planes.
- Stick to repairs on dry, mild days—paint and filler cure best without excess humidity or freezing temps.
You don’t need to be a pro to get a pro-quality finish. Start slow, don’t skip steps, and you’ll be amazed at what a little DIY can do.
Closing Thoughts: Keeping Your Exterior Door Frame Strong and Sharp
A scratched exterior door frame around the strike plate is one of those little annoyances that’s easy to put off—but surprisingly satisfying to fix. Whether you’re patching a minor scuff or tackling something deeper, the process is all about taking it step by step: inspect, prep, repair, and protect. With the right materials and a little patience, most folks can handle it on their own.
Just keep an eye out for bigger issues like rot or major misalignment, and don’t be afraid to ask for help if you need it. A little maintenance here goes a long way—your door frame will not only look better, but it’ll stay solid and secure for years to come. And honestly, every time you walk through that door and don’t spot a scratch, you’ll be glad you took the time.