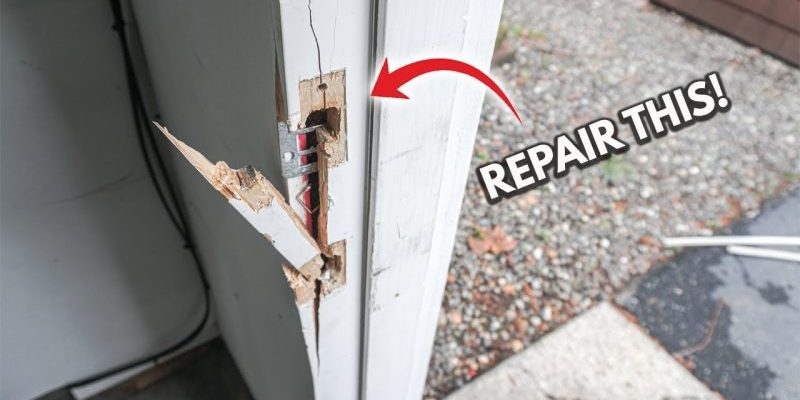
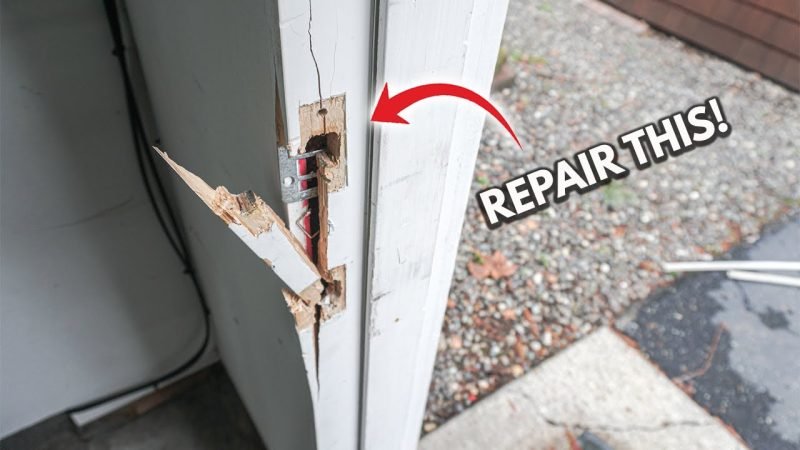
Let’s walk through how to repair a minor crack in an exterior door panel, focusing on those pesky spots around the lock or knob. Whether you have a classic wooden door from Masonite, a steel model, or a fiberglass panel, the basics are the same. I’ll break it down using simple language and a step-by-step approach, because, frankly, everyone deserves a tight, draft-free entrance that doesn’t look battle-scarred.
Why Cracks Form Near Door Hardware
If you’ve ever wondered why minor cracks seem to pop up around doorknobs, deadbolts, or lock plates, you’re not alone. This is one of the most common spots for wear and tear. Here’s the thing: the hardware creates a weak point. Every time you twist a knob or turn a key, a bit of pressure transfers into the panel, especially if the screws were over-tightened during installation. Factor in weather—hot, cold, wet, dry—causing the material to expand and contract, and you’ve got a recipe for cracks.
Wood doors are especially vulnerable to splitting around the hardware. Wood dries out in the sun or swells in the rain. If the pilot holes for the screws weren’t drilled properly, the wood can literally split from the inside out. Fiberglass and steel doors aren’t immune, either; they can develop surface cracks or even develop hairline fissures along the edge of the hardware cutout due to repeated stress or impact damage.
It might seem like no big deal to ignore a small split, but that gap can let in water, which leads to rot, rust, or swelling. Over time, even a minor issue can make the latch or lock start to wobble—or worse, fail completely. If you have a smart lock or keyless code remote system, that’s a recipe for even more frustration if moisture seeps into the electronics. Catching and repairing these cracks early is way easier than replacing an entire door slab down the road.
Gathering the Right Tools and Materials
Before you roll up your sleeves, you’ll need a few key items to do the job right. Don’t worry—none of this requires a contractor’s van, and most things are at your local hardware store.
- Wood filler or epoxy putty (for wood and fiberglass doors)
- Automotive body filler (for steel doors)
- Putty knife or scraper
- Sandpaper (medium and fine grit)
- Painters tape
- Matching exterior paint or stain (and primer, if needed)
- Screwdriver (to remove the hardware)
- Clean rags and mild soap (for prepping the area)
You might be tempted to skip the filler and just squish in some caulk, but that’s only a temporary fix. Door panels flex, especially near locks, so you want a repair product that cures hard and bonds with the surface. If you have a remote or smart lock system (like a Schlage keypad or Yale Assure brand), fully removing the hardware before you start will help you avoid getting dust in the electronics. Just remember how to re-sync, pair, or reset your remote afterward if it’s a “smart” setup—it’s never fun to troubleshoot a lockout.
Prepping the Area Around the Crack
A good repair always starts with good prep. Start by removing any hardware near the crack. Don’t just loosen it—take it off completely. This gives you room to work and prevents filler or sanding dust from getting into moving parts. If you’re working with a coded lock or remote-controlled deadbolt, now’s the time to check the battery and take note of any sync code or reset procedure, since you’ll need to reinstall it later.
Once the hardware is off, clean the surface gently with a rag and some mild soap. You want to get rid of dirt, oils, and any old paint chips that might stop the filler from sticking. Dry the area thoroughly. Next, use painter’s tape to mask off any nearby trim or glass so you don’t make a mess with filler or sanding.
Take a close look at the crack itself. If there are any loose splinters or sharp edges, knock them down with a little bit of medium-grit sandpaper or the flat edge of your putty knife. Be gentle—you’re just scuffing the surface so the repair material will grab. For cracks that go deeper than 1⁄8 inch, use the tip of the knife to tease out debris so the filler can really get in there. You want the repair to bond, not just sit on the surface.
Filling and Sealing a Minor Crack
Now comes the satisfying part. For wood or fiberglass panels, scoop up some wood filler or epoxy putty with your putty knife and press it directly into the crack. Overfill it just a little, because fillers usually shrink as they dry. For steel doors, use an auto body filler that’s designed to stick to metal. Smooth the surface as best you can, feathering the edges so it blends with the door.
Here’s where patience pays off: don’t rush the drying time. Most fillers take at least 30 minutes to an hour, but check the package. If the crack was near the latch or deadbolt, make sure no filler oozes into the screw holes or the cutout for the hardware. If it does, carefully scrape it out with a toothpick or the tip of your knife while it’s still soft.
Once the filler is dry, sand the area gently with medium-grit sandpaper, graduating to fine grit for a smooth finish. You want the repair to be flush—neither raised nor sunken. Wipe away the dust with a damp rag.
A clean, invisible repair means nobody will ever know there was a crack in the first place. Take your time on this step!
Don’t skip sealing the repair. If you’re staining the door, use a stainable filler and primer; if painting, always prime the area first, then paint to match the rest of the panel. A couple of light coats look better and last longer than one heavy go.
Reinstalling Hardware and Resetting Smart Locks
After everything’s dry and painted, put the hardware back on. Before you tighten any screws, check that the holes aren’t stripped out. If they are, fill them with a dab of wood glue and toothpicks for wood doors, or use the right size hardware for metal or fiberglass models. This keeps everything solid and helps prevent future cracks.
If you removed a standard keyed lock, it’s as simple as lining up the screws and tightening them evenly. For remote-controlled or smart locks—like Schlage, Kwikset, or Yale Assure—double-check the battery contacts, and follow the pairing or sync instructions that came with your lock. Sometimes, after any work near electronics, a quick reset is a good idea to prevent any weird troubleshooting hiccups later. If your lock has a code, re-enter it and make sure it works before calling the job done.
Don’t force anything—overtightening is what caused many cracks in the first place! The goal is a snug fit that doesn’t stress the repaired area.
Why Fast, Proper Repair Matters
It’s tempting to ignore a hairline crack, especially when life gets busy. But reality check: cracks near a door’s hardware are little invitations for bigger headaches. Left alone, they can become entry points for rain, bugs, air leaks, or even intruders if the lock starts to wobble. If you’ve got a remote or code-based security system, a compromised panel puts your smart hardware at risk for moisture damage or glitchy performance.
Fast, careful repair keeps your home energy-efficient, secure, and looking sharp. Even more, it’s a confidence boost to realize you can handle these fixes yourself. Honestly, it’s one of those “adulting” moments that pays off every time you open and close your door without a creak or wiggle. As a side bonus, you dodge the troubleshooting cycle of trying to sync or reset a smart lock that’s taken on a little too much water.
Comparing DIY Fixes to Professional Repairs
You might be wondering if it’s worth doing this repair yourself, or if you should call in a pro. If the crack is minor—say, under three inches and not actively spreading—DIY is the way to go. With basic tools and a steady hand, you’ll end up with results that are almost invisible. Plus, you can save a decent chunk of money and avoid waiting around for appointments.
However, if the crack is wide, runs the full height of the door, or if the door itself is warped or feels mushy, it’s probably time to call a professional. Same goes if your door is under warranty, since DIY repairs might void certain guarantees. For expensive remote or code-enabled brand locks, check with the manufacturer for any troubleshooting tips if you notice any issues after reinstalling—sometimes sync or reset quirks pop up after a repair.
For the majority of minor cracks, though, especially those near hardware, a careful DIY fix is just as strong as calling in a specialist, as long as you follow the steps and use quality materials.
Taking Steps to Prevent Future Cracks
Once you’ve patched up your exterior door, it’s smart to do a little maintenance to keep cracks from coming back. First, check the screws holding your hardware every season or so. If they feel loose, tighten them gently—never wrench them down, or you’ll risk splitting the door again.
Keep an eye on your door’s finish. Sun and rain can break down paint or stain, letting moisture seep in. If you see peeling, flaking, or exposed wood, touch it up with exterior-grade paint or sealant. For smart locks or remote systems, battery corrosion can sometimes cause swelling or minor cracking near electronics, so swap in fresh batteries regularly and make sure to pair or sync as needed.
If your door gets stuck or slams shut hard, fix the hinges or strike plate. A door that doesn’t close smoothly puts extra stress near the hardware every time it’s used. Little adjustments can save you a lot of patching down the line.
Final Thoughts on DIY Door Panel Repairs
Fixing a minor crack in an exterior door panel—especially near your hardware or lockset—is one of those home repairs that’s well within reach for most people. You don’t need fancy skills, just some patience, the right supplies, and a willingness to take it step by step. Whether your door is classic wood, tough steel, or modern fiberglass, the process is about the same: clean, fill, seal, and put everything back together solidly.
Taking the time to do it right means you’ll avoid drafts, keep your hardware in top shape, and, if you’ve got keyless or code-based remotes, sidestep annoying troubleshooting and reset cycles. It’s a small investment of time that pays off in peace of mind every time you lock up and head out for the day.