
Honestly, repairing a kick plate that’s bent at the corners from impact isn’t rocket science, but it can be a little intimidating the first time. Maybe you’re thinking about just squishing it back down or grabbing some tape (don’t). Whether yours is a sturdy steel model or a lighter aluminum one, with a few basic tools and a little patience, you can smooth out the damage and have your door looking sharp again. Let’s get hands-on and walk through how you can fix those corners, even if you’ve never tackled a repair project before.
Why Kick Plates Get Bent at the Corners
Most people install kick plates to protect the lower part of their door from scratches, stains, and—well—kicks. It’s like armor for your door, taking the brunt of everything from deliveries to soccer cleats. You might be wondering, “If it’s designed to be tough, why do the corners bend so easily?” Here’s the thing: the center of a kick plate is supported by the door, but the corners and edges can be more vulnerable.
Common causes of bent corners include:
- Repeated impacts from shoes, pets, or carts
- Improper installation or loose screws
- Thin material, especially on budget or universal kick plates
- Weather exposure causing expansion, warping, or corrosion
Sometimes, it’s just bad luck—a heavy package hits the edge at the wrong angle, or playful kids treat your door like the goalpost. Other times, an older or universal kick plate may not fit quite right, leaving those corners unsupported and prone to curling up. No matter the cause, once those edges start to lift, they only get worse until you step in and fix them.
Tools and Materials You’ll Need for the Repair
Before you get started, it’s smart to gather everything you’ll need. Trying to bend a metal corner back into place with your bare hands is a quick way to frustrate yourself (and possibly cut yourself, too). Here’s a quick checklist:
- Flathead screwdriver or pry bar
- Rubber mallet or small hammer—with a soft cloth to prevent scratches
- Heavy block or flat board (for bracing)
- Protective gloves
- New screws (in case originals are stripped or rusty)
- Optional: pliers for stubborn bends, wood filler or caulk, touch-up finish
A lot of folks find they need to remove the kick plate to do a proper repair, especially if the damage is severe or if you’re dealing with a code-compliant model or a brand-specific fit. If you have a “universal” kick plate, double-check the screw pattern—sometimes holes don’t line up perfectly when you go to reattach it. Having everything ready before you begin helps you avoid hunting for tools with the door half-disassembled.
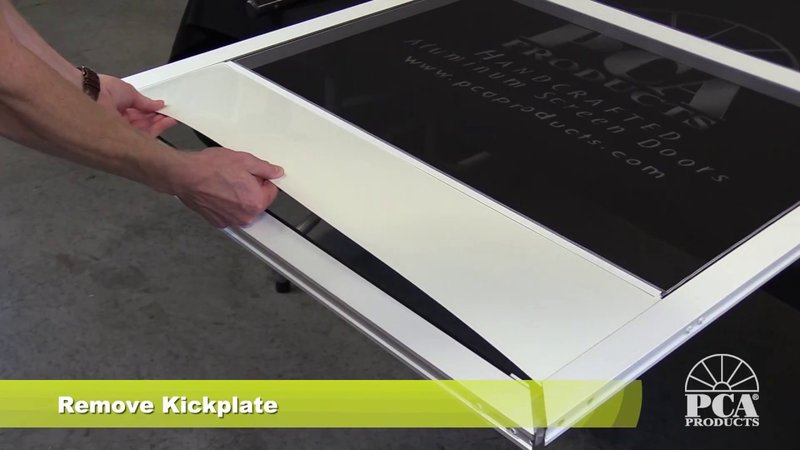
Removing the Kick Plate Safely
Let me explain why you should almost always remove the kick plate before trying to straighten out bent corners. Trying to hammer or bend it while it’s still on the door can make the damage worse, crack the finish, or even dent the door itself. Plus, you’ll get a much cleaner result working on a flat, stable surface.
Here’s how to remove a kick plate step-by-step:
- Open the door and secure it so it won’t move
- Use a screwdriver to back out the screws along the top and sides first
- Gently pry under the plate with a flathead screwdriver—work slowly to avoid gouging wood or paint
- If the plate is stuck, wiggle it gently rather than forcing it—sometimes old caulk or paint can create a seal
- Once free, set the plate on a clean, flat work surface
A quick note: on some doors, especially those with electronic locks or smart-home features, you might have wiring close to the kick plate area. Be careful not to nick or dislodge any wires as you work. If you spot any corrosion or wood damage under the plate, now’s your chance to clean or repair it before reinstalling the plate.
How to Straighten Bent Corners (Step by Step)
Here’s the part where most people get nervous. Bending metal back into shape takes some finesse, but you don’t need special skills or a workshop to do it well. Just patience and a steady hand.
Steps to repair kick plate corners:
- Lay the plate flat. Place it on a sturdy work surface, with the bent corner hanging just off the edge.
- Brace the plate. Hold the main body of the plate down with a heavy block or board. This keeps the rest from flexing while you work.
- Straighten the corner. Wearing gloves, gently press the corner downward. For stubborn bends, use pliers padded with a cloth to avoid scratching.
- Tap it flat. Lightly tap along the bent area with a rubber mallet (or a regular hammer with a towel or cloth). Work slowly from the edge inward, checking progress as you go.
If you see waves or ripples after straightening, that’s normal—especially with softer metals like aluminum or brass. You can press the area with a flat board and add gentle pressure to even it out. Just don’t overdo it, or you’ll create new bends in the process.
Addressing Deep Dents and Finishing Touches
Sometimes, impact does more than just curl the corner—it leaves a visible dent or ripple that looks stubborn. In this case, you might not be able to get things looking perfect, but you can make major improvements. Start by smoothing out the big bend as described above, then:
- Use a block of wood on both sides of the plate. Sandwich the dented area and tap gently with your mallet to distribute the force.
- For small dings, try a rolling pin or a piece of dowel wrapped in cloth to massage out creases.
- If you have access to a vice or clamp, use it—just protect the finish with rags or cardboard.
When you’re happy with the shape, take a moment to assess the finish. Scratches can be disguised with a bit of metal polish or a special touch-up pen (hardware stores sell these for brass, steel, and more). For deeper gouges, you can try a bit of wax or even a dab of matching paint, depending on your kick plate’s material.
The key is not aiming for perfection, but for an honest, tidy repair that keeps the plate functional and the door looking cared for.
Reattaching the Kick Plate—And Preventing Future Bends
Once your repairs are done, you’ll want to put everything back the right way. Here’s where attention to detail really pays off. If your kick plate was loose before (especially a universal one), use this chance to reset it firmly and evenly.
When reattaching:
- Line up the holes carefully—don’t overtighten screws, or you risk warping the plate again
- If any holes are stripped, fill them with wood filler and let dry, then drill new pilot holes
- Consider adding a dab of caulk around the edge (especially outdoors) to keep water and dirt out
- Check that the corners lie flush with the door surface—if not, double-check your repair before final tightening
Want to avoid doing this fix repeatedly? A few tips: go for a slightly thicker, code-compliant brand kick plate if yours is thin; check that screws are all secure and replace any rusty or stripped hardware; and remind household members (and pets—good luck) not to use the plate as a footrest or battering ram.
Is It Ever Better to Replace Your Kick Plate?
You might be wondering if it’s worth all this trouble—why not just swap the plate out entirely? Here’s the honest answer: if your kick plate is super dented, cracked, or rusted through, replacement can save time and headache. Universal models are easy to find, and most brands make direct replacements that’ll fit the same screw holes.
However, if the rest of your kick plate is in good shape and the door itself is fine, repairing a kick plate that’s bent at the corners from impact is cheaper, faster, and gives you a little satisfaction every time you open the door. Plus, if you’re dealing with a vintage or special order plate (like one that matches custom hardware or an old-school code requirement), a repair might be your only practical option.
If you decide to go the replacement route, make sure you measure carefully—door widths and screw patterns can vary more than you’d think. And if you’re upgrading to a heavier or brand-name kick plate, check that your door can support the extra weight without stressing any hardware, especially if you have a lightweight or hollow-core door.
Common Mistakes and How to Avoid Them
Let’s be real—DIY repairs don’t always go smoothly the first time. Here are a few classic mistakes people make when fixing bent kick plates, and how you can sidestep them:
- Bending the plate while it’s still on the door: This usually leads to dents in the door or a plate that fits poorly afterward.
- Using the wrong tools: Grabbing a bare hammer or skipping gloves is a recipe for scratches and pinched fingers.
- Over-tightening screws: Too much force can bend even a freshly repaired plate.
- Forgetting about nearby gadgets: Modern doors have all kinds of code locks, sensors, and electronics near the bottom—don’t accidentally knock something loose.
- Ignoring underlying damage: If the door is rotted or warped under the plate, fix that first—otherwise, the problem will keep coming back.
The main thing? Take your time, work methodically, and remember: the goal is a straight, sturdy plate—not a perfect, brand-new look.
Final Thoughts on Kick Plate Repair
Fixing a kick plate that’s bent at the corners from impact is a simple, rewarding task that beats replacing the whole thing—most of the time. With a careful approach and a little patience, you can make your door look polished and keep those annoying snags and scrapes at bay. Even if you’re totally new to DIY, this is the kind of home fix that can boost your confidence and make daily life just a bit smoother.
If your kick plate keeps getting damaged, think about what’s causing the impacts—sometimes a quick change, like moving a heavy delivery box or adding a bumper, makes all the difference. No matter your door’s style or hardware brand, a well-maintained kick plate means your entryway stays welcoming and protected, year after year.