Here’s the thing: fixing a kick plate with corroded spots isn’t exactly rocket science, but it does call for a bit of patience and the right steps. Most kick plates are made from brass, stainless steel, or even aluminum. Each one corrodes a bit differently, and certain brands like Schlage or Ives use unique coatings that can affect how you tackle the job. No matter the brand or finish, though, the basic process holds up—as long as you don’t just slap paint on and call it a day.
What Causes Kick Plate Corrosion?
Before you break out the sandpaper, it helps to know why kick plates corrode in the first place. Doors are notorious for taking a beating from the elements—rain, snow, foot traffic, and sometimes even salt if you live where winters hit hard. If the metal isn’t sealed perfectly or the coating chips over time, water can sneak in, leading to those dreaded corroded spots.
Corrosion on kick plates is usually a sign that moisture got under the finish. On brass or aluminum models, you might see dull green or white patches. Stainless steel tends to form rusty orange spots, especially if the surface has scratches or grime built up. Some brands add a clear protective coating, but even the best finishes wear off eventually, especially if your kick plate sees a lot of action from shoes, boots, or pets.
You might be wondering, “Why bother fixing it instead of swapping it out?” Honestly, replacing a kick plate is an option, but if the corrosion is mild, a good cleaning and a bit of elbow grease can save you money and keep your door looking sharp. Plus, some older kick plates match the hardware style on your door, which can be hard to replace exactly.
Tools and Materials for the Job
Don’t worry—you won’t need a shop full of fancy equipment. Most repairs use basic household tools, plus a few extras if the corrosion is stubborn or widespread. Here’s a handy list to gather before you get started:
- Protective gloves (to keep your hands safe from grime and chemicals)
- Safety glasses (just in case anything flies up)
- Soft rags or microfiber cloths
- Fine-grit sandpaper (320–600 grit works well)
- Non-abrasive scouring pads
- Mild dish soap and warm water
- White vinegar or lemon juice (natural cleaners for mild corrosion)
- Metal polish (Brasso, Bar Keepers Friend, or similar)
- Small paintbrush (optional, for applying sealant)
- Clear metal sealant or lacquer (optional but highly recommended)
- Screwdriver (if you decide to remove the kick plate)
If you have a branded kick plate from Ives, Schlage, or Baldwin, check if it has any special coating notes in the manual or on the brand’s website. Some finishes need gentler handling or specific cleaning products to avoid voiding a warranty or damaging the surface.
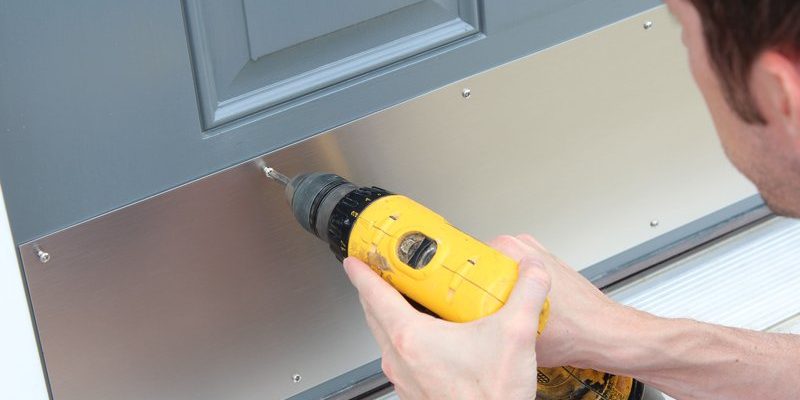
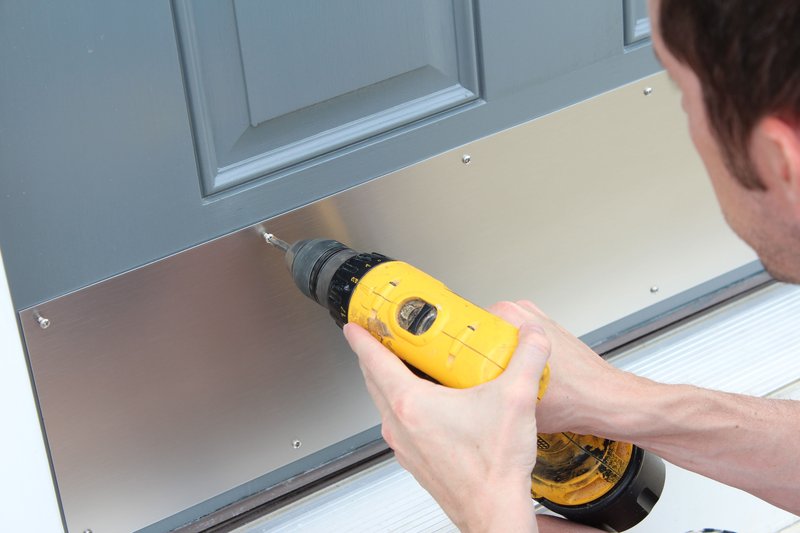
How to Remove the Kick Plate for Easier Repair
Technically, you can repair most surface corrosion with the kick plate still on the door, but let me explain why removing it makes life easier. When you take the plate off, you can access every spot (even the bottom edge, where gunk loves to hide), and you don’t risk scratching your door’s paint or wood finish during the cleanup.
To remove a typical kick plate:
- Locate the screws holding the plate to the door (usually along the top and bottom edges).
- Use a screwdriver to carefully loosen and remove each screw. Set the screws aside in a cup—trust me, they’re easy to lose.
- Gently pry the plate away from the door. If it’s stuck, slide a plastic putty knife under the edge instead of a metal tool to avoid damaging the door.
- Lay the kick plate flat on a protected surface, like old newspaper or towels, so you can work comfortably.
If you have a universal remote-style kick plate (yes, some newer ones are magnetic or use adhesive), the removal process is even easier: just pull up from one edge, working slowly. Don’t bend the metal, or you’ll have a new problem to fix later.
Cleaning and Preparing the Surface
Now for the fun (and slightly messy) part: cleaning off dirt, grease, and loose corrosion. Honestly, skipping this step is a rookie mistake. If you try to polish or seal over grime, the corrosion will come right back.
Start by mixing warm water with a drop of dish soap. Use a soft rag to wipe down the entire kick plate, paying special attention to the edges and corners. If the corrosion is light, a little scrubbing with a non-abrasive pad or toothbrush can lift away most of it.
For tougher spots, dip your rag in white vinegar or lemon juice and rub it gently over the corroded areas. These mild acids break down minerals without harming most metals. Let the solution sit for a couple of minutes, then rinse with clean water and dry thoroughly.
If you spot any stubborn, raised corrosion, gently sand with fine-grit sandpaper. Work in small circles—don’t press too hard, or you’ll scratch the metal. Wipe away dust with a clean, dry cloth.
Take your time during this step. The cleaner and smoother the surface, the better your final result will look and last.
Treating Corroded Spots on Different Metals
Not all kick plates are created equal. Stainless steel, brass, and aluminum each need slightly different handling if you want them to shine again—without weird color changes or streaking.
- Stainless steel: Use a soft cloth and a stainless steel cleaner or polish. Always rub in the direction of the metal’s grain, never in circles—this helps prevent more scratches or “cloudy” spots. For really stubborn rust, a paste of baking soda and water can work wonders; just rinse thoroughly afterward.
- Brass: Brass is softer and more prone to scratching. Stick to gentle polishes like Brasso, and use a microfiber cloth. If you see green tarnish, this is just copper oxidation—treat it with lemon juice or a vinegar paste, then polish.
- Aluminum: Aluminum can pit easily. Use a polish made for aluminum (never something acidic or abrasive) and avoid steel wool, which can leave ugly streaks. If spots remain, a dedicated aluminum restorer will usually bring back the shine.
If your kick plate is a painted color or has a custom finish (common with Ives or Emtek brands), double-check with the manufacturer before using any polishes or acids. Some specialty coatings will react badly to normal metal cleaners.
Polishing and Sealing for Long-Term Protection
Once you’ve cleaned up those corroded spots, it’s time to make things shine. Applying a good metal polish can restore that “just new” look and help protect against future corrosion.
Rub a thin layer of metal polish onto the kick plate using a soft cloth. Work in straight lines (not circles) and don’t skimp on the corners—these spots commonly get missed and start corroding first. Let the polish sit for a few minutes if the directions suggest it, then buff with a clean, dry rag until the surface gleams.
For extra protection, especially if your door faces the outdoors, apply a clear metal sealant or lacquer. Use a small paintbrush for even coverage, and let it dry completely before reinstalling the plate. This sealant acts as a barrier, locking out moisture, road salt, and daily grime.
You’ll be amazed how much difference a fresh coat of sealant makes. It’s like putting a screen protector on your phone—the kick plate will handle more abuse before it shows any wear.
Reinstalling the Kick Plate Securely
After repairs, make sure your kick plate goes back on the door correctly. Honestly, it’s easy to rush this part, but a loose or crooked plate just invites more problems later on.
- Line up the kick plate with its original position. If you removed screws, use the same holes to avoid stripping the wood or metal.
- Start fastening screws by hand to make sure everything lines up. Tighten evenly, but don’t overdo it—you want the plate snug, not bent.
- If you have a magnetic or adhesive plate, press firmly and hold for 30 seconds. For adhesive, check the directions for any “cure” time before letting it slam against shoes or brooms.
Take a final look at the edges: there shouldn’t be any gaps for water or dirt to sneak behind. If the old screws are rusty, swap them for fresh ones (stainless steel or brass preferred) to prevent more corrosion down the line.
When to Replace a Severely Damaged Kick Plate
Sometimes, despite all your efforts, a kick plate is just too far gone—deep pitting, large flakes of missing metal, or holes that no amount of polish will hide. Here’s the thing: at a certain point, repair turns into an endless battle, and a replacement just makes more sense.
If your door hardware has a special finish or shape (looking at you, Baldwin and Schlage fans), you can order a matching replacement from the original brand. Universal kick plates are an option, too, and they’re usually easy to install without extra drilling or custom fitting.
When picking a new kick plate, consider:
- Material: Stainless steel outlasts brass or aluminum, especially for outdoor doors.
- Finish: Match your doorknobs, levers, or other hardware for a coordinated look.
- Mounting style: Screw-on, adhesive, or magnetic—choose the one that suits your situation best.
If you switch brands or go with a universal option, you might need to “sync” the screw holes or cover up old marks with touch-up paint. It’s a small hassle, but worth it for a kick plate that looks sharp and lasts longer.
Simple Maintenance Tips to Prevent Future Corrosion
Now that your kick plate looks new again, a little maintenance can go a long way. Corrosion is sneaky, but regular care can keep it at bay and save you from another repair day.
- Wipe down your kick plate every few weeks with a soft, damp cloth—especially after storms or salt exposure.
- Dry thoroughly to prevent water spots or minerals from settling in.
- If you notice scratches or dull spots, touch them up with a bit of polish before they turn into full-blown corrosion.
- Once or twice a year, apply another coat of clear sealant or wax for lasting protection.
- Check for loose screws or gaps and tighten as needed to keep water out.
A quick inspection once a month can catch trouble while it’s small. Honestly, these five minutes can add years to the life of both your kick plate and your door.
Wrapping Up Your Kick Plate Repair
Repairing a kick plate that has corroded spots isn’t a glamorous job, but it’s one of those “small fix, big impact” projects. You’ll notice the difference every time you walk through your door—no more grimy patches or embarrassing rust streaks. Whether you’re dealing with a fancy Schlage brass plate or a basic aluminum strip, the steps are pretty much the same: remove, clean, polish, protect, and reinstall.
Corrosion happens to the best of us, but with a little know-how and the right tools, you can bring that kick plate back to life. More importantly, you’ll keep your entryway looking tidy and extend the life of your door hardware—no code, sync, or reset required. If you keep up with the occasional cleaning and stay on top of minor issues, you’ll save money and headaches in the long run. Happy repairing!