Think of your handleset like the lock on a treasure chest. Everything needs to line up and move smoothly for the treasure (your door) to open. But when paint gets into the gears, springs, and little nooks, it’s like pouring molasses into clockwork. Suddenly, things jam up, keys don’t turn, and locking (or unlocking) the door turns into an Olympic event. Whether you’ve got a classic Baldwin deadbolt or a more modern electronic set from Yale, the principle’s the same: too much paint in the wrong place, and the mechanism stops playing nice.
How Paint Ends Up Inside Your Handleset Mechanism
Let me explain what usually happens here. You—or maybe a well-meaning painter—tape around the hardware, but the tape isn’t perfect. Or, the handleset isn’t removed before painting, so stray drips seep into the cracks. It seems harmless at first. But doors and handlesets have tiny gaps, and paint loves to sneak inside.
On most handle brands like Schlage, Kwikset, or Yale, the moving parts hide just behind the surface. Any wet paint that touches the edge of the handle or the keyway can run inside, pool up, and dry exactly where you don’t want it. Once cured, that paint clings to springs, pins, and the turning shaft, making everything rigid and sticky. Sometimes you’ll even see a crusty build-up right at the seam where the handle meets the door—almost like the hardware got dipped in icing.
Honestly, the worst thing is how sneaky it can be. A lock might still “sort of” work for weeks, but little by little, the action gets rougher until one day it just…won’t budge. If you’re facing that now, don’t worry. This is a fixable problem—no need to call a locksmith (yet).
Signs Your Handleset Mechanism Has Paint Caked Inside
You might be wondering, “How do I know it’s paint and not rust, dirt, or something else?” Good question! Here’s what people usually notice when paint is the culprit:
- Key won’t turn smoothly: It feels gritty, sticky, or you need extra force—almost like the lock is fighting you back.
- Handle or thumb latch is stuck: You push or pull, but it’s slow, stiff, or gets “caught” halfway.
- Visible paint residue: You see dried paint around or inside the keyhole, screws, seams, or handle base.
- Clicks, scraping, or muted sounds: Instead of a smooth click, the lock grinds or makes a dull, thudding sound.
Here’s the thing: Paint in the mechanism feels different from a lock that’s just old, corroded, or out of alignment. With corrosion, you’ll see rusty dust. With paint, there’s usually visible color, especially white or bright latex. And if you recently painted the door or frame, well, there’s your clue.
Tools and Supplies You’ll Need to Repair a Painted Handleset Mechanism
Before you dive in, it’s smart to get everything ready. Trying to clean a gummed-up handleset without the right tools is like using a butter knife instead of a screwdriver—technically possible, but not fun.
- Phillips and flathead screwdrivers: For removing the handleset and any mounting hardware.
- Small brush (toothbrush or paintbrush): Great for scrubbing dried paint out of cracks.
- Picks or toothpicks: For digging stubborn paint out of tight spots.
- Isopropyl alcohol or mineral spirits: Breaks down dried latex or oil paint without damaging most metal parts.
- Lint-free cloths or paper towels: For wiping off dissolved paint and gunk.
- Non-oily lubricant (graphite or silicone spray): To restore smooth movement after cleaning.
- Optional: cotton swabs, compressed air, tweezers: Handy for cleaning inside keyways or hard-to-reach spots.
If you have an electronic handleset, like those from Yale or August, you’ll also want to remove batteries and keep moisture away from circuit boards. For classic mechanical locks, the above tools will cover almost every scenario.
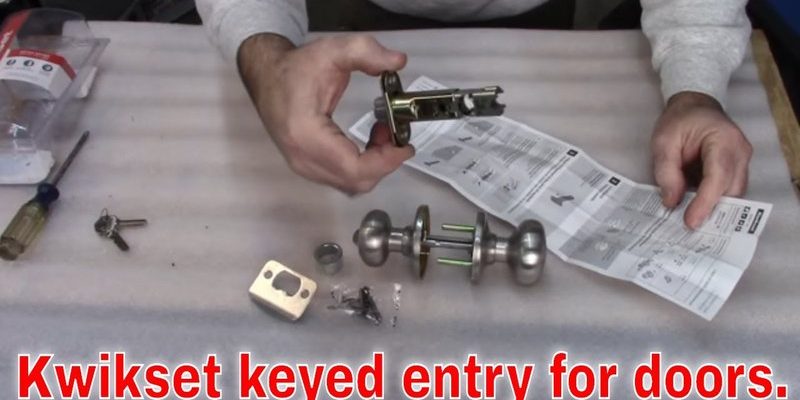
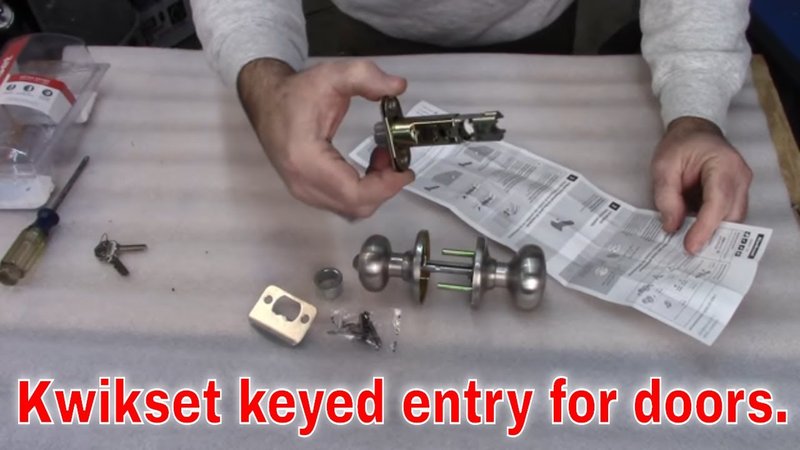
Step-by-Step: Removing and Disassembling the Handleset
Now, let’s walk through the repair process—no need to rush. Take your time, and if you get stuck at any step, come back to it with fresh eyes. Here’s what you want to do:
- Remove the handleset from the door. Use your screwdriver to unscrew both sides. On some Schlage or Kwikset sets, you’ll find screws hidden under rose trim or behind a little snap-on plate.
- Gently separate the inside and outside parts. Pull the lock away from the door so you can see the guts. Set aside all screws somewhere safe (trust me, they love to roll away).
- Look for obvious paint lumps or streaks. Check all moving parts—key cylinder, thumb latch, and spindle—for anything sticky, flaky, or discolored.
- If you spot caked paint inside, don’t force anything. Forcing a stuck part could bend springs or snap tiny internal pieces. Take a photo before you go deeper, so you’ll know how things fit back together.
Honestly, getting the lock off the door is often the hardest part, especially if paint has glued some screws in place. If one doesn’t budge, gently tap the handle with a plastic tool or rubber mallet—it’ll usually break any paint seal without damaging the finish.
Cleaning Out Paint from the Mechanism: What Works (and What Doesn’t)
Here’s where the magic happens. Removing crusty paint from a handleset mechanism isn’t rocket science, but patience pays off big here. If you want the lock to feel as smooth as new, go slow and avoid shortcuts.
- Brush off loose paint first. Use your toothbrush or small brush to scrub away anything that flakes or peels easily. This clears the way for deeper cleaning.
- Apply isopropyl alcohol or mineral spirits to stubborn spots. Lightly dampen a cloth or cotton swab and rub dried paint until it softens. For painted keyholes or tiny cracks, a toothpick dipped in solvent works wonders.
- Don’t soak electronic parts. If your lock has a keypad or battery, keep liquids far away or apply cleaner with a brush instead of pouring or spraying directly.
- Work slowly and check your progress. Try turning the key or handle as you clean. If things loosen up, you’re on the right track. If not, repeat until all moving parts move freely.
- Avoid scraping metal-on-metal aggressively. A plastic pick or wooden toothpick is safer for lock internals than knives or steel tools, which might scratch the finish or mess with the delicate code pins.
Sometimes, even after cleaning, you’ll see a little color left deep in the cracks. As long as the parts move freely and the lock works, don’t sweat the tiny stuff!
Testing and Reassembling Your Clean Handleset
Let’s say everything looks clean. Now’s the moment of truth: putting it back together and seeing if the fix worked. Here’s what I recommend:
- Double-check each part as you reassemble. If something feels sticky, stop and clean again. Don’t rush—tiny bits of paint can cause big headaches later.
- Apply a dry lubricant before closing up. A squirt of graphite or silicone spray on moving parts keeps things gliding smoothly. Skip WD-40 or oil, as they can attract new grime.
- Put all screws back and tighten gently. Overtightening can pinch moving parts, especially on cheaper or universal sets. Tight but not cranked is perfect.
- Test everything before remounting. Turn the key, push the thumb latch, and check both sides for smooth action. It should feel easy and click like new.
If, for some reason, the mechanism still feels rough or stubborn, take it apart again. Sometimes a second pass catches hidden paint, especially in complicated or older handlesets.
How to Prevent Handleset Mechanism Paint Problems in the Future
Honestly, cleaning up after the fact is a pain. The best defense? Don’t let paint get into the lock next time. Here are a few practical tips—some learned the hard way:
- Remove handlesets before painting doors. This takes extra time up front, but saves hours of fixing and troubleshooting in the long run.
- If you can’t remove hardware, use quality painter’s tape. Tape carefully around every seam and edge. Press it down with a fingernail or tool so paint can’t seep underneath.
- Cover keyholes and seams with small strips of tape. Even if it looks a little fussy, it’s worth it. Paint loves to sneak through the tiniest gaps.
- Wipe away any drips or accidents immediately. Fresh paint is much easier to remove than dried, cured gunk.
Here’s the thing: No matter the handleset brand—universal, Schlage, Kwikset, Yale, or something fancy—paint protection should always be part of your prep. It’s faster and cheaper than repairs, every time.
When to Replace vs. Repair a Painted Handleset
Sometimes, even the best efforts can’t bring a lock back to life. If the inside is absolutely packed with paint or the mechanism’s been damaged by aggressive attempts at code breaking (trust me, it happens), a replacement might be the way to go.
Signs it’s time to replace instead of repair:
- Multiple parts are warped or bent from forcing.
- Paint has hardened inside the keyway, and cleaning doesn’t help.
- The lock is old, corroded, or the finish is ruined.
- Electronic parts were exposed to too much cleaning liquid and now won’t power on or sync.
Swapping out a handleset isn’t as intimidating as it sounds. Most brands use standard screw patterns and code systems, so a universal replacement will usually fit. Still, it’s wise to bring the old set with you to the hardware store or snap a photo of the latch mechanism for reference.
Final Thoughts: Keeping Your Handleset Running Smooth and Paint-Free
Repairing a handleset that has paint caked in the mechanism is a chore, but it’s also pretty satisfying when that last bit of gunk loosens and the lock turns freely again. Whether you’re dealing with a Schlage, Kwikset, Yale, or a universal handleset, a little patience and attention to detail go a long way.
If you take anything from this, let it be this: Protect your hardware before you paint, and don’t ignore sticky locks—they almost never fix themselves. With a few basic tools, the right cleaner, and some careful troubleshooting, even stubbornly painted handlesets can work like new again. And next time, you’ll be one step ahead when it comes to door DIY.