Fixing a bent handleset lever isn’t just about appearances. A faulty lever can make the lock hard to use, wear out the latch, or even leave your home less secure. Luckily, you don’t always need to call in a pro. With a little patience, the right tools, and a clear plan, most homeowners can get things working again. Let’s break down what’s really going on—and how to get your lever straightened out or replaced so your door feels like new.
Spotting a Bent or Damaged Handleset Lever
You might be wondering how to tell if your lever is just loose or actually damaged. Sometimes, the signs are obvious—a lever that sticks out at a weird angle or feels floppy. Other times, it’s more subtle, like the handle suddenly feeling gritty or refusing to spring back into place. Honestly, if you’re having trouble getting your door open or shut with one hand, or the lever doesn’t line up the way it used to, it’s probably bent or has some internal damage.
Here’s the thing: most modern handlesets (from brands like Schlage, Kwikset, and Yale) rely on sturdy, but not indestructible, internal mechanisms. Slamming the door, applying too much force, or even just years of daily use can cause the lever or spindle to bend. Metal fatigue is real—especially on handlesets that see dozens of uses every day. Don’t ignore a small wobble or slant; it rarely fixes itself, and it’s easier to repair before things get worse.
If you’re troubleshooting, look for these giveaway signs:
- The lever hangs down instead of sitting level
- You feel grinding, scraping, or extra resistance when turning
- The door won’t latch or lock smoothly
- Visible dent, kink, or twist in the handle
A quick visual inspection and a wiggle test (gently moving the lever up and down) can help confirm the issue. If you see daylight where parts used to fit flush, or if the lever feels like it might pull out, you’ve got a repair job on your hands.
Tools You’ll Need for Handleset Lever Repair
Before diving into repairs, make sure you’ve got the right gear. Trying to fix a Schlage or Kwikset handleset with a butter knife or borrowed pliers is a quick way to make things worse. Trust me, a few proper tools make all the difference and can save you a trip to the hardware store mid-project.
Here’s what you’ll want nearby:
- Phillips and flathead screwdrivers (for removing faceplates and handles)
- Allen wrench or small hex key (many lever handles use a set screw)
- Needle-nose pliers (great for straightening a slightly bent spindle or lever arm)
- Replacement lever or repair kit (especially if the damage is bad)
- Lubricating spray like WD-40 (for sticky mechanisms)
- Rag or towel (to protect the door and your hands)
Let me explain why these matter. Most levers are held in place by set screws and fit tightly to a spindle or shaft. Using the right wrench or screwdriver prevents stripping the hardware. If you’re swapping out a lever, make sure the replacement matches your handleset brand; universal handles might not fit a Schlage or Kwikset exactly and could require extra tweaking.
Always double-check that you’ve got the right size hex key or screwdriver before you start. Stripping the screw heads is a pain to undo, and it’ll slow the whole repair process.
How to Remove a Bent or Damaged Lever
Taking off the damaged lever is the first real step in getting your handleset back in shape. Don’t rush it—forcing parts or leaving screws in place can lead to scratches or more damage. Here’s a simple, step-by-step approach:
- Locate the set screw – Most handlesets, especially from Schlage or Kwikset, have a small set screw (either underneath the lever or on the side) that holds the lever to the spindle.
- Loosen the set screw – Use your Allen wrench or screwdriver, turning counterclockwise. Keep a tray or cup nearby so tiny screws don’t roll away.
- Gently pull off the lever – Wiggle it back and forth; if it’s stuck, give it a little tap with the handle of your screwdriver, but don’t use brute force.
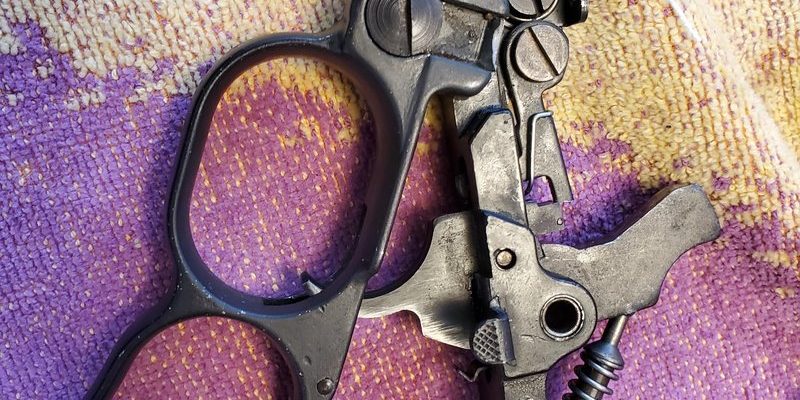
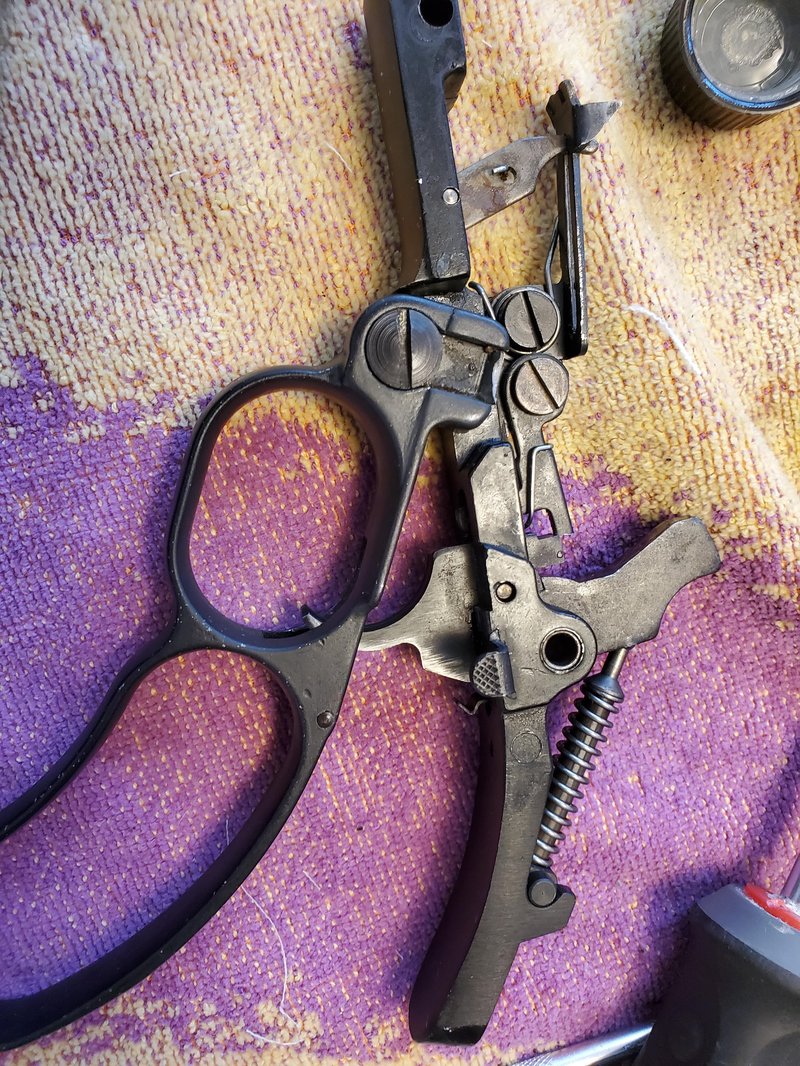
- Inspect the spindle and internal parts – Check for bends, rust, or damage. If the spindle is bent, you’ll need to fix or replace it, too.
Some handlesets have decorative covers hiding the fasteners. Pry these off gently with a flathead screwdriver or your fingernail—never anything too sharp, or you’ll scratch the finish. If you’re dealing with a specialty or electronic handleset (one that uses a code, syncs, or has a battery-powered lock), consult the brand’s manual or website for specific removal instructions.
If things feel stuck, don’t twist harder. Sometimes, a little WD-40 and patience does more good than extra muscle.
Straightening a Slightly Bent Lever (When Replacement Isn’t Needed)
Not all lever damage means you’re headed to the store for a new handle. If the lever is only slightly bent—maybe it just got caught on a heavy bag or twisted a bit—you can often straighten it yourself. Here’s how:
- Protect the finish by wrapping the lever in a soft cloth or rag.
- Apply steady, gentle pressure to bend the lever back into place. Slow and even is key—don’t yank or you might snap the metal.
- Check alignment frequently by reattaching the lever temporarily (without tightening the set screw all the way). The lever should sit level and not rub against the backplate.
- Repeat as needed, making small adjustments until the lever looks and feels right.
Here’s the thing: this trick works best for solid metal levers, especially those on quality brands like Schlage or Kwikset. Hollow or cheaper handles can crack if bent too far. If you hear cracking or see stress marks in the finish, it’s time to stop and look at a replacement lever instead.
If the lever keeps falling out of alignment, or if you notice the spindle itself is crooked, you may need to adjust or replace the spindle as well. Sometimes, the real culprit is the hidden part inside the door, not the lever itself.
When (and How) to Replace the Lever or Handleset
Let me be honest: sometimes, you just can’t save a badly bent lever. If it’s kinked, cracked, or the finish is ruined, a replacement is the best option. The good news? Most modern handlesets from major brands are designed for easy swapping, and universal levers are available to fit older models.
Here’s what you’ll want to do:
- Buy a matching lever or complete handleset. Stick with your current brand if possible (Schlage for Schlage, Kwikset for Kwikset), but universal options do exist.
- Bring the old lever to the store to match size, style, and finish. Pictures help if you’re ordering online.
- Install the new lever by sliding it onto the spindle, tightening the set screw, and making sure everything feels firm.
- Check for smooth operation. Open and close the door, lock and unlock to ensure no rubbing or catching.
Here’s a tip: if the replacement lever doesn’t fit, double-check that the spindle is straight and seated correctly. Some universal levers need to be adapted—read the instructions carefully. It’s also a good opportunity to upgrade to a keyless or programmable lock if you’ve been thinking about better security or easier access.
It’s better to replace a lever that “sort of” works than to wrestle with it every day. Your door should be as reliable as your morning coffee.
Handling Handlesets with Electronic or Keyless Features
If your door uses a high-tech handleset—maybe one with a keypad, sync feature, code program, or battery—repairing the lever takes a little extra care. Electronic locks from brands like Schlage or Yale often combine mechanical levers with sensitive electronic components hidden in the backplate or the interior side of the lock.
Here’s how to fix these without messing up the electronics:
- Remove batteries before starting (if your lock uses them) to prevent accidental short circuits or code resets during repair.
- Disconnect any wiring gently. Most modern locks have small connectors—pull, don’t yank.
- Follow the manufacturer’s instructions for removing or replacing levers. There’s usually a specific order to the screws and covers.
- Take photos during disassembly. This helps you pair everything up again during reassembly, especially with tricky wiring or battery covers.
If you’re troubleshooting a remote or programmable handleset, check if the lever issue is affecting lock function (like not registering a code or failing to sync with your phone). Sometimes, a jammed lever confuses the system and makes it seem like the lock isn’t working. Fixing the mechanical problem usually gets things back on track, but you may need to reset or re-pair the lock through the manufacturer’s app or instructions.
Don’t force anything around a circuit board or battery pack. Even a small slip-up can turn a quick repair into a full-on replacement.
Tips for Preventing Future Lever Damage
After you’ve spent the time repairing or replacing a bent lever, the last thing you want is a repeat performance. Prevention is all about mindful use and regular TLC—think of it as “handleset hygiene.” Let’s face it, a little extra care saves a lot of hassle down the road.
Here are my go-to habits for keeping handleset levers (especially from brands like Schlage, Kwikset, and Yale) in top condition:
- Don’t hang bags, purses, or heavy items from the lever. The extra weight quickly bends the mechanism and wears out the spindle.
- Maintain and lubricate the moving parts every few months with a silicone-based spray. This keeps the action smooth and prevents rust or grinding.
- Tighten the set screws or mounting hardware if you notice any wobble or play. A snug fit keeps everything aligned.
- Be gentle with the handle. Slamming or forcing the lever can bend even the toughest metal over time.
If you live somewhere with temperature swings or lots of humidity, metal handles can expand or contract slightly—check your handleset after any big seasonal shifts for tightness or unusual play. And with electronic locks, keep an eye on battery life; low batteries can make the lock “draggy” and add extra stress to the lever.
Comparing Handleset Repair vs. Full Replacement
So, is it worth fixing a bent handleset lever, or should you just swap out the whole thing? The answer depends on the damage, the brand, and how attached you are to your current style. Let me walk through the main trade-offs:
- Repairing is usually cheaper, especially for minor bends or loose levers. It keeps your existing lock and keys but may not look perfect if the finish is damaged.
- Replacing the lever (or just the damaged part) makes sense if you like your handleset and a matching part is available. It’s a quick fix if the rest of the hardware is solid.
- Full handleset replacement is best for major damage, or if you want to upgrade to an electronic, keyless, or remote-controlled lock. This can be a bigger DIY project but adds security and features.
If your handleset is old or discontinued (think vintage Kwikset models), finding replacement levers might be a challenge. In those cases, a universal replacement—though sometimes less stylish—gets the job done. And if you’re upgrading to a smart lock, consider it an investment in both security and convenience; syncing your new lock and learning the code is usually easier than you think.
The right call is the one that leaves your door working smoothly, with a lever that feels like it was made for your hand—not a daily reminder of a fix gone wrong.
Wrapping Up: Bringing Your Handleset Back to Life
Fixing a bent or damaged lever on your handleset doesn’t have to be a headache. With the right tools, a steady approach, and a little know-how, you can straighten, repair, or replace most levers—even on brands like Schlage and Kwikset—without breaking a sweat. Remember, a reliable door handle makes every entry and exit feel right. Take your time, follow these steps, and enjoy that solid, satisfying click each time you lock up. If you hit any snags, don’t hesitate to look up your specific brand instructions or ask for a hand. After all, your front door is the gateway to your home—it deserves to work (and look) its best.