Many people face this issue, especially with older doors or those that have been used and abused over the years. Whether it’s the front door taking a beating from the elements or the bathroom door that’s just had too many kids slamming it, knowing how to fix this can save you both headaches and money in the long run. Let’s dive into how you can repair a door frame where the strike plate screws are stripped, using a few tools and some patience.
Understanding the Strike Plate and Its Importance
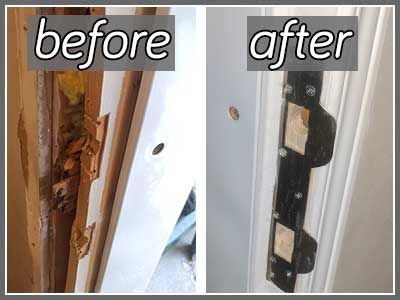
The strike plate is that small piece of metal attached to your door frame. It works with the door’s latch to keep your door closed and secure. When you turn the doorknob, the latch moves and clicks into this plate. If the screws holding it in place are stripped, the strike plate can’t do its job, leaving your door vulnerable.
You might be wondering why this happens. Over time, screws can become loose from regular use. The wood can also weaken, making it difficult for the screws to hold tight. When this happens, the connection weakens, and the door can swing or rattle more than it should.
Visualize it this way: if you had a key that didn’t fit in the lock properly, you wouldn’t feel safe, right? That’s the same feeling you get when your door doesn’t latch securely. Fixing this problem ensures you can feel safe and sound in your home.
Gathering the Right Tools
Before jumping into the repair, you’ll need a few tools. Trust me, being prepared can make this process much smoother. Here’s what you need:
- Screwdriver (preferably a drill for speed)
- Wood filler or toothpicks
- New screws (choose slightly larger ones if necessary)
- Measuring tape
- Sandpaper (optional, but can be helpful)
Let’s break it down. A screwdriver helps you remove the old screws and install new ones. Wood filler or toothpicks can help fill in the stripped holes, giving your new screws something to grip. A drill can speed things up, but if you don’t have one, a manual screwdriver works just fine.
Remember, having everything on hand means you won’t be running back and forth to the toolbox, which can be a real time-saver.
Assessing the Damage
Now that you’ve gathered your tools, it’s time to take a close look at the strike plate. Start by removing it gently with your screwdriver. Once it’s off, examine the wood where the screws were. Look for holes that seem too big or stripped out. You want to see whether the wood itself is still sturdy or if it’s crumbling away.
If the wood looks okay but just has larger holes, you’re in luck. If it’s damaged, you might need to consider more serious repairs. However, don’t worry just yet—most of the time, minor fixes can work wonders.
To give you an idea, if you find loose bits of wood or if the holes are enlarged, that’s your cue to fill them. If everything looks solid but the screws are just stripped, you can often just switch them out for a larger size.
Filling the Stripped Holes
To repair stripped holes, you can use wood filler or toothpicks. Here’s how:
1. Wood Filler Method:
– Clean the area of any debris or dust.
– Apply the wood filler into the holes and let it dry according to the package instructions.
– Once dry, you can sand it down slightly to make it smooth.
2. Toothpick Method:
– Insert a few toothpicks into the stripped hole.
– Apply wood glue to the toothpicks for extra grip.
– Snap them off even with the surface and wait for the glue to dry.
Using either of these methods gives your screws something firm to hold onto. It’s like putting a fresh tire on a car; it helps everything roll smoothly.
Installing New Screws
With your holes filled and dried, it’s time to reattach the strike plate. Grab your new screws—make sure they’re a bit longer or thicker than the originals if necessary.
To install them, follow these steps:
1. Align the strike plate with the holes.
2. Insert the new screws into the filled holes.
3. Tighten them gently but firmly—don’t go overboard; you don’t want to strip them again!
As you screw them in, apply even pressure. It’s like tightening a jar lid; if you do it too hard in one spot, you’ll risk breaking it.
Once everything is secure, test the door. Close it gently and ensure it latches correctly. If you feel resistance or if it doesn’t latch, you might need to adjust the plate slightly for a better fit.
Common Problems and Troubleshooting
Even after your hard work, we all know that sometimes things can go awry. Here are a few common issues you might encounter and how to handle them:
– Door Misalignment: If your door isn’t aligning with the strike plate, check the hinges. You might need to tighten or replace them.
– Screws Still Stripped: If the screws keep coming loose, it may indicate underlying damage to the frame. Consider using longer screws or a reinforced strike plate.
– Difficulty Closing the Door: If the door still doesn’t close properly, it could be due to warping. Check if the door itself has warped over time, which might require adjustments.
Don’t get discouraged! Most of these problems can be tackled with a little extra patience and minor tweaks.
When to Call a Professional
There are times when DIY fixes just won’t cut it. If your door frame is extensively damaged or if you notice any structural issues, it’s best to call a professional. They can assess the situation and provide solutions that might be beyond the simple home repair.
Sometimes, knowing when to step back and ask for help can save you from bigger headaches later on. It’s not a defeat; it’s just being smart about your home repairs.
Repairing a door frame where the strike plate screws are stripped might seem daunting at first, but it’s a manageable task with the right approach. Just remember to take your time and assess the situation clearly. With a few tools and some patience, you can restore your door to its secure, functioning state.
So, next time your door doesn’t close right, you won’t feel helpless. You’ll remember this guide and be ready to tackle the repair confidently. Happy fixing!