You might be dealing with a wooden door that’s seen better days or perhaps a modern door with a frame that’s lost its structural integrity. Either way, it’s important to address this issue to ensure your door functions as it should and looks good doing it. In this guide, I’ll walk you through the steps for repairing a door frame that’s cracked around a hinge, making it easy enough for anyone to follow—even if you’ve never taken on a repair project before.
Assessing the Damage
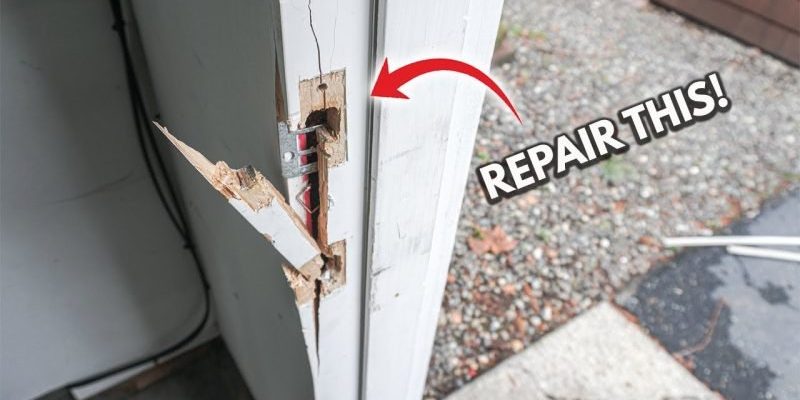
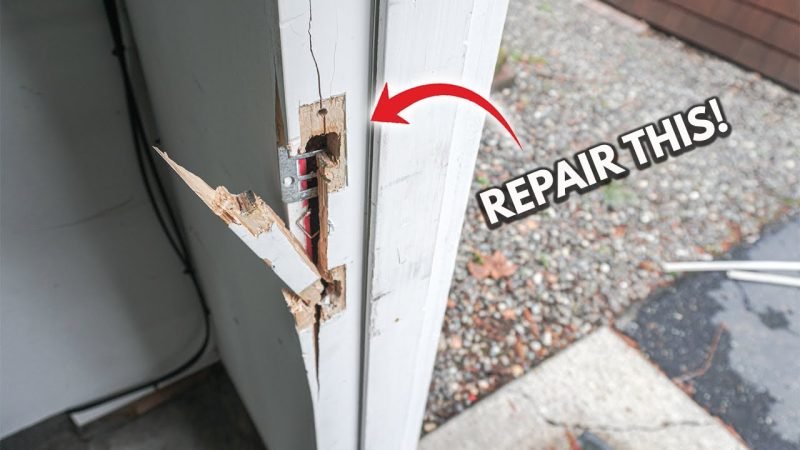
The first step in fixing a cracked door frame is to understand the extent of the damage. Look closely at the area around the hinge. If you see cracks, it’s essential to determine how deep they are and whether the frame is still structurally sound. A hairline crack might be straightforward to fix, while deeper cracks might require more intensive repairs.
To check for structural integrity, try gently pushing on the door while it’s closed. Does it feel loose? If so, the frame is likely compromised and might need a more robust solution. Remember, repairs are about building strength back into the structure. So, take your time assessing what you’re working with.
Once you’ve evaluated the damage, gather your tools. You’ll need some wood glue, clamps, wood filler or epoxy, sandpaper, and paint or stain to match the existing frame. Think of these tools as your “repair squad”—each one plays a role in getting your door frame back to its former glory.
Gathering Your Tools
Before diving into the repair, gather everything you’ll need. Here’s a quick checklist:
- Wood glue
- Clamps (or something heavy to press the frame together)
- Wood filler or epoxy
- Sandpaper (medium and fine grit)
- Paint or stain (to match your frame)
Having your tools ready not only makes the process smoother but also keeps you focused. You won’t want to be searching for that elusive tube of glue halfway through your project.
Pro tip: If you’re unsure about color matching paint or stain, take a small sample of your door frame to your local hardware store. They can help you find just the right shade—no guesswork necessary!
Preparing the Area for Repair
Now that you’ve assessed the damage and gathered your tools, it’s time to prepare the area for repair. Start by cleaning the cracked area. Dust and debris can interfere with the glue or filler adhering properly, so give it a good wipe down.
Next, if the crack is particularly deep, you might need to widen it a bit using a chisel. This will help the wood glue penetrate better and bond the pieces together securely. Think of it like creating a little pocket for the glue to settle into.
Once that’s done, dry-fit the pieces together. This means you should try to realign the frame as best as possible without applying adhesive. This step ensures that you know how everything fits before you get started. It’s like rehearsing for a play—it’s essential to know your lines before going live!
Applying Wood Glue
With the area prepped, it’s time to apply wood glue. Squeeze a generous amount of glue into the crack—don’t be shy! You want it to fill the entire space. Once you’ve done that, gently press the pieces back together.
Now, it’s time for the clamps. Place the clamps on either side of the hinge area to hold everything tight. This is where you’ll want to be patient—the glue needs time to dry and set properly. Follow the instructions on your glue, but generally, you should leave it clamped for at least an hour.
Here’s the thing: If the crack is substantial, consider adding a small wood screw or two for additional support. Just make sure to countersink them a bit so they’re flush with the wood surface.
Filling the Crack
After the glue has dried, it’s time to fill in any gaps. You’ll use wood filler or epoxy for this part. Apply the filler over the crack with a putty knife, pushing it into any voids for a smooth finish.
Make sure to follow the manufacturer’s instructions for drying time—some fillers take longer than others. Once it’s fully set, you can begin sanding. Start with medium-grit sandpaper to level the surface, then switch to fine-grit for a smooth finish.
Imagine this step as giving your door frame a professional buff. You want it to look as seamless as possible!
Finishing Touches
Once the sanding is complete, you’ll want to add the finishing touches. If you stained or painted the frame initially, now’s the time to do the same with the repaired area. Take your time blending the new finish with the old—this is where the magic happens.
Use a small brush for precision and don’t rush it. If the color doesn’t match perfectly at first, that’s okay—let the first coat dry, and apply more as needed. You want your repair to be as invisible as possible.
A little tip: If you know the exact paint or stain used, it might be worth it to apply a clear coat over the entire frame afterward. This way, the entire door frame looks cohesive.
Reinstalling the Door
Finally, it’s time to reinstall your door. If you took the door off during the repair process, now is the moment to put it back on the hinges. Carefully align the door with the hinges, making sure everything fits snugly.
As you reattach the screws, check that the door swings freely without resistance. If it feels off or sticks, you might need to adjust the hinges slightly. Your goal is a door that opens and closes smoothly, like it’s gliding on air.
Remember: The goal of this entire process is to strengthen the door frame and make your entrance as inviting as possible again.
Repairing a door frame that’s cracked around a hinge may seem intimidating, but it’s entirely doable with a little patience and the right tools. By assessing the damage, gathering your materials, and following each step, you can restore your door’s integrity and appearance.
Not only will your door function better, but you’ll also feel proud knowing you tackled the repair yourself. Remember, every home has its quirks, and fixing them is part of making your space uniquely yours. Now that you know how to handle this repair, don’t shy away from other small projects around the house—you might just find you enjoy it!