Think of your door frame as the backbone of your door—it supports the entire weight and function of the door. When it’s compromised, not only does the door look off-kilter, but it can also affect how well it opens and closes. Luckily, with a little patience and the right tools, you can restore it to its former glory and ensure it works smoothly again. Ready to roll up your sleeves? Let’s dive into how to tackle this repair step-by-step.
Identifying the Problem
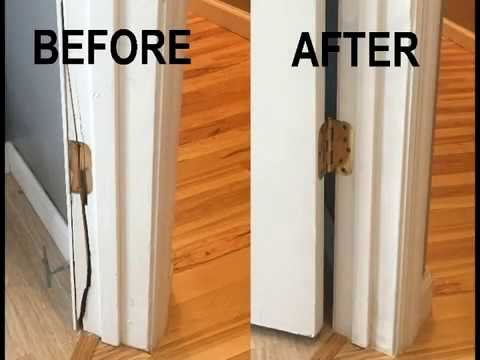
Before you pick up any tools, it’s important to understand what you’re dealing with. Start by carefully inspecting the door frame. Look for visible splits or cracks around the hinge area. You’ll want to check both the top and bottom hinges, as well as the door itself. A split may be small and unnoticeable at first, or it could be a larger gap that impacts the door’s functionality.
You might be wondering how to differentiate between a minor surface crack and a deeper split. A surface crack is usually shallow and may not extend much beyond the paint. In contrast, a deeper split can feel soft or even move when you push it. Be sure to note any issues with the door’s alignment—does it sag or stick when you try to open it? These signs will guide you in your repair process.
If you’ve determined that the split is significant enough to warrant a repair, don’t worry. The steps ahead will help you address the issue effectively. You’ll be able to restore the integrity of the frame and ensure your door operates smoothly once again.
Gathering Your Supplies
Now that you’ve identified the problem, it’s time to gather your supplies. Having everything ready will make the repair process smoother and help you avoid unnecessary trips to the store. Here’s a list of what you’ll need:
- Wood glue or epoxy
- Wood filler or putty
- Sandpaper (medium and fine grit)
- Paint or stain (to match your door frame)
- Clamps or a C-clamp
- Utility knife
- Brush or applicator for glue
When selecting wood glue, make sure to pick one that’s strong and durable. Epoxy provides a stronger bond, which can be especially useful if the split is large. If you’re unsure about what to choose, ask a staff member at your local hardware store—they’re usually quite helpful.
Also, think about the finish you’ll want after the repair. If your door frame is painted, matching the color shouldn’t be too hard. If it’s stained wood, bring a sample along to ensure you get the right shade. Having all your supplies ready before you start will save you time and keep you focused on the task at hand.
Preparing the Area
Before diving into the repair, take a moment to prepare your work area. Clear any furniture or obstacles away from the door to give yourself ample space to work. Dust and dirt can affect the adhesion of glue, so it’s a good idea to wipe down the area around the split with a damp cloth.
Next, use a utility knife to gently remove any loose paint or splintered wood around the split. This doesn’t have to be perfect—just enough to create a clean surface for the repair. If there’s any dirt or grime, a quick scrub will help as well. Remember, the goal is to give the glue and filler the best chance to bond well.
Lastly, it can be helpful to have a few clamps on hand to hold the frame together while the glue dries. If you don’t have clamps, you can use heavy objects to apply pressure, but clamps usually provide a more secure grip. Once everything is ready, you’re set to start the actual repair.
Applying Wood Glue
With your area prepped, it’s time to tackle the split itself. If you’re using wood glue, apply it generously into the crack. Use a brush or a small applicator to spread the glue evenly. The goal is to penetrate the split as deeply as possible to ensure a strong bond. If the split is larger, epoxy might be a better option as it can fill gaps more effectively.
After applying the glue, gently press the wood back together. If the split is deep, don’t hesitate to apply some extra glue to ensure a solid bond. Use your clamps to hold the frame together securely. It’s important that the pieces of wood align perfectly to avoid any misalignment once it’s dry.
Let the glue set according to the manufacturer’s instructions, usually a few hours. While it’s drying, you could take a break or clean up your workspace. But remember, patience is key here—rushing can lead to a weaker bond.
Filling the Split
After the glue has dried, you might find some gaps that need filling. This is where wood filler comes into play. Take your wood filler and, using a putty knife, apply it over and into the split. Make sure to push it in deeply to ensure that it fills all the voids. The goal is to create a smooth surface that blends seamlessly with the frame.
Once you’ve filled the split, allow the filler to dry completely. This can take anywhere from 30 minutes to a few hours, depending on the product you’re using. After it’s dried, grab your sandpaper and smooth out the area until it’s even with the rest of the frame. Start with medium-grit sandpaper and finish with fine-grit for a polished touch.
It’s always a good idea to check your work as you sand. You want a smooth surface that feels level with the rest of the door frame. After sanding, wipe away any dust to prepare for the final touch.
Painting or Staining the Repair
Now comes the fun part—finishing your repair! If your door frame is painted, grab your matching paint and a brush. If you’re going for a stain, make sure to choose one that closely resembles the original finish. Apply the paint or stain evenly over the repaired area. You might need two coats, so let the first coat dry before applying the second one.
When painting, be careful not to get any brush strokes or drips. If your finish is glossy, sanding lightly between coats can help achieve a smooth final look. For stain, after the first coat has dried, you can add another coat if you want a deeper color. Always follow the manufacturer’s instructions for drying times and number of coats.
Once the final coat has dried, step back and admire your handiwork! Your door frame should now look good as new, with the split repaired and the finish restored.
Testing Your Repair
After everything’s dried and dried, it’s time to put your door to the test. Open and close the door a few times to see how it functions. It should swing smoothly without any sticking or dragging. If you notice any issues, double-check that the hinges are tight and properly aligned.
You might also want to keep an eye on the repair for a few days, just to ensure everything holds up. If anything seems off, you might need to tweak the hinges or reapply some glue.
Remember, a well-repaired door frame not only looks great but also adds to your home’s overall integrity. You’ve done the hard work, and it shows. It’s always satisfying to tackle a DIY repair, especially when you see a marked improvement.
In conclusion, repairing a door frame that has split around a hinge might seem daunting at first, but it’s a manageable DIY project. By following the steps outlined here—identifying the problem, gathering supplies, preparing your area, applying wood glue, filling the split, and finishing with paint or stain—you can restore your door frame in no time. So, roll up your sleeves, get your tools, and give your door a new lease on life!