
Here’s the thing: fixing a worn door bottom isn’t just about looks. A tight, well-sealed door keeps weather out, saves on heating and cooling, and blocks pests or dust from sneaking in. Whether you’ve got a classic wood entry door, a metal fire-rated door, or even a newer fiberglass type, the repair process is more about the condition than the brand. The good news? You don’t have to be a pro or have a garage full of tools. Let’s walk through what’s really happening when your door seal goes wonky and how you can bring it back to life.
What Causes Door Bottoms to Wear Down?
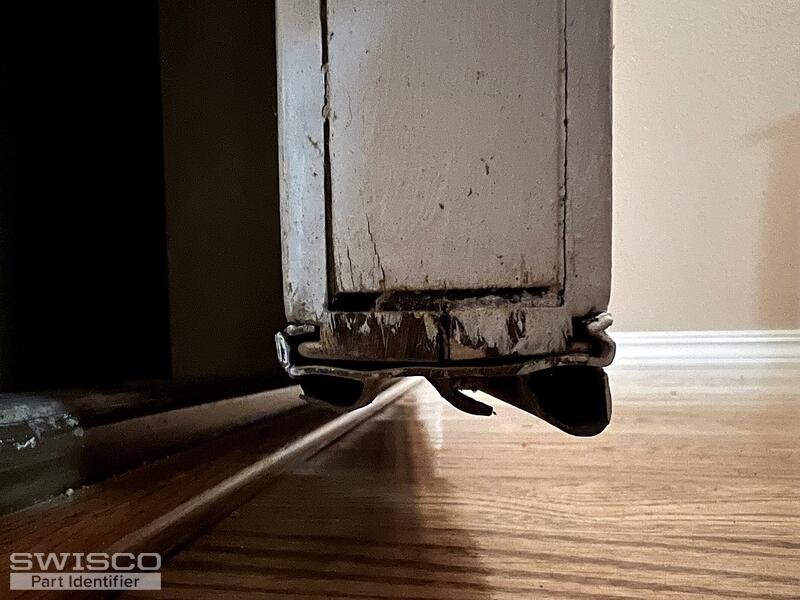
The bottom of your door has a tough job. Think about how often it’s dragged across rough surfaces, bumped into shoes, or exposed to moisture and dirt. *Door bottoms* are constantly fighting friction. Over time, all that rubbing and force can eat away at wood, metal, or even sturdy rubber seals. Sometimes, just one harsh winter or a bit of swelling from rain can make a once-perfectly snug door start to gap and leak.
If your home’s shifting a bit (which is totally normal), the frame might settle unevenly. That puts extra pressure on certain spots—so the door bottom starts to wear at an angle or develops a groove. And for anyone who’s got a habit of wedging things under the door to “block a draft,” that can actually speed up the wear, too. Honestly, even good-quality doors from big names like Jeld-Wen, Therma-Tru, or Masonite aren’t immune if they’re used daily.
You might be wondering about the seal itself—the rubber or vinyl strip called a *door sweep* or *weatherstrip*. Those get brittle or flatten out after a few years, basically turning useless against air or water. So when you start seeing daylight or feeling a breeze, don’t be surprised if the real problem is hidden underneath.
Signs Your Door Bottom Needs Repair
It’s easy to brush off a slightly drafty door, but little signs can turn into bigger headaches fast. The most obvious clue is seeing light peeking in under the door, especially during the day. Even the best deadbolt won’t keep out cold air if there’s a gap at the bottom. If you notice a whistling noise when the wind’s up, it’s probably slipping through a worn-down bottom or seal.
Check for visible damage: Does the paint look scraped off right at the threshold? Is the wood splintering, or is there a little dent in a metal door? Push gently on the bottom—if it feels soft or crumbly, you might be dealing with rot or corrosion. And for those who spot water pooling just inside the door after a storm, that’s a big red flag the *weatherstripping* or *sweep* isn’t doing its job.
Another trick: use a piece of paper. Close the door on it at the very bottom and see if it pulls out easily. If it slides out with almost no resistance, your seal isn’t tight. Honestly, fixing this now is way easier (and cheaper) than dealing with floor damage or higher energy bills later.
Choosing the Right Materials for Repairing a Door Bottom
Not all doors or situations call for the same fix. The first thing to decide is whether you’re repairing *just the seal* (like swapping a worn sweep or weatherstrip) or if the *door bottom itself* is chewed up and needs new life. For wooden doors, replacing part of the wood is possible but takes a bit of carpentry skill. For metal or fiberglass, adding a new sweep or *door bottom kit* usually does the trick.
Here’s what you’ll find at most hardware stores:
- Adhesive Weatherstripping: Flexible foam or rubber strips that stick onto the bottom edge. Great for quick fixes but may wear out faster.
- Door Sweeps: Metal or plastic strips with a flexible vinyl or brush bottom. These screw onto the inside face of the door and create a sliding seal against the threshold.
- Automatic Door Bottoms: Higher-end solutions that drop down a rubber seal when the door closes. Pricier, but really effective for sound and weather.
- Replacement Door Bottoms: Full-length pieces (aluminum, vinyl, or wood) that cap or replace a badly worn edge. Good for doors with major damage.
You might be tempted to save $5 and grab whatever looks about right, but measure your door width and thickness first. If you’re unsure, take a photo and show it to a store clerk. Some brands, like Frost King or M-D Building Products, make universal sweeps, but certain doors—especially older or custom ones—may need something more specific.
How to Remove the Old Door Bottom or Seal
Getting the damaged part off is often the messiest part of the repair, especially if there’s old caulking, paint, or rust in the way. Start by opening the door wide and, if you can, pop it off the hinges and lay it flat. That way, you’re not fighting gravity or worrying about scratching your floor.
For adhesive weatherstripping, just peel it back slowly. If it’s dried out, use a putty knife to help lift tricky bits. For metal or wood sweeps that are screwed on, grab a screwdriver and remove the screws, then gently wiggle the sweep loose. Sometimes, you’ll hit stubborn nails or staples—don’t be afraid to use pliers or a small pry bar, but be careful not to gouge the door bottom more than it already is.
Once it’s clear, use a stiff brush or some fine sandpaper to clean up any leftover gunk, paint, or rust. If you see signs of rot or soft wood, poke gently with a screwdriver. If it sinks in easily, you might need to let the wood dry out completely before patching or replacing it. Here’s an insider tip: a hair dryer on low heat helps dry damp wood fast if you’re short on time.
Pro insight: Don’t rush this step. A clean, smooth surface helps the new seal grip tight and last longer—otherwise, you’ll just be repeating the process in a few months.
Installing a New Door Sweep or Door Bottom Seal
Now that the old, worn-down material is out of the way, it’s time to give your door a fresh start. Measure the width of your door with a tape measure, making sure you’re getting the exact distance from edge to edge. Most sweeps and replacement bottoms are made a little longer so you can trim them for a perfect fit.
Here’s a simple step-by-step to install a new door sweep:
- Line up the sweep so the flexible edge just barely brushes the threshold—too tight and the door will stick, too loose and you’ll still have a gap.
- Mark the screw holes with a pencil, then use a small drill bit to make pilot holes (especially important for wood doors).
- Hold the sweep in place and attach it with the provided screws, making sure it stays level from one end of the door to the other.
- If the sweep is too long, trim it with a hacksaw or heavy-duty scissors before the final screws go in.
For doors with really rough or damaged bottoms, a *replacement door bottom kit* might slide over or cap the edge. These take a bit more patience. You’ll need to remove the door, slide the new bottom on, and sometimes add a bead of exterior caulk to seal gaps. Fiberglass or steel doors often have a slot for the seal to slide into—just push the new gasket in place, making sure it’s seated all the way across.
Some folks swear by automatic door bottoms for busy, high-traffic spots. These take a few extra tools, but the installation isn’t too wild: just follow the template provided for screw holes, and double-check that the rubber seal drops flush with the floor when the door closes.
Testing the Seal and Troubleshooting Common Issues
Once your new sweep or seal is installed, don’t just slam the door and call it done. Here’s where a little troubleshooting pays off. Close the door slowly and watch how the sweep contacts the threshold. If it bunches up, drags, or leaves a big visible gap, you might need to loosen the screws and shift it up or down.
Try the paper test again—close the door on a slip of paper at several spots along the bottom. It should have enough grip that the paper doesn’t fall out easily, but you shouldn’t have to tug with both hands, either. Walk outside and listen carefully as you open and close the door. A well-fitted sweep or seal should be whisper-quiet, not squeaky or scratchy.
You might be wondering what to do if the door still feels drafty. Double-check for gaps at the corners—sometimes these need a dab of caulk or a narrow stick-on weatherstrip to seal tight. If your floor is uneven and the sweep seems to miss a spot, consider a sweep with an adjustable height or a brush-style seal, which can flex over small dips.
If all else fails: Sometimes a door is warped beyond an easy fix, or the threshold itself is the problem. If you find the seal just won’t close no matter what, it might be time for a pro to check for bigger alignment issues.
Comparing Repairs: DIY vs. Professional Help
So, where do you draw the line between a good DIY fix and calling in a pro? For most folks with a standard wood, metal, or fiberglass door, swapping out the door sweep or fitting a new bottom is a straightforward afternoon project. Hardware stores and home centers have tons of options, and the instructions on most kits are pretty beginner-friendly.
But, let me explain—some situations genuinely need expert help:
- If the bottom inch or two of a wooden door is soft or crumbling, cutting and patching new wood is tricky and needs precision tools.
- Steel doors that are rusted through may need welding or a replacement skin, which isn’t a casual weekend project.
- Historic doors with special details or odd sizes often require custom material, and you really don’t want to ruin the look with a modern plastic sweep.
- Severe water leaks (especially if you see black stains or mold) can mean problems with the sill itself, not just the door bottom.
If you’re feeling stuck, there’s no shame in asking a handyman or door specialist to take a look. They’ll save you time, hassle, and possibly more expensive repairs down the road.
Preventing Future Wear and Extending Door Seal Life
A little bit of maintenance goes a long way to keep your door bottom in good shape. Think of it like checking your car’s oil or tightening a loose hinge—small actions now stop big issues later. Every few months, run your hand along the door bottom. If it feels rough, sticky, or brittle, clean it with a damp cloth and check for early trouble.
Don’t ignore stubborn dirt or grit on your threshold. That acts like sandpaper every time you open the door, slowly grinding away at both the seal and the floor. Sweep or vacuum the area regularly, and if you spot mud or salt in winter, wipe it up right away.
Re-seal or repaint wooden doors as needed, especially on the edges. For metal doors, check for rust starting along the seam and hit it with a little primer if needed. And, if you ever notice screws working loose on your door sweep, tighten them up—sloppy seals invite problems.
Smart habit: Keep a spare sweep or stick-on weatherstrip in your tool drawer. Future you will thank you when the next cold snap hits and you don’t have to run to the hardware store in a panic.
Wrapping Up: A Solid Door Bottom Means Comfort and Savings
Fixing a worn-down door bottom is one of those chores that pays off every time you come home and close out the world. A snug seal blocks out drafts, noise, and critters—and it can even lower your bills a bit. Whether you went with a quick adhesive fix, a sturdy new sweep, or a full replacement for a battered edge, you’ve put an end to that pesky gap.
Honestly, this isn’t just about repairs—it’s about taking control of your space. Regular checkups and a little bit of DIY know-how keep your door (and your home) feeling safe, comfortable, and energy-efficient. Whenever you catch a chill by the door or see that strip of daylight, you’ll know exactly how to handle it next time.