Honestly, paint splatter on a deadbolt isn’t just an eyesore. It can gum up the locking mechanism, keep the key from turning smoothly, or even block the key slot. If you’ve ever tried to unlock your door and felt resistance—or heard a weird gritty scrape—you might be dealing with more than just a cosmetic issue. The good news? With a bit of patience, a handful of basic tools, and the right know-how, it’s totally possible to fix a painted-over deadbolt without calling a locksmith or buying a new lockset.
Why Paint Damages Deadbolts and Why It Matters
Here’s the thing: a little paint seems harmless, but locks are precise bits of machinery. When wet paint seeps into the tight spaces of a deadbolt, it dries into tiny, rigid layers that block movement. Suddenly, your keys may refuse to slide in, or the turn of the bolt feels rough and gritty. Brands like Kwikset and Schlage design their deadbolts to operate smoothly, so anything that messes with those tolerances—like dried paint—can throw the whole system off.
You might be wondering, “Can’t I just scrape off the visible paint?” Sometimes that works for splatter on the surface. But if paint has trickled into the keyhole, latch, or even inside the locking mechanism, it can start causing deeper trouble. People often mistake a sticky lock for a worn-out one, when in reality, a paint-clogged lock can often be revived with some careful cleaning.
Paint inside your deadbolt also means you might run into problems with your remote-controlled smart locks—if you have one. Smart deadbolts like the Kwikset SmartCode or Schlage Encode use electronics and mechanical parts that really don’t mix well with paint residue. Paint can block batteries, jam the code buttons, or mess up the auto-lock features, which makes troubleshooting a pain.
How to Inspect and Diagnose Paint-Splattered Deadbolts
First things first, you’ll need to take a close look at your deadbolt and figure out how bad the paint splatter is. Sometimes, the damage is just surface deep, but other times, hidden paint can be causing the lock to jam or fail. Here’s how to get started:
- Check the keyway and faceplate: Look for dried paint around the keyhole and the visible parts of the lock. Try inserting your key—does it go in smoothly, or does it catch?
- Test the locking and unlocking: Turn your deadbolt from both inside and outside. If you hear scraping, feel resistance, or notice sticking, chances are the mechanism is affected by paint.
- Check for paint inside: Use a flashlight to peek into the keyhole or around the latch. Don’t shove anything inside—just look for any obvious signs of dried paint or debris.
Sometimes you’ll find the paint is just on the surface, while other times, it may have gotten pulled inside when you used the lock before it dried. The level of cleaning needed depends on how deep the paint goes. If you spot paint inside the lock or if the key refuses to turn, you’re probably in for a more involved repair.
Gathering the Right Tools and Supplies
Repairing a deadbolt damaged by paint splatter can be surprisingly simple if you’re prepared. Trust me, trying to scrape dried paint with a house key or butter knife will probably make things worse. Here’s what you’ll want to have nearby:
- Small screwdriver set (Phillips and flathead): Most deadbolts use standard screws to hold everything together.
- Soft cloths or paper towels: For wiping paint and cleaning up residue.
- Cotton swabs: These are perfect for reaching into tight spaces without scratching.
- Toothpicks or wooden skewers: For poking out stubborn bits of dried paint (never use metal).
- Non-acetone paint remover or rubbing alcohol: Acetone can wreck finishes, so pick something gentler for safe cleanup.
- Graphite lock lubricant: Don’t use oil-based sprays—they attract dust and can make issues worse.
- Masking tape (optional): If you want to protect nearby paint or trim while you work.
If you’re dealing with a smart lock, make sure you remove or disconnect any batteries before you start cleaning. Otherwise, you might short out the electronics or trip a reset code—especially important for models like the Kwikset SmartCode or Schlage Sense, which often have delicate wiring inside.
How to Remove Paint Splatter from the Surface of a Deadbolt
Let me explain—sometimes the fix is as easy as careful surface cleaning. If the paint is on the faceplate, key slot, or surrounding trim, you can often fix the problem without disassembling anything.
- Start by dampening a soft cloth with warm water and gently rubbing off as much dried paint as you can. Don’t scrub too hard, or you’ll risk scratching the finish.
- If the paint is stubborn, dab a little non-acetone paint remover or rubbing alcohol onto a cotton swab. Test this in a hidden spot first, because even “safe” removers can mess up polished or brass finishes. (Honestly, it’s worth the extra minute.)
- Gently work around edges, inside the keyway (just at the entrance), and anywhere else you see paint. Use toothpicks to nudge loose flakes out, but be careful not to push paint deeper in or gouge the metal.
Let the area dry fully before testing the lock again. If things feel smoother and your key goes in easily, you might be in the clear. But if there’s still resistance or the key won’t go in at all, deeper cleaning is needed.
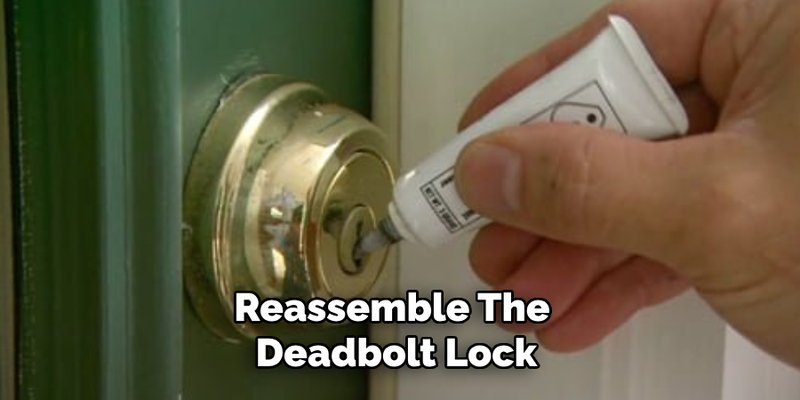
Disassembling the Deadbolt for Deep Cleaning
If cleaning the outside didn’t fix things, you’ll need to go a bit further. Removing the deadbolt may sound intimidating, but honestly, it’s just a couple of screws and a steady hand. Make sure your door is unlocked before starting.
- Remove the screws from the interior side of the deadbolt. These are usually hidden by the turn piece or a little faceplate. Set the screws aside somewhere safe.
- Gently pull the deadbolt apart. The exterior and interior pieces should detach from each other. Watch for small parts (like springs or pins) that may fall out.
- Inspect the inside for paint. Look for any dried paint around the cylinder, latch, or on moving parts.
Clean out visible paint with cotton swabs, gentle paint remover, or even a soft toothbrush. Avoid getting remover on electronics or battery contacts if you’re working with a smart or coded lock. This is also a good time to give the inside a shot of graphite lubricant, especially if turning the bolt was gritty before.
Once everything is spotless and dry, carefully reassemble the deadbolt. Don’t force anything—if pieces don’t fit smoothly, double-check for hidden paint or leftover debris.
What to Do if Paint Affects Smart Deadbolt Functions
With smart deadbolts, like the popular Kwikset SmartCode or Schlage Encode, paint can be a bigger headache. If enough finds its way into the button panel or battery compartment, your code might stop working, the lock could lose sync, or batteries won’t connect right.
If a painted-over keypad or battery terminal is the problem, here’s what to try:
- Remove the batteries and keypad faceplate. Most models pop off with a few hidden screws or clips.
- Clean the affected area carefully. Use a dry cotton swab or, if needed, one barely damp with rubbing alcohol—never anything wet or harsh. Make sure everything is completely dry before reassembling.
- Check the code and pairing. Sometimes, cleaning can cause the lock to lose its code or Bluetooth sync settings. If things don’t work after putting it back together, try a reset or re-pair following your user manual’s troubleshooting steps.
Never spray cleaning fluid directly into a keypad or battery slots. Even a drop of moisture can short out sensitive circuits, leaving you with a whole new repair job.
When to Call a Locksmith or Replace Your Deadbolt
Here’s a hard truth: not every paint-splattered deadbolt can be saved. If paint has seeped deep inside the cylinder or the lock just won’t budge even after a thorough cleaning, you might be better off replacing it. Likewise, if your smart deadbolt won’t pair, reset, or recognize your code after cleaning, the electronics may be damaged.
Some signs it’s time for professional help or a replacement:
- The key still won’t turn after deep cleaning and lubrication
- You can’t remove paint from inside the mechanism without risking damage
- Digital features won’t reset or sync properly after cleaning
For classic deadbolts, replacement is often cheap and simple. For smart locks, consider whether repair costs are worth it compared to simply buying a new model. If you’re not confident or the door is sticking, too, a qualified locksmith can usually get things working in minutes.
Tips to Prevent Paint Damage Next Time
After wrangling with paint splatter once, you’ll want to avoid a repeat performance. The easiest fix? Protect your deadbolt with masking tape and a plastic bag before painting. Secure the tape tightly, making sure no gaps let drips or overspray inside.
- Always remove hardware if possible before painting doors or trim.
- Use painter’s tape and plastic wrap to cover locks that must stay installed.
- Double-check for overspray during painting, and wipe it away immediately—fresh paint is way easier to clean than dried splatter.
For smart deadbolts, take out the batteries first to avoid electrical mishaps if you have to clean up later.
If you’re careful during prep, you’ll save yourself so much time and hassle. Future-you will thank you!
Wrapping Up: Restoring Security and Peace of Mind
Dealing with a deadbolt damaged by paint splatter can be annoying, but it’s not the end of the world—or your lock. With some careful cleaning, a little patience, and the right step-by-step approach, you can usually bring your trusty Kwikset or Schlage back to life.
Don’t rush, pay attention to details, and never force stubborn parts. Most sticky deadbolts just need some TLC to turn smoothly again, whether they’re old-school mechanical models or modern smart locks with sync and code features. And once you’ve survived the cleanup (and maybe vowed to never paint near a lock again), you’ll know exactly how to keep your home secure and paint-free next time around.