The good news? You don’t have to be a professional locksmith (or even particularly handy) to tackle this. Fixing a deadbolt latch bolt that’s bent at the tip is totally doable at home, if you move slowly and understand what’s going on. Let me walk you through why this happens, how to spot the problem, and what you can do—step-by-step—to get your door locking smoothly again.
Why Do Deadbolt Latch Bolt Tips Get Bent?
Honestly, most of us don’t give much thought to our locks until they start acting up. But every time you turn that key or push your thumb against the keypad, the latch bolt shoots in and out of the strike plate. Over time, a few things can mess with this simple dance.
One common culprit is misalignment. If the strike plate (the metal piece in the door frame) isn’t lined up perfectly, the latch bolt can slam into the edge instead of sliding smoothly. Imagine trying to plug your phone charger in blind—it just scrapes and bends. This repeated banging can eventually warp the tip.
Another big cause? Forcing the lock when it’s already sticky or stubborn. Maybe the door shifted from humidity, or paint built up in the frame, so locking up starts to feel like arm day at the gym. Giving the deadbolt extra muscle can bend the tip before you realize it. And sometimes, manufacturers just use softer metals to save a buck, which makes the bolt easier to bend.
Here’s the thing: once the tip of your deadbolt’s latch bolt starts to deform, it can get progressively worse until the lock won’t engage at all—or it’ll jam so hard you risk snapping the key. That’s why it’s worth fixing early.
How To Tell If Your Latch Bolt Tip Is Bent
You might be wondering if your lock’s trouble is really a bent latch bolt or just a plain old sticky lock. There are a few telltale signs to help you spot the problem.
First, pay attention to how the bolt feels when you lock or unlock the door. Does the key feel like it’s scraping or catching? Does the bolt refuse to extend or retract fully, stopping short or getting hung up? Sometimes, you’ll hear a metallic “ting” instead of a soft click. That’s usually the bolt tip dragging on metal where it shouldn’t.
If you can, open the door and turn the deadbolt while watching the latch bolt itself. Is the tip visibly angled, or is there a gouge or dent right at the end? Even a small bend can cause big problems, since deadbolts don’t have much wiggle room. Compare it to another door in the house if you’re not sure what “straight” looks like.
Finally, check how the bolt fits in the strike plate. If it only partly enters, or hits the edge before settling, you’re likely dealing with a bent tip. Sometimes, you’ll even spot small metal shavings near the plate—a sign the bolt is grinding instead of gliding.
If your deadbolt used to work but suddenly feels off, don’t ignore it—catching a bent latch bolt early can save you from a full lockout later.
What Tools Do You Need To Repair A Bent Latch Bolt Tip?
Let me be honest: you don’t need a toolbox worthy of a pro locksmith to fix most deadbolt latch bolt problems. Most people already have what they need in a kitchen drawer or garage. Here’s what you’ll want on hand:
- Screwdriver set (Phillips and flathead, usually
- Needle-nose pliers (for bending the tip back, if it’s only lightly bent)
- Fine metal file (to smooth out nicks or burrs on the bolt tip)
- Lubricant (graphite powder or dry Teflon spray, not WD-40)
- Replacement latch bolt or entire deadbolt assembly (if the damage is severe)
A flashlight can be handy for seeing inside the lock, and a workbench or sturdy table is helpful for disassembly. If you’re dealing with a smart lock brand (like August or Ultraloq), have any sync or reset instructions ready, since you might need to code or pair it again after reinstallation.
Don’t forget patience. Sometimes the screws are tight or the parts a little stubborn. Take your time—the lock isn’t going anywhere.
Step-By-Step: Removing Your Deadbolt For Repair
Here’s where most beginners get intimidated, but don’t worry—deadbolt removal is easier than it sounds. Let me explain each step slowly, so you won’t miss anything.
First, make sure your door is open and supported, so it doesn’t swing closed mid-repair. Start by unscrewing the two screws on the inside plate of the deadbolt. These are usually right above and below the thumbturn or keypad. Don’t force them; if they’re stuck, try a drop of lubricant.
Once the screws are out, gently pull apart both the inside and outside parts of the lock. Some models, especially smart or electronic deadbolts, may need a battery disconnect or careful unplugging of tiny wires. Always snap a photo of the wiring (honestly, it can save you from future headaches when it’s time to re-sync or reset the remote control).
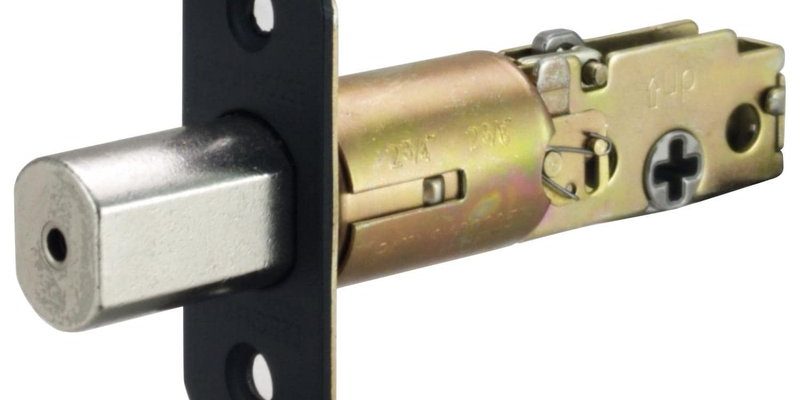
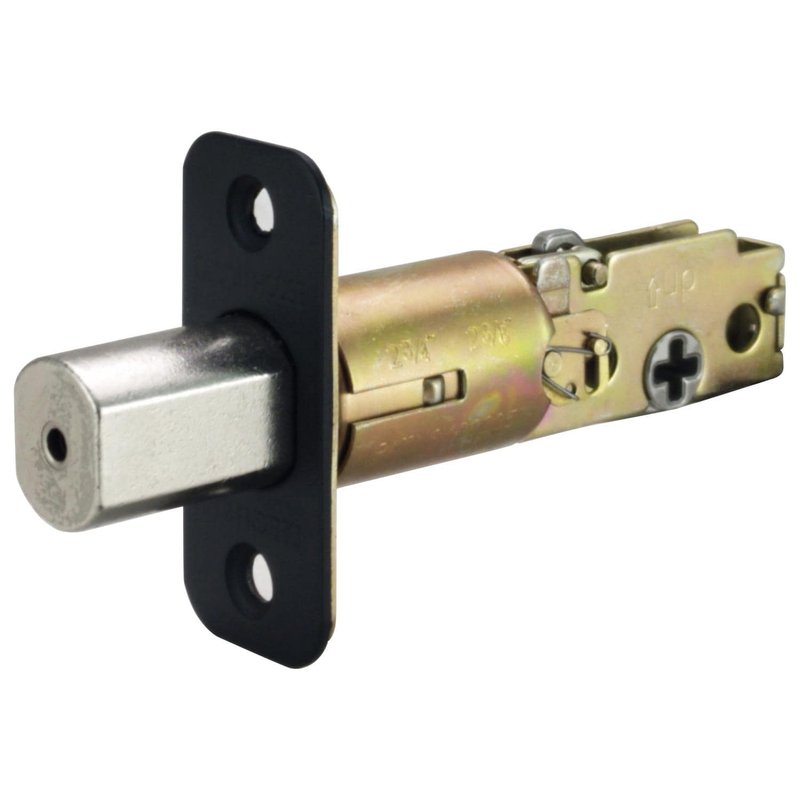
With the outside assembly off, you’ll see the actual latch bolt mechanism inside the edge of the door. Remove the pair of screws holding it in place, and carefully slide the bolt out. Now you can inspect the tip up close—run your finger (carefully) along the edge and look for bends, notches, or dents.
Take your time reassembling. If you’re using a universal replacement, check your lock’s code for compatibility, especially with smart brands that require pairing or battery replacement after reinstallation.
How To Straighten a Bent Latch Bolt Tip Safely
This is the heart of the fix. If your latch bolt tip is only slightly bent—say, visible but not dramatically kinked—you may be able to straighten it yourself.
Lay the latch bolt on a flat surface so you can see the bend clearly. Using needle-nose pliers, gently grip the tip and ease it back into alignment. Don’t rush this—metal can snap if forced. If the tip has leftover burrs or roughness, use a fine metal file to smooth it out. Avoid filing too much, or you might make the tip weak.
Test the bolt by sliding it in and out of the latch case. It should move smoothly, without sticking or binding. If the bolt just won’t go straight, or it’s badly gouged, it’s time to replace it. There’s no sense risking a failed lock—replacement deadbolt assemblies are affordable and easy to install, especially for brands like Kwikset and Schlage.
Before you reinstall, wipe the bolt clean and add a tiny bit of dry lubricant. This makes it move freely and helps prevent future sticking. Put the latch bolt back in, reattach the inside and outside lock assemblies, and tighten the screws without overtightening.
When To Replace The Whole Latch Bolt Or Deadbolt Assembly
Sometimes, repairs just aren’t enough. If the bent tip is badly twisted, or filing it down would leave it too short or weak, you’re safer replacing the entire latch bolt. If your deadbolt is older, showing signs of corrosion, or has a history of battery and remote issues (for smart locks), swapping it out might be the smarter move.
Let’s say you have a universal deadbolt—those generally fit most doors, but always check the code or model number before picking out a new one. For smart locks, you may need to pair or sync the lock from scratch, so have access to your app or remote instructions. Some brands even require a reset using a specific sequence of button presses or battery pulls.
Don’t worry too much about matching the finish perfectly—most hardware stores stock a wide range of brands and colors. Just make sure the new latch bolt extends fully into the strike plate and operates smoothly. If you run into any trouble, look up troubleshooting steps for your specific brand.
Fixing Strike Plate Alignment To Prevent Future Bends
Here’s something that’s easy to overlook: even if you repair your deadbolt latch bolt perfectly, a misaligned strike plate will cause the same problem to come back. Think of it like fixing a car tire without fixing the pothole you hit last week.
With the door open, slowly extend and retract the latch bolt to see if it slides directly into the strike plate opening. If it’s scraping or barely making it in, you may need to adjust the strike plate position. Loosen its screws a little and shift the plate up, down, or sideways, then retighten.
Sometimes, you’ll need to gently file the edges of the strike plate opening, especially if paint or debris is blocking it. For stubborn cases, installing a new strike plate with a wider opening can save the day. Don’t forget to add a squirt of dry lubricant to help the bolt glide in like butter.
Proper alignment isn’t just a finishing touch—it keeps your lock trouble-free and avoids future bending. Always double-check this after fixing your latch bolt.
Deadbolt Maintenance Tips For Longevity
After you’ve repaired or replaced your deadbolt latch bolt, it’s a good time to give your whole lock a little TLC. Preventative maintenance can save you from repeating the repair cycle.
- Lubricate the bolt and moving parts twice a year using graphite powder or dry Teflon spray. Avoid greasy sprays like WD-40—they attract dirt and gunk up the mechanism.
- Tighten all screws on the deadbolt assembly, including those on the strike plate and door edge. Loose screws = wobbly parts, which leads to misalignment and more bending.
- Check door alignment. If your door sticks or sags, adjust hinges or shim as needed. Even the fanciest deadbolt can’t overcome a warped door frame.
- If you’re using a smart deadbolt, keep batteries fresh, update firmware, and check any remote syncing instructions after major repairs.
Regular check-ups—just like with your car—keep your lock working like new and help spot small issues before they become locked-out emergencies.
Final Thoughts: Keeping Your Deadbolt Secure And Smooth
A bent deadbolt latch bolt tip can seem like a tiny flaw, but it can mean the difference between a door that’s truly secure and one that puts your home at risk. The good news is, most of these problems are fixable with a bit of patience, a handful of basic tools, and the willingness to get a little hands-on. Whether you’re repairing a classic Schlage or troubleshooting a finicky smart lock that needs to sync or pair after a battery change, the steps are within reach for most people.
Take your time, pay attention to the details, and don’t ignore the warning signs—a sticky lock or a strange sound is worth checking now, not later. By understanding how your deadbolt works and giving it some routine care, you’ll enjoy smooth locking and peace of mind, knowing your home is safe and sound.