Honestly, it’s a little like your front door is wearing mismatched socks: it still works, but it just doesn’t look quite right. Fixing a discolored deadbolt faceplate isn’t hard, and you don’t have to be a pro. You just need a bit of patience, the right tools, and a few tricks to get things looking sharp again. Let’s dig into what causes this in the first place, and how you can bring your deadbolt faceplate back to life—without replacing the whole lock.
Why Deadbolt Faceplates Get Discolored
If your deadbolt faceplate looks brown, greenish, or streaky, you might be wondering what exactly happened. Here’s the thing: most deadbolt faceplates are made from metals like brass, zinc, or stainless steel. These materials stand up well to weather, but they aren’t invincible.
When it rains, moisture hangs around on the metal. Add in air pollution, salt (if you live near the coast), or even just fingerprints, and the metal can start to react. That’s why you’ll see corrosion, tarnish, or weird splotches forming over time. Think of it like a slow-moving science experiment on your front door.
Sunlight can also make things worse. UV rays break down protective finishes, leaving the metal more exposed to the elements. Even the best brands, like Kwikset or Schlage, eventually see some discoloration unless you keep up with cleaning and maintenance. And if you’ve got an older house, chances are the original finish wore off years ago, making discoloration show up faster.
Assessing the Damage Before You Start
Before you break out the tools or cleaners, take a close look at your deadbolt faceplate. Is it just a bit dull, or are there deep patches of rust or greenish corrosion? Touch the surface—does it feel rough or gritty? Are there *actual* holes or pits in the metal?
If you’re lucky, you’re just dealing with surface discoloration or mild tarnish. These are easy to fix with a simple polish or a homemade cleaning paste. But if the faceplate is pitted, peeling, or flaking, it’s probably past the point of just cleaning. You might need to refinish it, or in the worst cases, swap it out entirely.
Don’t forget to check how the faceplate is attached. Most are held with two screws, but some newer smart deadbolt models (like a Schlage Connect or Kwikset Halo) may have a more complicated setup. If you’re not sure, look up your lock model. You don’t want any surprises in the middle of your repair job.
Gathering Tools and Materials
Let me explain what you’ll need before you get started. You don’t want to be halfway through scrubbing only to realize you’re missing something.
- Screwdriver: Most faceplates use a Phillips head. Check your lock before you start.
- Soft cloths or sponges: Microfiber works best for buffing and polishing.
- Mild dish soap: For basic cleaning and degreasing.
- Vinegar or lemon juice: These help with tarnish and mineral buildup.
- Baking soda: Useful for gentle scrubbing.
- Metal polish: Get one suited for your faceplate’s metal (brass, chrome, stainless steel, etc.).
- Protective gloves: Especially if you have sensitive skin or are using harsh cleaners.
- Replacement screws (optional): If yours are rusty or stripped out.
If you find the faceplate is too far gone, consider picking up a replacement that matches your deadbolt’s brand. Most hardware stores carry Kwikset and Schlage universal faceplates that fit standard deadbolts, but bring your old one for comparison.
Removing the Deadbolt Faceplate Safely
Here’s where things get a little hands-on. Start by unlocking your deadbolt and propping the door open for easy access and good light (trust me, it helps). Locate the screws on either end of the faceplate.
Step-by-step:
- Use the right screwdriver and turn each screw counterclockwise. If they’re stuck, dab a little penetrating oil (like WD-40) and wait 5 minutes.
- Once the screws are out, slide or gently pry off the faceplate. If it doesn’t budge, wiggle it side-to-side to loosen any paint or old grime sticking it to the door.
- Keep the screws in a small dish or cup—I’ve lost more than a few to porch cracks.
Removing the faceplate makes cleaning way easier, and you won’t risk scraping up your door’s finish.
Be careful not to bend the faceplate or scratch your door. If you notice the inner workings of the deadbolt are exposed, don’t mess with them. Focus only on the faceplate for now.
Cleaning and Restoring the Discolored Faceplate
This is the part that makes the biggest difference. If you’ve ever polished up old silverware or a brass doorknob, it’s a similar process—but easier, since the faceplate is flat and small.
Basic Cleaning:
- Rinse the faceplate with warm water and a drop of mild dish soap to remove surface grime. Pat dry with a soft cloth.
- Mix a paste of baking soda and water (about 3:1 ratio). Smear it across discolored spots, then scrub gently with a sponge or an old toothbrush.
- If you still see tarnish, try dabbing with vinegar or lemon juice. Let it sit for 5 minutes, then buff again.
Now, for the final shine, grab your metal polish. Apply per the instructions (usually with a soft cloth, in small circles). Buff until you see the natural color coming back and the surface feels smooth. For deep discoloration, you might need two or three rounds.
If the faceplate is pitted or looks dull even after polishing, you can try gently sanding with *very* fine steel wool (0000 grade), but be careful—not all finishes can handle it.
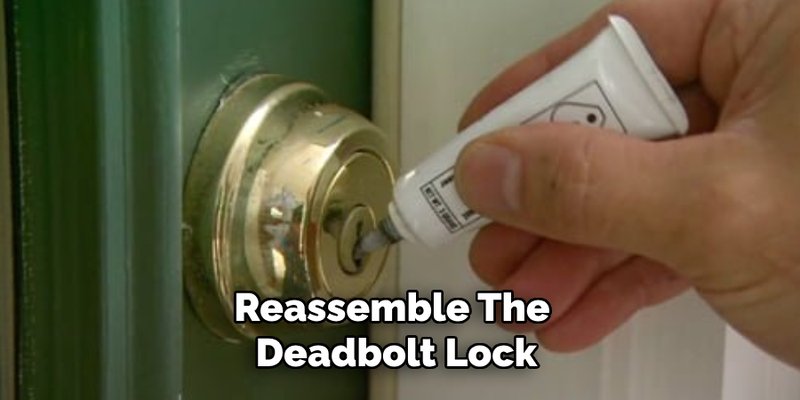
Reattaching and Protecting Your Faceplate
Now that your faceplate looks almost new, it’s time to put it back. Make sure it’s completely dry before you reattach it; leftover moisture just invites new rust or tarnish.
How to put it back on:
- Align the faceplate with the cutout in your door.
- Insert the screws and tighten them by hand, just until snug. Don’t overtighten—it can strip the holes or warp the plate.
- If you had any trouble with rusty or mismatched screws, now’s the perfect time to swap them out for fresh ones.
For extra protection, consider adding a tiny dab of clear nail polish or a thin coat of car wax on the faceplate surface—this can help seal out moisture and slow down future discoloration.
A little routine—wiping down the faceplate every few months—can keep it looking sharp for years.
When a Replacement Is the Better Option
You might be wondering, “Is there a point where I should just get a new faceplate?” Absolutely. Sometimes, no amount of cleaning or polishing brings back that original shine—especially if the metal is deeply corroded, dented, or the finish is peeling.
If your deadbolt is a popular model like a Schlage or Kwikset, the good news is replacements are easy to find. You can usually pick up a faceplate that matches your existing hardware without needing to re-code, re-sync, or mess with the lock’s battery (if it’s electronic). Just take your old one to the store to be sure you get the right fit.
If you have a specialty or vintage lock, look for the brand name stamped on the deadbolt or faceplate and search for parts online. If all else fails, a locksmith can often track down hard-to-find replacements or offer advice on retrofitting a universal plate.
Tips for Preventing Future Discoloration
Nobody wants to be out here buffing deadbolts every few months. Here are some simple things you can do to keep your faceplate looking good longer:
- Wipe it down: Every few weeks, go over the faceplate (and the rest of your hardware) with a clean, damp cloth.
- Apply a protective coating: Car wax, clear lacquer, or even a spritz of WD-40 can help block moisture and slow down weathering.
- Avoid harsh cleaners: Sticky sprays or abrasive pads can strip the original finish, opening the door (no pun intended) to more discoloration.
- Check your door’s weatherstripping: If water is leaking in around your lock, fix the weatherstripping for bonus protection.
If you want to go the extra mile, consider upgrading to stainless steel or weather-resistant faceplates next time. They’re a little pricier up front but save you trouble in the long run.
Closing Thoughts
Fixing a deadbolt faceplate that’s discolored from weather isn’t rocket science, but it does make a surprising difference for your curb appeal and peace of mind. Sometimes, all it takes is a little elbow grease and a few household supplies to make your front door look more welcoming.
Whether you’re sprucing up a trusty Kwikset, a sturdy Schlage, or another brand, just take it step by step—assess, clean, polish, and protect. If a replacement is the better call, don’t sweat it; you’ve got options. Either way, your lock (and your house) will thank you for the upgrade.