Honestly, fixing a door jamb can seem intimidating the first time you spot that splintered wood, especially near the hardware. Maybe you’re picturing a big, expensive contractor job. But here’s the thing: if you’re a bit patient and know what you’re looking for, you can absolutely tackle this with a few common tools, some repair materials, and a slow, steady approach. Whether your door sports a Schlage smart lock, a Kwikset deadbolt, or just an old-fashioned latch, the core steps and principles hold true for almost every brand and style.
Let me walk you through the nitty-gritty details, focusing on the area around the hardware, since that’s where most of the trouble shows up—and, frankly, where mistakes are easiest to make.
What Causes Damage Around Door Jamb Hardware?
You might be wondering why the area around the lock or latch gets damaged in the first place. In reality, it’s one of the most stressed parts of any door frame. Every time you slam the door or turn a key, that force travels straight into the wood surrounding the strike plate or deadbolt.
Over years, or sometimes thanks to one really forceful slam, the wood can split or crack. Common causes include:
- Old age and wear: Wood dries out and weakens, especially if your door gets lots of sun, rain, or general use.
- Improperly installed hardware: Screws or latches not anchored into solid wood, or oversized holes drilled during a rushed install, can make things loose and prone to damage.
- Forced entry attempts: Someone trying to break in, even if they don’t succeed, can leave lasting structural issues around the lock or deadbolt.
- Pets and pests: Sometimes dogs scratch near the latch, or termites sneak in, and suddenly you’ve got a mess of holes or soft wood.
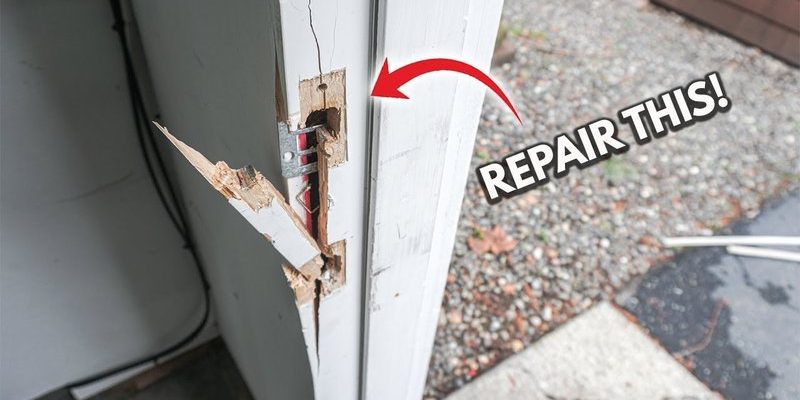
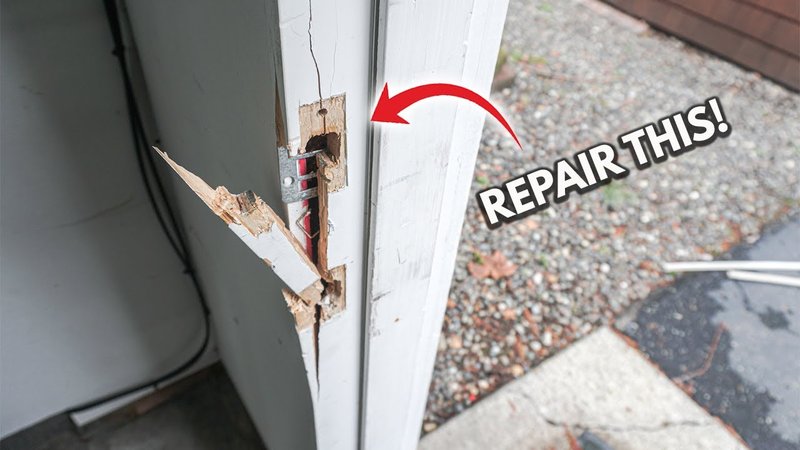
That’s why you’ll often see cracked or splintered jambs right where the hardware sits. And if you ignore it, the door might refuse to lock—or worse, the whole thing could give way with a solid push.
How to Assess the Damage Before Starting Repairs
Before grabbing your tools, it’s smart to take a close look and figure out how bad things really are. Not all door jamb damage means a full replacement; sometimes, it’s just a matter of patching a chunk or tightening things up.
Start by gently opening the door and inspecting the area around all hardware—especially any deadbolt, regular latch, keypad lock, or smart lock system. Use a flashlight if needed to see into cracks or holes.
Check for:
- Splits or cracks: Is the wood just lightly split, or is there a deep break running through the jamb?
- Loose hardware: Try wiggling the strike plate or latch. Does it move, or are the screws still tight?
- Missing or soft wood: Press your thumb into the wood around the hardware. If it feels spongy or chunks come loose, you’ve got rot or pest damage.
- Misaligned locks: Does the door latch or deadbolt line up with the hole, or are things out of place?
If you only see minor splits or cracks (less than 6 inches long and not running the whole height of the jamb), repair is usually pretty simple. However, if the wood is deeply rotted, cracked through entirely, or the whole frame flexes when you push, you may need to replace part or all of the jamb.
Tools and Materials You’ll Need for Door Jamb Repair
Let’s talk supplies. The good news? You won’t need a woodshop’s worth of gear—just a few basics you might already have in the garage.
Here’s a typical list:
- Screwdriver: For removing and re-installing hardware (Phillips or flathead, depending on your lock).
- Hammer and pry bar: For gently removing old strike plates or loosening trim, if necessary.
- Wood glue: Great for minor splits or cracks.
- Wood filler or epoxy putty: For filling holes, gouges, and rebuilding missing chunks near hardware.
- Sandpaper (medium and fine): To smooth out any patched areas and prep for paint or finish.
- Drill and drill bits: To reset hardware with new screw holes if needed.
- Replacement screws or longer screws: If the old ones stripped out or lost grip.
- Paint or finish: To match your repair to the rest of the frame.
For bigger jobs (where a whole section of jamb is split or rotten), you might also need a handsaw to cut out and patch in a new segment of wood. But for most hardware-area fixes, the list above covers it.
Step-by-Step: Repairing a Split or Damaged Jamb Around Hardware
Here’s the heart of things—the actual repair process. I’ll walk you through a common example: a strike plate area that’s split, with some missing wood. The steps are similar for Schlage, Kwikset, Defiant, or any other brand.
1. Remove the Hardware
Start by unscrewing and carefully removing any strike plates, latch, or electronic lock that covers the damage. Set everything aside in a small container so you don’t lose any screws.
Take your time here! Hardware often hides additional cracks, and you don’t want to make the damage worse by yanking it out.
2. Clean and Prep the Damaged Area
Clear out any loose splinters or soft wood using the tip of your screwdriver or a small chisel. If you spot any mold, rot, or bug debris, scrape it out until you’re back to solid wood. Wipe away dust so the glue or wood filler bonds well.
3. Fix Minor Splits With Wood Glue
For simple splits (not gaping holes), squeeze wood glue into the crack, then gently close it back up using a clamp or masking tape. Wipe off any ooze, then let it dry as directed (usually a few hours).
If you don’t have a clamp, some strong tape or a wedge of scrap wood pressed gently against the jamb can help.
4. Fill and Reshape Larger Holes With Wood Filler or Epoxy
If chunks of wood near the strike plate are missing, use a two-part wood epoxy or wood filler. Press it firmly into the gap, building up until you restore the original shape of the jamb. You can smooth it with a putty knife, but it doesn’t have to be perfect right away.
Let it cure fully. Epoxy often sets in 20–30 minutes, but check your product’s instructions—some require longer for deep fills.
5. Sand Smooth and Reinstall Hardware
Once the repair material is dry, sand the patch smooth so it sits flush with the rest of the frame. Next, line up your hardware and mark new pilot holes if necessary—try to avoid old, stripped out screw holes, as they won’t hold well. Drill small pilot holes and use slightly longer screws for extra grip.
Pro tip: If you’re using a smart lock or electronic deadbolt, double-check the alignment so the battery compartment and keypad clear the repaired area.
6. Touch Up With Paint or Finish
Finally, match the repaired spot to the rest of your door jamb. Use a small brush to apply paint or stain, touching up until it blends in. Not only does this look better, but it also protects your repair from moisture and UV damage.
Common Mistakes to Avoid During Repair
Let me be honest: It’s easy to make a few rookie mistakes on your first repair. Repairing a damaged exterior door jamb around hardware isn’t rocket science, but there are tripwires.
- Skipping the prep: Patching over loose, crumbly wood never works. Always clean out to solid material.
- Overfilling holes: Don’t pack in two inches of filler thinking it’s bulletproof. For bigger voids, use layered applications, or consider a wood patch instead.
- Ignoring alignment: If you don’t test-fit your hardware before drilling, you can easily end up with a lock or latch that doesn’t work—or, worse, a split in your new repair.
- Using short or stripped screws: If the original screws are tiny or spin freely, they won’t hold. Slightly longer wood screws bite deeper and keep things tight.
- Not sealing your repair: Untreated filler or bare wood absorbs water, which leads right back to rot. Always finish your repair with paint or sealer.
When to Replace the Door Jamb Instead of Repairing
Sometimes, repairing a damaged door jamb around hardware just isn’t enough—especially if the damage is severe or widespread. But how do you know when it’s time to call it quits and swap out the whole jamb?
Here’s what to look for:
- Deep rot: If you find soft, spongy wood beyond just the lock area—and especially if it crumbles under pressure—you’re dealing with bigger problems. Rot tends to spread, and repairs won’t last.
- Major structural cracks: If the split goes all the way down the jamb or up into the header, it’s a sign the frame can’t safely hold hardware.
- Repeated repair failures: If you patch it and a few months later it’s splitting again, the wood might not have the strength left for a long-term fix.
- Security concerns: If your lock area feels soft or flexes when you push, that’s a weak spot that can compromise your home’s security.
In these cases, it may be safest—and most cost-effective—to replace a section of the jamb, or even the entire frame. Hardware and lock manufacturers like Schlage and Kwikset generally recommend a sturdy, undamaged surface for all their code and keypad locks, so don’t cut corners if security is a concern.
Strengthening Your Door Jamb for Better Security
After repairing a damaged exterior door jamb around hardware, it’s worth taking an extra step to beef things up—especially if you’ve ever worried about break-ins.
One affordable upgrade: Longer strike plate screws. Instead of the short, 1-inch screws that come standard, use 3-inch wood screws to anchor your strike plate deep into the wall stud, not just the thin frame. This simple tweak can make it dramatically harder for anyone to kick in your door.
You can also purchase reinforcement plates or jamb armor kits from hardware stores. These are metal sleeves or brackets that wrap around the repaired section and spread any force across a wider area. They’re compatible with most brands of locksets and smart locks, and installation usually takes less than an hour.
If you just repaired your door jamb, adding reinforcement now can help your fix last—and might even save your lock from the next big slam or accidental hit.
Repair Alternatives: When a Quick Fix Will Do
Let’s be real: Sometimes you just need a temporary patch—maybe you’re renting, or waiting for a contractor to do a bigger job. Here are a few stopgap options:
- Toothpicks and glue: If screw holes are stripped, dab some wood glue into the hole, jam in a few toothpicks, let dry, then re-drive the screw. It’s a classic, surprisingly sturdy fix.
- Metal strike plate covers: Hardware stores sell oversized strike plates designed to span over minor cracks and reinforce the jamb, buying you time before a full repair.
- Wood shims: For misaligned locks, slip a thin wood shim behind the strike plate to adjust the fit until you can do a real repair.
These aren’t long-term solutions for a majorly damaged jamb, but they can hold things together in a pinch—especially if you’re troubleshooting a loose lock on a Sunday night.
Final Thoughts: Keeping Your Door Jamb (and Lock) Strong
Repairing a damaged exterior door jamb around hardware might take an afternoon, but it’s one of those projects that pays off for years—both in peace of mind and home security. Whether you’re patching up after a slammed door or shoring up the lock area for your Schlage, Kwikset, or Defiant remote-lock system, you’re saving yourself bigger headaches down the road.
The steps are simple: inspect, prep, repair, reinforce, and finish. Take your time—door jambs matter more for security than most people realize. And if things look too far gone, don’t be afraid to call in a pro or swap the jamb altogether. Either way, your door (and your peace of mind) will thank you.