Repairing a door frame around the strike plate might sound daunting, but it’s much like fixing a puzzle piece. Once you gather the right tools and know how to approach it, you can slide that piece back in with confidence. Honestly, it’s all about understanding what you’re dealing with—whether you have a simple crack, warping, or even more serious damage. Let me explain how you can tackle this project step by step.
Understanding the Door Frame Structure
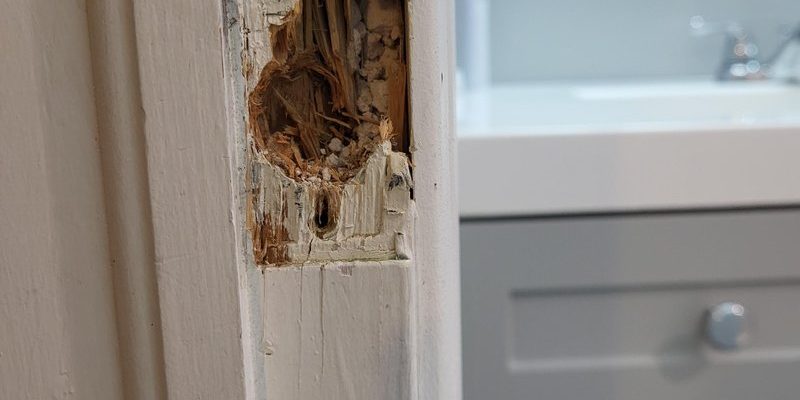
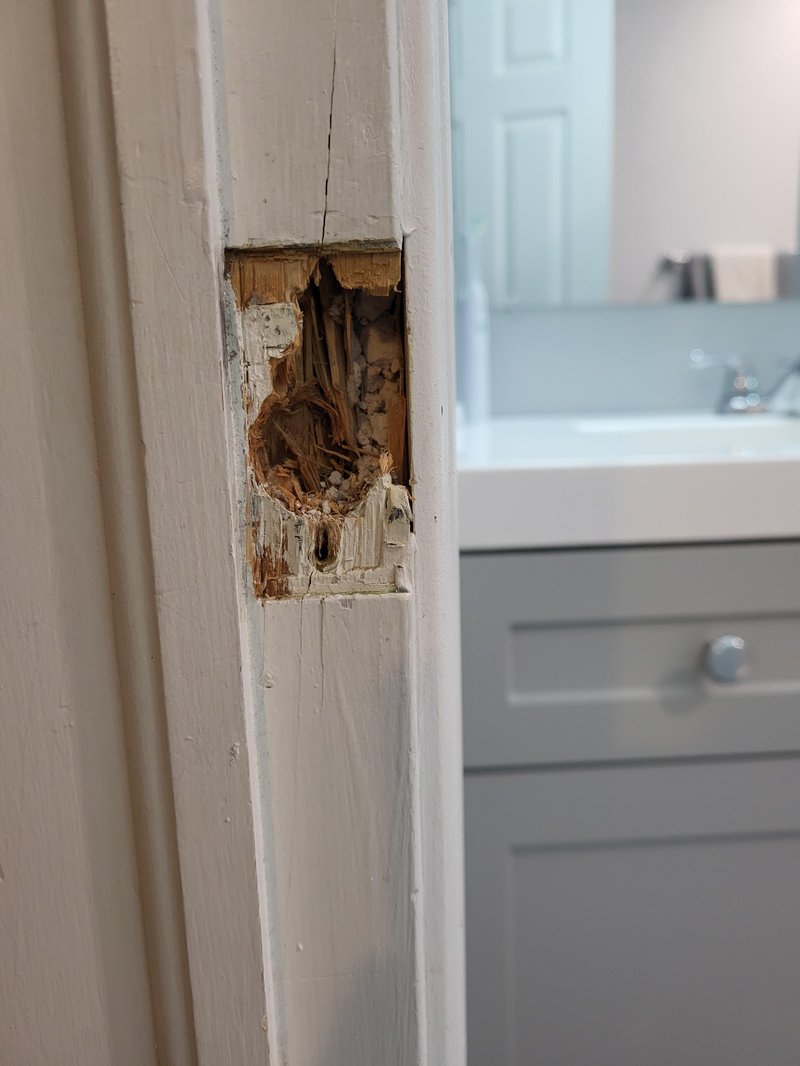
Before diving into repairs, it’s important to know what you’re working with. A door frame consists of several parts, but the key players around the strike plate are the jambs (the side pieces) and the head (the top piece). The strike plate itself is a metal piece that secures the latch when the door is shut, ensuring a snug fit.
When the frame gets damaged, it generally means that the jambs or head have been compromised. Damage can occur due to wear and tear, moisture, or even an accidental kick. If the frame remains damaged, it can lead to a misaligned door, making it hard to open or close. Essentially, any damage around the strike plate can affect how well your entire door operates.
Tools and Materials Needed for Repair
Now that you understand the basics, let’s gather what you’ll need for this repair. Here’s a quick list to get you started:
- Wood filler
- Sandpaper
- Paint or stain (to match your door frame)
- Screwdriver (for removing and reattaching the strike plate)
- Clamps (if you need to hold pieces together)
- Utility knife (for cleaning up edges)
Gathering these supplies puts you one step closer to a successful repair. Make sure to pick a wood filler that matches the texture of your frame. It’s often the small details that count!
Step-by-Step Guide to Repair the Door Frame
Ready to dive into the actual repair? Here’s a step-by-step guide to help you through it:
Step 1: Assess the Damage
Start by examining the damaged area closely. If the damage is superficial—like a small crack—you might just need wood filler. If the frame is warped or more severely damaged, you may need to consider replacing that section.
Step 2: Prepare the Area
Remove the strike plate from the door frame. Use a screwdriver to take out the screws, and be sure to keep them somewhere safe. This will give you easier access to the damaged area. Clean up any loose debris around the damage. This is crucial for ensuring a smooth application of any materials.
Step 3: Fill the Damage
If you’ve determined that wood filler is enough, apply it generously to the damaged area. Use a putty knife to smooth it out. Don’t worry about making it perfect; you can sand it down later. If the damage is severe and the jamb is completely broken, you may need to splice a new piece of wood into place.
Step 4: Sand and Paint
Once the filler has completely dried—usually a few hours—use sandpaper to smooth out the area. You want it to be even with the rest of the frame. Then, paint or stain the area to match the rest of the frame. This will not only improve the look of your door frame but also protect it from future damage.
Importance of Proper Alignment
After your repair, check the alignment of the door. If the door doesn’t close properly or the latch doesn’t fit into the strike plate, you’ll need to make adjustments. Sometimes, a small tweak to the hinges can help the door sit right.
You might be wondering why alignment is so important. It’s simple: a properly aligned door not only looks better, but it also enhances security. Plus, it prevents wear and tear on both the door and the frame. You don’t want to do a repair job only to find the door is still misaligned!
Regular Maintenance Tips
Once you’ve repaired your door frame, it’s wise to keep an eye on it. Regular maintenance can prevent the need for more extensive repairs down the road. Here are a few tips to keep your door frame in top shape:
- Inspect regularly for signs of wear or moisture damage.
- Keep the area clean and free from debris.
- Consider applying a protective sealant to prevent moisture from seeping in.
More often than not, a little attention now can save you a lot of hassle later. Just like any part of your home, your door frame benefits from regular check-ups.
When to Call a Professional
While many repairs can be tackled by a determined DIYer, sometimes it’s best to call in a professional. If the damage is extensive, such as severe warping or structural issues, it might be out of your comfort zone. A professional can ensure the job is done right, saving you time and stress in the long run.
Additionally, if you’re unsure about your skills or don’t have the right tools, don’t hesitate to seek help. There’s no shame in asking for assistance—it can be a smart move if you want peace of mind.
Repairing a damaged door frame around the strike plate isn’t just about fixing a physical structure; it’s about ensuring your home stays secure and welcoming. With the right tools and a bit of patience, you can make your door frame look good as new.
Remember, if you encounter challenges or if the job seems too big, don’t hesitate to reach out for professional help. The effort you put into this repair reflects not only in the look of your home but also in your peace of mind. So, roll up your sleeves and tackle that door frame with confidence!