Here’s the thing: replacing or repairing a damaged compression weatherstrip on an exterior door isn’t just another home-maintenance job. It’s your ticket to a comfier house, lower energy bills, and fewer creepy-crawlers. Brands like Pemko and M-D Building Products make it simple for homeowners, but getting the right fit and a tight seal can take some patience and know-how. Don’t worry—once you see what’s involved, you’ll realize it’s totally doable, even if you’ve never handled a caulking gun or a trim puller before.
What Is a Compression Weatherstrip and Why Does It Matter?
Let me explain: a compression weatherstrip is that rubbery or foam strip running around the edges of your exterior door frame. Its job? To gently compress against the door when it’s closed, sealing out outside air, moisture, and even sound. If you’ve ever noticed that snug, satisfying thud when the door closes, that’s the weatherstrip doing its thing.
Honestly, many folks don’t even know it’s there—until something goes wrong. Over time, weatherstripping can lose its shape, crack, or peel away. When that happens, your “airtight” home starts leaking money (and warmth) faster than a cheap tent in a thunderstorm. Not only does a damaged compression weatherstrip let in drafts and noise, but it can also make door security weaker. Believe it or not, a tight seal helps your deadbolt work better too.
Here’s why this matters: a simple repair or swap of a weatherstrip can have a big impact on your home’s comfort and energy efficiency. Plus, brands like Pemko or Frost King offer universal or custom-fit options, so you don’t have to hunt for an exact match. As long as you know what you’re looking for, this is a project you can take on—even with no experience.
Signs Your Compression Weatherstrip Needs Repair or Replacement
Wondering if your weatherstrip is really the problem? You might be surprised how subtle—or obvious—these signs can be. First, run your hand around the inside edge of the closed door. Feel any air sneaking in? That’s a classic sign. Sometimes you’ll see visible gaps or daylight peeking through around the frame, especially near corners.
Here’s another clue: listen for rattling or whistling noises when the wind picks up. Weatherstripping that’s cracked, squished flat, or just missing in spots won’t dampen sound as well. And if you find yourself wiping up water after each rainstorm, damaged weatherstrip is almost always the culprit. In some cases, you’ll even spot mold or mildew forming along the threshold—never a good sign.
Honestly, don’t underestimate small imperfections. Even a half-inch gap can let in a surprising amount of cold air or moisture. If you’re troubleshooting energy loss, a quick visual and tactile check of the weatherstrip should be one of your first moves. Sometimes you’ll find it’s just dirty or out of place—other times, it’s cracked, brittle, or missing chunks. Either way, fixing it sooner is always easier than waiting.
Tools and Materials Needed to Repair Exterior Door Weatherstripping
You might be wondering, “Do I need a shed full of tools for this?” Thankfully, you can keep things pretty simple. For most repairs or replacements, you’ll only need a few basic items. Here’s a helpful rundown:
- Replacement compression weatherstrip (match to your door or check the brand/type—universal options are available from M-D, Pemko, and others)
- Flathead screwdriver or trim puller (to carefully remove old weatherstrip)
- Utility knife or sharp scissors (for cutting new strip to length)
- Measuring tape (accuracy matters!)
- Adhesive (if the strip isn’t “push-in” or “snap-in” style)
- Caulk and caulking gun (for minor repairs around the door frame—optional, but helpful if you spot gaps)
- Cleaning supplies (mild soap, rag, maybe some rubbing alcohol to prep surfaces)
Each door and brand can be a bit different. Some weatherstrips slide or snap into a groove; others stick on with a peel-and-stick backing. It’s always smart to double-check the door manufacturer or snap a picture before heading to the hardware store. You don’t want to go home with the wrong size or shape—trust me, it’s a pain.
Step-by-Step: How to Remove a Damaged Compression Weatherstrip
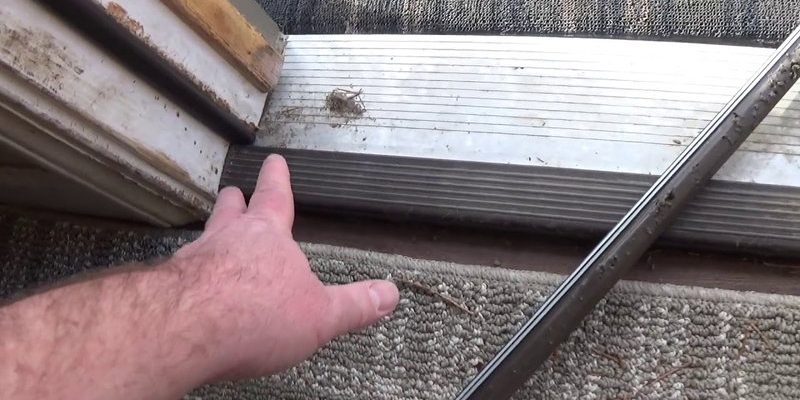
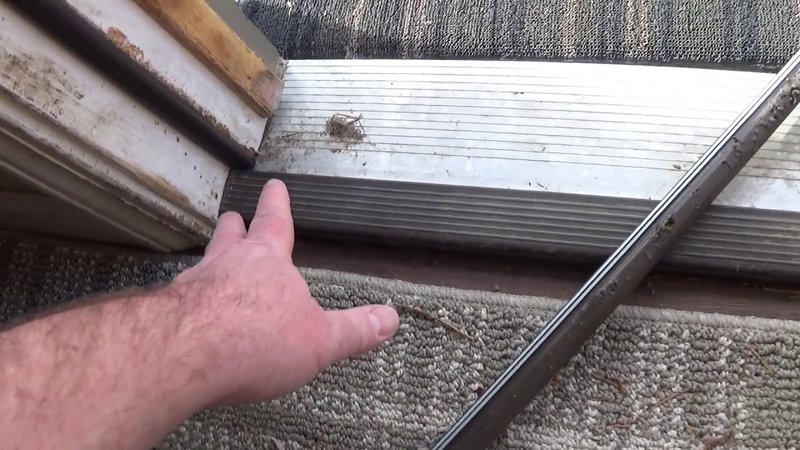
Alright, time to get your hands dirty. Start by opening the door wide, so you can access the inner edge of the frame. Most compression weatherstrips are easy to spot—they’ll look like a rubber or foam gasket tucked into a channel.
Step 1: Inspect how the weatherstrip is attached. Try tugging gently on a corner. Many brands (like Pemko or M-D) use a “push-in” style that presses into a groove, while others might use adhesive. If it resists, use a flathead screwdriver to nudge it out, but go gently—you don’t want to damage the wood or metal frame.
Step 2: Remove the strip completely. Start at the top and pull down slowly, peeling away any sections that are stuck. If you run into nails, staples, or stubborn adhesive, work carefully with your screwdriver or a trim puller. Sometimes, old strips will break apart—don’t worry, just keep going until it’s all out.
Step 3: Clean the groove or surface. With the old strip gone, clean out dust, debris, or leftover glue. A rag with soapy water works fine, but if it’s sticky, try a little rubbing alcohol. Let the area dry completely before moving on. This is your chance to spot any hidden damage—if you see rot or big gaps, fix those first with wood filler or caulk.
Taking your time on this cleanup step makes the new weatherstrip fit better and last longer. Don’t rush it!
Fitting and Installing the New Compression Weatherstrip
Installing a new compression weatherstrip looks harder than it is. Here’s how to do it, one step at a time:
Step 1: Measure and cut the new strip. Hold the new weatherstrip up to the door frame, and mark where it needs to be cut for the top and sides. Use a sharp knife or scissors so you get clean edges—jagged cuts can create tiny gaps. If you bought a universal strip, trim it to match the brand’s original length and shape.
Step 2: Attach the top piece first. (Pro tip: always start at the top so gravity helps, not hinders.) If it’s a push-in style, press it gently into the groove, making sure it sits flush along the whole length. If it’s adhesive-backed, peel and stick it firmly into place, applying steady pressure with your fingers or a plastic tool.
Step 3: Do the sides next. Start at the top and press the weatherstrip down the length of each side, lining up the corners. Make sure the ends butt together snugly—no gaps or overlaps. If the strip resists, try wiggling it side-to-side. Don’t stretch the material, or you’ll create weak spots.
Step 4: Double-check your work. Close the door and check for a uniform seal all the way around. The compression strip should press lightly against the door, not squish flat or leave gaps. Sometimes you’ll need to adjust or trim tiny bits for a perfect fit—it’s normal for first timers to tweak it a little.
Common Problems When Repairing Door Weatherstripping (And How to Fix Them)
Even a simple repair has a few pitfalls. Sometimes the new weatherstrip won’t stay put, or the door suddenly feels hard to close. You might be troubleshooting a door that won’t latch, or noticing that the new strip is getting chewed up quickly. Don’t panic—most fixes are easy.
- New strip falls out: This usually happens if the groove is dirty or too wide. Clean it out, or use a dab of adhesive. Push-in types can be lightly tapped in with a rubber mallet—just be gentle.
- Door hard to close: If you need serious muscle to shut the door, the strip might be too thick or not seated right. Try a thinner type, or reseat it so it compresses—without being crushed.
- Persistent drafts: Still feel air sneaking in? Check the corners and bottom edge. Sometimes it takes a second adjustment, especially near the threshold where alignment matters most.
- Sticky or noisy operation: If the door squeaks or sticks after the fix, it might be rubbing at a high spot. Trim or sand the strip slightly, just until the door operates smoothly.
If you’re syncing a universal weatherstrip to an older, out-of-square door, be patient. Minor gaps are common, but the right adjustments make a huge difference. Mismatched brands can sometimes create tiny issues—Pemko’s compression weatherstrips, for example, might not snap into an M-D groove perfectly. If that’s the case, look for a truly universal fit or stick with your door’s brand whenever possible.
Should You Repair, Replace, or Upgrade Your Compression Weatherstrip?
You might be debating whether to patch up a section, replace the whole strip, or just upgrade everything at once. Here’s my take: if your weatherstrip is only damaged in one small spot—say, the dog chewed the corner—sometimes a quick patch or replacement of that section is fine. Just make sure the old and new pieces overlap tightly and seal cleanly.
If the weatherstrip is worn, brittle, or flattened all around, a total replacement is the way to go. It might cost a few bucks more and half an hour longer, but the long-term pay-off is worth it. Trust me, you’ll notice the difference every time a storm rolls in, or when your heating and cooling bills go down.
If you’re already fixing the door, it’s smart to check for upgrade options too. Some modern compression weatherstrips offer better insulation, noise reduction, and longer life than the original. Universal strips from brands like Frost King or Pemko often come with extra features—mold-resistant coatings, UV protection, or a wider range of colors. Consider these details if you plan to stay in your home a while.
Sometimes, a small upgrade—like a better weatherstrip—can make your old door feel brand new. It’s a cheap fix with a surprisingly big reward.
Comparing Compression Weatherstrips: Universal vs. Brand-Specific
You’ll notice that exterior door weatherstripping comes in “universal” and brand-specific versions. *What’s the difference?* Universal strips are designed to fit most door types and frames, making shopping simpler. They’re usually made of flexible materials and can be trimmed to fit, which is perfect if you’re dealing with an older or quirky door.
Brand-specific options, like those from M-D Building Products, Pemko, or Schlage, are designed for tight compatibility with their own frames. These can be easier to install if you know your door’s brand and model—no guessing about width or fit. On the flip side, they’re sometimes pricier and can be harder to find at your local hardware store.
Here’s an easy comparison:
| Universal Compression Weatherstrip | Brand-Specific Weatherstrip |
| Fits most standard door frames | Exact match for door brand/model |
| Flexible sizing, easy to cut | Usually snap or push into place perfectly |
| May require small adjustments | Higher price, but no guesswork |
| Great for older or unusual doors | Best for newer or branded doors |
In my opinion, if you’re uncertain or your weatherstrip groove looks a bit odd, the universal style gives you more wiggle room for a custom fit. But if your door is just a few years old and you can still find the original brand, brand-specific is the stress-free route.
How to Make Your Compression Weatherstrip Last Longer
After all this effort, you’ll want your new weatherstrip to hold up. Here’s a bit of practical wisdom: it pays to keep it clean. Twice a year, wipe down the strip with a damp rag and mild soap to remove dust, pollen, or bugs. Dirt and grime can cause premature wear, especially if you open and close your door a lot.
If your climate is especially hot or cold, check the strip every season for cracks, brittleness, or compression that’s lost its bounce. It’s a good idea to keep the groove or channel clean, too—dirt buildup can pinch or deform the strip over time, which means you might be back to troubleshooting sooner than you’d like.
Lastly, if you ever repaint your door or frame, use painter’s tape to protect the weatherstrip. Paint buildup can cause sticking or a poor seal. A little maintenance now means less headache later—trust me!
Bringing It All Together: Enjoying a Draft-Free, Comfy Home
Repairing a damaged compression weatherstrip on an exterior door is about more than patching up a leaky spot. You’re restoring your home’s comfort, efficiency, and even a bit of peace and quiet. Whether you used a universal strip or stuck with a trusted brand like Pemko, each step—from removing the worn-out gasket to pressing the new strip in place—makes your space feel safer, cozier, and more put-together.
The next time you hear the wind howling or see rain splatter the front step, you’ll know your door is up to the task. And if you ever spot a problem creeping back, you’ve got the troubleshooting know-how to nip it in the bud. Here’s to warm toes, sensible bills, and a door that closes with a satisfying, weather-tight thunk.