Here’s the thing: fixing a damaged bulb seal isn’t rocket science, and it doesn’t take a garage full of power tools. Whether your door is a classic wooden front door, a fancy French patio slider, or a basic steel exterior, the process is nearly the same. Most bulb seals, like those on a standard Andersen or Therma-Tru door, work by pressing into a groove or sliding into a channel at the bottom. That means you can tackle this repair yourself, save some cash, and keep your home comfortable year-round—even if you’re new to DIY projects.
What Is a Bulb Seal and Why Does It Matter?
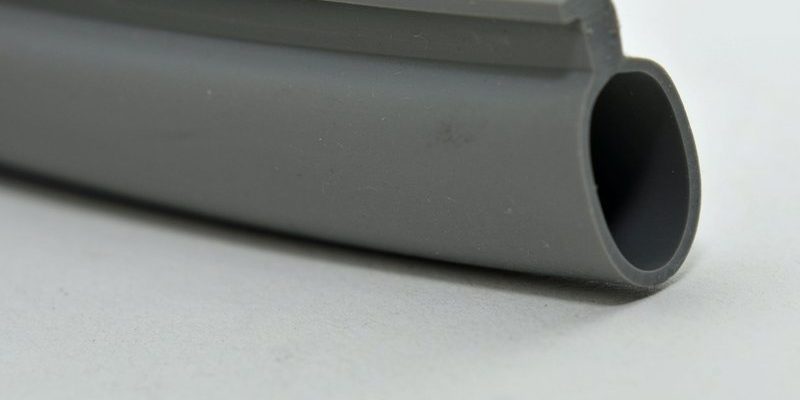
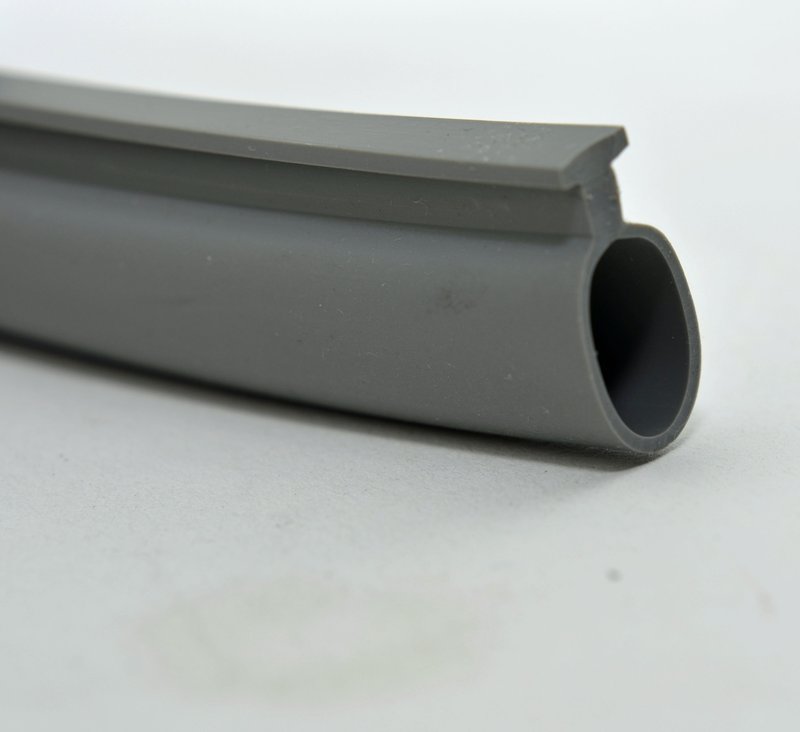
A bulb seal is a simple strip of flexible rubber or vinyl that runs along the bottom or edges of exterior doors. Think of it as a squishy gasket for your door—pressing tightly when you close the door, blocking out drafts, rain, and unwelcome critters. It’s called a “bulb” seal because of its round, puffy shape that compresses to make a tight fit. Some doors use a single bulb, while others have a double-bulb or T-shaped design, but the function is the same.
Honestly, you only notice your bulb seal when it starts to fail. Maybe you feel a chilly breeze near your feet in winter, or you see daylight peeking under the door. Sometimes, you’ll spot bugs or even puddles after a heavy rain. All of these point to a bulb seal that’s past its prime. While it may seem minor, a damaged seal is basically an open invitation for bigger headaches—higher energy bills, warped flooring, or even a slow parade of ants.
Here’s another thing: manufacturers like Therma-Tru, Pella, or Emtek design bulb seals to match their doors, but the core concept doesn’t really change. Whether you have a steel entry door or a sliding patio door, the bulb seal’s job is to keep the outside out and the inside in.
Common Signs Your Exterior Door Bulb Seal Needs Repair
You might be wondering, “Do I really need to fix my bulb seal?” Let me explain what to look for. The signs are usually straightforward—if you know where to check. Start by looking at the seal in daylight with the door open; you want to spot obvious cracks, splits, or missing sections. If the seal is flattened and doesn’t bounce back when you press it, that’s another red flag.
Another giveaway is feeling a draft. When you notice cold or hot air sneaking in around the bottom of the door, that usually means the seal isn’t working. You might even hear a whistle of wind on stormy days. Water leaks are an even bigger clue. If your entryway gets damp spots after rain, or you see mud trails from bugs, your bulb seal is letting the outside in.
Sometimes the signs are sneaky. Check for rattling noises when the door is closed, or if you notice your heating or cooling bills creeping up without any other obvious reason. Even a small gap under the door can add up over time.
Prepping for Repair: Tools and Materials You’ll Need
Before you dive in, it helps to have everything ready. Most bulb seal repairs are pretty simple, but you’ll want to grab a few essentials first. Here’s a quick checklist:
- New bulb seal: Make sure it matches your door brand, type, and length. You’ll usually find them labeled for specific brands like Therma-Tru or universal fits online or at hardware stores.
- Measuring tape: You’ll need to measure the length of the old seal to buy the right size.
- Flathead screwdriver or putty knife: Great for prying out the old seal, especially if it’s stuck in a groove.
- Scissors or utility knife: These make trimming the new bulb seal to size quick and easy.
- Soapy water or silicone spray (optional): Lubricates the new seal for a smoother install.
- Cloth or brush: For cleaning out dust and grit from the groove before you install the new seal.
Honestly, that’s about it. You don’t need special code or battery-powered tools—just a little patience and the right supplies. The only thing that might trip you up is picking the right replacement. Double-check whether your door uses a slide-in or push-in bulb seal. If in doubt, bring the old piece to the store or snap a photo for reference.
Step-by-Step Guide: Replacing the Damaged Bulb Seal
Alright, let’s get into the nitty-gritty of replacing your damaged bulb seal. Don’t worry—I’ll break it down so you can follow along, even if you’ve never tackled a repair like this before.
- Open the door and inspect the seal. Look for retaining screws or clips—most modern doors, like Andersen or Pella, just use a press-in or slide-in seal with no hardware. Gently pry out the old bulb seal using a flathead screwdriver, starting at one end and working your way across. If it’s brittle and breaks apart, just keep pulling out the pieces.
- Clean the groove or channel. Grab your brush or cloth and wipe out any dirt, dust, or little bits of the old seal. If the groove is sticky, a quick wipe with soapy water helps. The cleaner the channel, the better seal you’ll get.
- Measure and cut the new seal. Lay the old seal next to the new one for length, or measure the door groove itself. Use scissors or a utility knife for a clean, straight edge—don’t just guess and risk coming up short.
- Install the new bulb seal. If it’s a press-in type, start at one end and work it firmly into the groove, making sure it’s fully seated the whole way. For a slide-in seal, fit one end into the channel and gently push or pull it through. If it feels sticky, a shot of silicone spray makes things easier. Go slow and check that the seal isn’t twisted or stretched.
- Test your work. Close the door and check for gaps, drafts, or resistance. The new bulb seal should press snugly, but you shouldn’t have to slam the door to get it shut. Tweak as needed—sometimes pressing the seal into place once or twice helps it seat better.
Pro tip: If your bulb seal never seems to fit right, double-check that you bought the right width and type. Universal seals work for lots of brands, but some doors (especially older or custom models) need an exact match.
Bulb Seal Troubleshooting: Fixes for Common Problems
Sometimes, things go sideways—even on a simple repair. Here’s what to do if you run into trouble while replacing your bulb seal.
- Seal won’t stay in the groove: If the new seal pops out or feels loose, make sure the groove is clean and undamaged. Some doors can get warped over time, making it tough for the seal to grip. Try a thicker bulb seal if your current one is too skinny, or add a tiny bit of clear silicone caulk (just a thin bead!) to help it stay put.
- Door is hard to close: New bulb seals are sometimes a bit puffy at first. If you have to shove the door, double-check you installed the seal correctly and didn’t use one that’s too big. A day or two of use usually compresses the seal so the door closes more easily.
- Gaps or drafts remain: If you’re still feeling a draft or seeing light, check for uneven compression along the door bottom. It could be the threshold is out of alignment, or you cut the seal too short. Sometimes, adjusting the threshold height with a screwdriver can fix small gaps—many exterior doors have adjustable sills for just this reason.
Here’s the thing: most issues can be fixed with a quick tweak. If you hit a stubborn problem (like a warped door frame or a broken threshold), you might need to call in a pro. But for most folks, a new bulb seal will solve 95% of your draft, leak, or bug problems.
Comparing Bulb Seals: Universal vs. Brand-Specific Replacements
You might be wondering if you have to buy the exact brand of bulb seal as your original door—or if a universal replacement will do. Let’s break down the differences.
- Brand-specific bulb seals are made to fit a certain groove shape or size. If you have a Therma-Tru, Pella, or Andersen exterior door, you can usually find replacement seals that match down to the millimeter. These are the safest bet if you want a perfect fit with the least hassle, especially for newer doors.
- Universal bulb seals are designed to fit a variety of doors. They come in standard widths (like 1/4″ or 5/16″) and can be trimmed to length. These are handy if you have an older or off-brand door, or if you want something you can pick up right away at a hardware store. Just double-check the shape and width against your old seal for the best results.
The real key here isn’t the brand—it’s the channel shape and size on your door. Measure the groove and take a sample if possible. Sometimes, even the best universal bulb seal won’t click into a custom groove, so when in doubt, go with the original manufacturer.
Why You Shouldn’t Ignore a Damaged Bulb Seal
Let me be honest: skipping this repair can lead to a lot of headaches down the road. Sure, you might put off fixing a damaged bulb seal for a few weeks or months, but the problems tend to sneak up and get worse. Gaps under the door don’t just let in chilly air—they can also bring in dampness, which can warp your flooring or cause mold in a snap.
There’s also the matter of wasted energy. Even a small draft can make your HVAC system work overtime, which means higher bills and more wear and tear on your furnace or AC. Some people even end up with persistent bug problems or a musty smell in the entryway—all because a five-minute repair was put off.
When you look at the cost and effort of replacing a bulb seal (usually less than $20 and under an hour of time), it’s almost always worth it to fix the problem right away. Your future self—and your utility bill—will thank you.
Maintaining Your New Bulb Seal for Lasting Results
Repairing the bulb seal is only half the battle—keeping it in good shape is the real goal. Bulb seals naturally wear out, but a little routine care makes them last longer.
- Clean the door bottom: Dirt and grit grind away at the seal over time. Wipe down the seal and the groove once a season with a damp rag.
- Avoid slamming the door: I get it, sometimes you’re in a hurry. But slamming the door wears out the bulb seal faster and can even unseat it.
- Check for cracking or flattening: Give the seal a quick squeeze every few months. If it doesn’t bounce back, or you see cracks, plan on replacing it soon.
- Keep an eye on weather shifts: As seasons change, temperature swings can shrink or harden rubber seals. If you notice fresh drafts, that’s usually your cue to check the seal.
A quick five-minute check once or twice a year helps you spot problems before they become headaches. It’s an easy way to keep your home cozy and energy-efficient, without any big projects popping up when you least expect them.
Wrapping Up: Peace of Mind From a Simple Fix
Repairing a damaged bulb seal on an exterior door is the kind of home fix that sounds like a chore, but it’s actually one of the most satisfying wins you can get. A few basic tools, a matching replacement seal, and a little patience are all it takes to block drafts, stop leaks, and keep pests where they belong. You don’t need to be an expert or buy a bunch of gear—just some common sense and a willingness to give it a go.
Once you’ve made the repair, you’ll notice the difference right away—quieter rooms, lower bills, and a lot less worry about what’s sneaking in under the door. So the next time you spot that battered old bulb seal, don’t put it off. A quick fix today can mean peace of mind for years to come.