When it comes to cabinet-style doors, you might encounter several types of latches—like magnetic latches or roller latches. They each have their quirks, but the repair techniques can be similar. In this guide, we’ll walk through understanding the latch’s components, diagnosing the issue, and finally, how to replace or repair it. So, let’s roll up our sleeves and dive into the world of door latches!
Understanding the Parts of a Door Latch
Before rolling up your sleeves, it helps to know what you’re working with. A door latch has several key components. First, there’s the latch bolt, which is the part that extends into the doorframe to keep it shut. Then you have the strike plate, a metal piece mounted on the doorframe that the latch bolt clicks into. Imagine them as a lock-and-key duo—without one, the other can’t do its job.
You might also find a lever handle or knob that you turn or push to operate the latch. And let’s not forget the plunger in some types of latches, which helps the bolt retract when you turn the handle. Each part is crucial for the latch’s function, like a team working together to keep your doors secure.
Understanding how these parts interact can help when troubleshooting. If the door doesn’t latch properly, it might not be the latch bolt itself but rather the strike plate needing adjustment. This foundational knowledge will set you up for a successful repair.
Identifying Common Problems with Door Latches
So, what goes wrong with latches? There are a few common issues you might encounter. One is that the latch isn’t aligning correctly with the strike plate. This misalignment can happen due to settling or shifting of your home over time, making your latch seem broken when it just needs a little adjustment.
Another issue could be that the latch bolt is stuck. This often happens because of dirt or grime buildup. Think of it as a door that hasn’t been opened in a while—a little dust can make it sticky. In this case, a simple cleaning could do the trick!
Sometimes, the latch mechanism itself could be broken. If you hear a suspicious crunching sound when you turn the handle, it’s a sign that the internal components may need replacing. Recognizing these issues early can save you time and hassle later on.
Gathering Your Tools for the Repair
Now that you’ve identified the problem, it’s time to gather your tools. Don’t worry; you won’t need a truckload of equipment. Here’s what you’ll generally need:
- Screwdriver: You may need either a flathead or Phillips, depending on your latch.
- Replacement latch: If the latch is broken beyond repair, having a new one ready is key.
- Level: This helps you ensure everything is aligned correctly.
- Lubricant: Something like WD-40 can help if the latch is sticking.
- Cleaning cloth: For any dirt or grime that might be causing issues.
It’s wise to keep a few extra screws or wall plugs handy, just in case! Having all your tools ready before you start will make the process smoother and keep you from running back and forth.
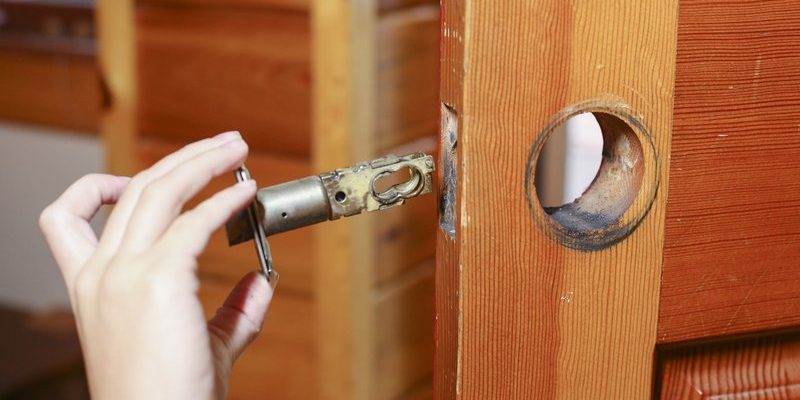
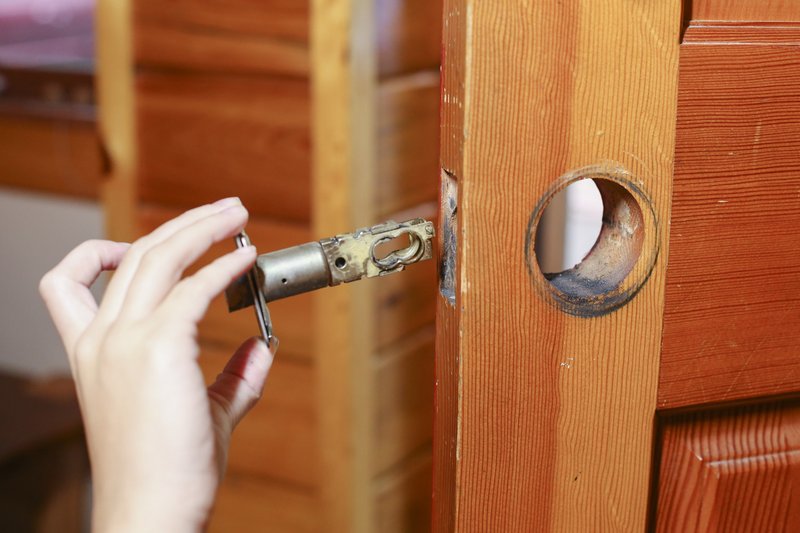
Removing the Broken Latch
Once you have your tools, it’s time to remove the broken latch. Start by opening the door and locating the screws holding the latch in place. Usually, these screws are on the edge of the door. Using your screwdriver, carefully remove them one at a time.
As you unscrew, keep an eye on how the latch is positioned. Taking a quick picture can be really helpful for reinstallation later. After removing the screws, gently pull the latch out of the door. If it’s stuck, a little wiggling should help loosen it. Just be careful not to damage the door itself!
If you’re dealing with a strike plate adjustment instead, locate the screws on that piece and remove them similarly. Again, a picture can help you know where to put it back, especially if you need to shift it a bit to align with the new latch.
Installing the New Latch
Now comes the exciting part: installing the new latch. Start by taking the new latch out of its packaging. If it looks different from the old one, compare them closely. Ensure that all the same components are present and that they’re compatible with your door.
Align the new latch with the hole in the door where the old one came out. Insert it and make sure it sits flush against the door. If you’re installing a roller latch, check the direction it needs to face. Once everything looks good, secure it with the screws you previously removed, tightening them just enough that the latch can move freely.
If you’re also installing a new strike plate, align it with the latch bolt and secure it in place. Use your level to ensure it’s straight. This step can make a big difference in how smoothly the door operates!
Testing the Latch and Making Adjustments
With the new latch installed, it’s time for testing. Close the door gently and see if the latch bolt engages with the strike plate. If all is well, great! Give it a few open and close cycles to ensure everything moves smoothly. However, if you notice any issues, adjustments may be necessary.
For instance, if the latch doesn’t catch properly, try loosening the screws on the strike plate and adjusting its position slightly. Even moving it just a bit can often make a huge difference. Tighten everything back in place, and test again.
You might also want to apply a bit of lubricant to the latch bolt and hinge if you notice any stiffness. A small spritz of WD-40 can work wonders here.
Preventative Measures for Future Issues
Once you’ve successfully repaired your latch, think about how to prevent future issues. Regular maintenance goes a long way! Make it a habit to check your cabinet doors every few months. If you notice any sticking or misalignment, address it immediately before it turns into a more significant problem.
Cleaning around the latch mechanism can also help. Dust and debris can build up over time, leading to issues down the line. A quick wipe with a damp cloth now and then can keep things running smoothly.
Lastly, check the door frame and hinges periodically. If they’re loose, it can throw everything out of whack. Tightening screws and adjusting hinges as needed can save you a screw or two down the line.
In conclusion, repairing a broken latch on a cabinet-style interior door might seem daunting at first, but breaking it down into manageable steps makes it entirely doable—even for beginners. With the right tools, knowledge, and a touch of patience, you can restore your door to its rightful functionality, ensuring it serves you well for years to come! Happy fixing!