But before you grab a toolbox, let’s dive into how this works. By replacing the existing screws with longer ones, you can secure the hinge tighter to the frame or door, giving it that snug fit it desperately needs. It’s like finding the perfect laces to make those shoes fit better. We’ll walk you through the steps, tips, and everything you need to know about tightening loose door hinges with longer screws.
Why Do Door Hinges Get Loose?
You might be wondering what causes your door hinges to get loose in the first place. There are several common culprits. Over time, the screws that hold the hinges in place can loosen due to the repeated stress of opening and closing the door. It’s kind of like how a bicycle seat can wobble if it’s not tightened regularly. Furthermore, if your door is particularly heavy or if it’s been improperly installed, the weight can take a toll on the hinges, leading to more loosening.
Weather changes can also play a role. For instance, if the wood of your door frame expands in heat and contracts in the cold, it can pull at the hinges and cause them to loosen over time. Even humidity can affect the stability of the wood, resulting in a loose door. It’s a bit like how our joints feel after a long day; sometimes they need a little extra care and attention!
Gathering Your Tools
Before you start your DIY journey, it’s essential to gather the right tools. You don’t want to find yourself halfway through the process and realize you’re missing something crucial. Here’s what you’ll need:
- Longer screws: These should be about 1 inch or so longer than the original screws.
- Screwdriver: A regular or power screwdriver will do the trick.
- Drill (optional): If you encounter any resistance, a drill can help make the process smoother.
- Wood glue (optional): For added security, if the holes are worn out.
- Wood filler (optional): To fill old holes if needed.
By having these tools handy, you’ll save a lot of time and frustration. Honestly, nothing is worse than getting into a project and realizing you’re missing a key item!
Steps to Tighten Loose Door Hinges
Now that you have your tools ready, let’s walk through the steps for tightening those loose hinges.
Step 1: Remove The Current Screws
Begin by using your screwdriver to remove the screws from the hinge. Make sure you keep them safe, as you might want to compare their length with the new screws. If the screws are particularly stubborn, a drill can help loosen them up. Just be careful not to damage the hinge plate or the frame.
Step 2: Inspect the Hinge and Frame
Once the screws are out, take a moment to inspect the hinge itself and the areas where the screws go into the door frame. Are there any damaged or worn-out holes? If the wood is chipped or excessively worn, you might need to fill those holes with wood filler before proceeding. It’s essential that the new screws have a solid grip, just like a good grip on a slippery surface!
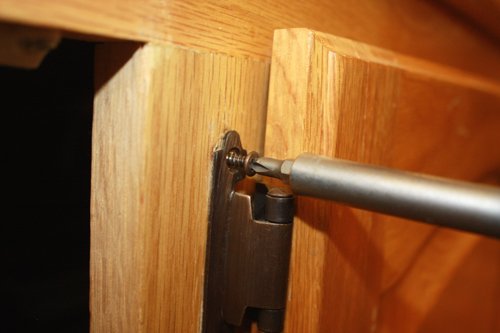
Step 3: Insert the Longer Screws
With the old screws removed and any necessary repairs done, it’s time to insert the longer screws. Start by aligning the hinge back to its original position. Insert a longer screw into one of the top holes first and tighten it down snugly. Then move to the bottom hole, repeating the process. This method helps keep the hinge aligned as you secure it.
Step 4: Test the Door
After securing the screws, gently open and close the door a few times. Does it feel more stable and secure? If everything seems good, great! If you notice any wobbling, double-check that the screws are tight and that the hinge is aligned correctly. You wouldn’t want your door to fall off like a poorly fitted lid!
Tips for Success
While tightening hinges with longer screws is a straightforward task, there are a few tips to keep in mind for the best results.
- Avoid Over-Tightening: While it’s essential to secure the screws, over-tightening can strip the holes or break the screws.
- Check Other Hinges: If one hinge is loose, it’s a good idea to check others to ensure they’re not coming loose as well.
- Regular Maintenance: Periodically check your doors and hinges to prevent future issues. Regular care is key!
These small steps can save you from future headaches. Remember that maintaining your door can keep it operating smoothly for years to come.
When To Call a Professional
Sometimes, even with the best DIY efforts, things don’t go as planned. If you find that you’ve tried tightening with longer screws but the door still isn’t secure, it may be time to call in a professional. They can assess the situation more thoroughly and may suggest more extensive repairs or even replacing the hinges entirely.
Just like needing a professional mechanic for a car issue that seems beyond your skills, sometimes it’s wise to have an expert take a look, especially when it comes to home repairs that could affect safety.
Tightening loose door hinges with longer screws is a simple yet effective way to improve your home’s functionality. By following these steps, you can save money and add to the lifespan of your door. It’s all about that snug fit—just like putting on a well-fitted sweater that you can rely on for comfort and warmth.
So, grab your tools, take a deep breath, and get to work. You’ll be amazed at how much of a difference this little task can make. With just a bit of effort, you’ll have a door that swings smoothly and securely. Happy DIY-ing!