
You might be wondering, “Why bother with a special tool? Can’t I just use my fingers or a screwdriver?” Honestly, you could try, but that’s like using a butter knife as a screwdriver—it works until it doesn’t. The MD Push-In Tool is designed specifically for pressing weatherstripping into grooves or channels without damaging the strip or the frame. If you want a tight seal, fewer gaps, and less hassle, this tool is your friend. Let’s break down exactly how it works, why it matters, and what to watch out for if you’re brand new to weatherstripping.
What Is a Weatherstripping Installation Tool, and Why Use One?
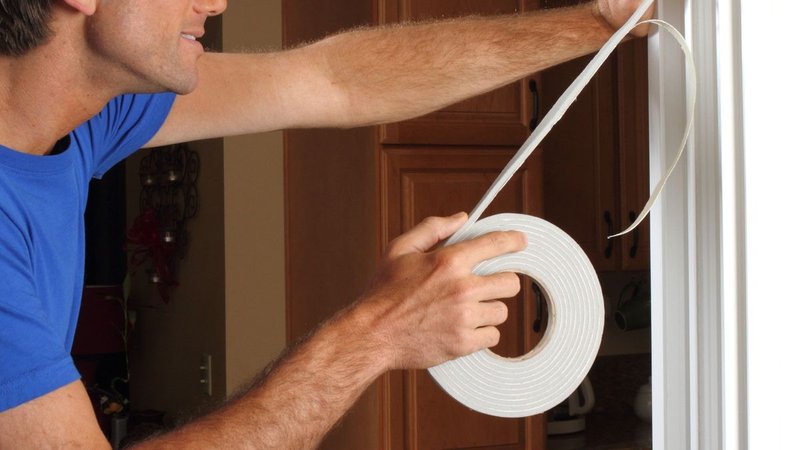
Here’s the thing: weatherstripping isn’t just about sticking foam on a door and hoping for the best. Different types of weatherstripping (rubber, vinyl, felt, or foam) often need to be pressed firmly into tiny channels or grooves so they stay put and actually block drafts. The MD Building Products Push-In Installation Tool is built for this one job. It usually looks like a small, sturdy wheel on a comfortable handle—almost like a tiny pizza cutter, but safer and meant for home repair.
The main reason to use a weatherstripping installation tool instead of doing it by hand is pressure and precision. Your fingers just can’t get the consistent pressure that’s needed to lock the strip into place, especially along tricky curves or tight corners. A flathead screwdriver might work for the first few inches, but it can tear or twist the seal. This tool applies even, steady force along the length of the channel—no pinched fingers, no slips, no ruined strips.
Think of it like using a rolling pin to smooth dough: the tool glides along, pressing the weatherstripping deep into its track. This gives you a professional finish, helps the strip last longer, and—most importantly—blocks out drafts, bugs, and even a bit of sound. If you’re trying to “code” a perfect seal, consider this tool your secret debugging weapon. It solves a problem you didn’t know you had until you try doing it without it.
Choosing the Right Weatherstripping and Tool for the Job
Not all weatherstripping is created equal, and neither are the tools. Before you start, you’ll want to match your installation tool to the type of strip and the surface you’re working with. For example, the MD Push-In Weatherstripping Tool works best with tube-style or V-type weatherstripping, which are designed to be pressed firmly into small channels around windows and doors.
- Foam Tape: Easy to peel-and-stick, but usually doesn’t need a special tool.
- Rubber or Vinyl Tubing: Needs to fit tightly into a groove—perfect job for the Push-In Tool.
- Felt Stripping: Sometimes requires tacking, but can also benefit from a tool for better adhesion.
- Adhesive Backed Types: Some don’t need tools, but a push-in tool helps with tough spots.
When picking your tool, focus on the width and shape of the wheel. A tool with a rounded edge is less likely to tear soft stripping, while a flat-edged wheel can give extra pressure for stiffer material. The MD Building Products Push-In Tool is popular because it’s versatile and designed to fit most standard door and window channels. If you’re standing in the hardware aisle, look for the tool that matches your weatherstripping’s specs—or ask a store expert. Better to ask now than wrestle with it later!
Steps for Using the MD Push-In Weatherstripping Installation Tool
Let me explain how to use this tool in a way that actually gets the job done right. First, gather your weatherstripping, the MD Push-In Tool, a measuring tape, utility knife (for trimming), and a clean rag. Here’s a simple step-by-step process:
- Clean the Surface: Wipe away dust and debris from the channel or frame. If it’s sticky or greasy, use mild soap and water. Let it dry completely. Clean surfaces mean better adhesion and a tighter seal.
- Measure and Cut: Measure the length you need for each side of the door or window, then cut the weatherstripping a little long. You can always trim the excess later. Pro tip: It’s better to have a small overlap than a gap!
- Position the Strip: Place one end of the weatherstripping into the channel, using your fingers to anchor it. Don’t worry if it’s not perfect—just get it started.
- Roll with the Tool: Here’s where the magic happens. Set the wheel of the Push-In Tool onto the weatherstripping and gently roll it along the length, pressing the strip into the channel as you go. Use slow, steady pressure. Listen for that “snap” or “click”—that means it’s locked in snugly.
- Check for Gaps: Once you reach the end, check for any spots where the strip isn’t seated properly. Roll over them again, or use the flat back of the tool to tap stubborn sections into place.
- Trim as Needed: Finally, trim any extra length with your utility knife. You want a flush fit, not something bunched up at the corner.
You might make a mistake the first time, and that’s totally normal. If the strip pops out, just reset it and roll again. Sometimes it takes a few tries to get the hang of the pressure you need.
Troubleshooting Common Weatherstripping Installation Problems
Even with the perfect tool, things don’t always go as smoothly as you hope. You might encounter issues like the strip bunching up, not staying in place, or corners that won’t cooperate. Here’s how to troubleshoot the most common problems:
- Strip slips out of the channel: Double-check that the surface is clean and dry. If it’s still loose, try using a slightly thicker weatherstripping, or add a dab of adhesive designed for your material.
- Seal won’t “snap” in: Use a bit more pressure with the Push-In Tool, but don’t force it so hard that you tear the strip. Some materials are stubborn at first but soften up after a few passes.
- Trouble at the corners: Use the rounded edge of the tool to press into corners, or angle the tool so you’re not pulling the strip out as you turn.
- Uneven gaps: Roll slowly and check your work as you go. If you spot a gap, pull up that section and try again—no harm in a do-over.
If you’re still struggling, step back and look at the big picture. Are you using the right size and style of weatherstripping for your door or window? Sometimes swapping out the strip or tool solves things instantly. Like debugging a stubborn code, half the battle is finding the mismatch.
Why a Weatherstripping Installation Tool Beats DIY Alternatives
Let’s be honest—sometimes you just want to “hack it.” Maybe you’re tempted to use a blunt knife, a credit card, or even just your thumbs. But here’s the truth: weatherstripping demands even pressure, and makeshift tools just aren’t up for the job. You’ll end up with uneven seals, torn strips, sore hands, or a finished job that looks like it was done in a hurry.
The MD Push-In Weatherstripping Tool is designed to fit perfectly into grooves and press material in without pinching or fraying. It’s got an ergonomic grip, so your hand won’t cramp halfway through. Plus, the wheel applies steady, rolling pressure—think of it like ironing a shirt versus just pressing with your palm. You get a neater, longer-lasting seal, less wasted material, and honestly, the whole process is just smoother.
If you’re installing weatherstripping throughout your house, investing in the right tool saves time, energy, and future frustration. I once tried to “reset” a misaligned door using just my fingers—let’s just say, that draft was back within a month. Lesson learned.
Comparing the MD Push-In Weatherstripping Tool to Other Options
There are a handful of weatherstripping installation tools on the market, but the MD Building Products Push-In Tool is popular for a reason. It’s sturdy, widely available, and designed to work with most modern door and window channels. But if you’re curious about alternatives, here’s a quick rundown:
- Universal push-in tools: These look similar but might have interchangeable wheels for different widths. Good for pros, maybe overkill for DIYers.
- Flat blade tools: Some folks use a simple plastic or metal blade. These are fine for adhesive strips but can’t apply the same rolling pressure.
- Homemade tools: You could wrap a cloth around a screwdriver or use a paint roller, but you’ll lose control and risk damaging the material.
If you’re only doing a small job, you can get by with a cheaper tool. But when it comes to whole-house weatherstripping or frequent repairs, the MD Push-In Tool is worth the couple of extra bucks. It’s like choosing a well-coded app over a buggy beta version—more reliable, less hassle.
When to Replace Your Weatherstripping (and Reuse Your Installation Tool)
The best thing about a good installation tool is that you only have to buy it once. Most weatherstripping needs to be replaced every few years—so if you have the MD Push-In Tool, you’re set for round two. But how do you know when it’s time to swap out the strips?
- Visible wear or cracks: If the weatherstripping looks worn, brittle, or pulls apart easily, it’s time to replace.
- Persistent drafts: If you feel cold air by the door or window, even with weatherstripping installed, check for gaps or flattened strips.
- Mold, mildew, or sticky residue: These mean the seal has broken down—best to start fresh.
The replacement process is just like the first time: clean, measure, roll in the new strip with your tool, and check your work. You’ll get faster each time—and trust me, it’s way less frustrating than dealing with cold toes in January.
Final Tips for a Tight, Long-Lasting Seal
Here’s my last bit of advice: take your time. Weatherstripping isn’t the flashiest home upgrade, but a few extra minutes with the right tool can make your home more comfortable and energy efficient for years. Make sure you press the strip all the way into the channel—don’t leave it half-done or you’ll be back at square one. If you’re ever unsure about the fit, run your hand along the seal and feel for a smooth, even surface.
Keep the MD Push-In Tool handy for future touch-ups. Like any reliable remote or favorite pocket knife, it’ll get used more than you think—window screens, storm doors, even some car doors take similar seals. And if you ever need to “reset” or install new weatherstripping, you’ll be ready to code a perfect seal every time.
Honestly, weatherproofing with the right installation tool just makes life better—no more drafts, less dust, and a quieter, cozier home. That’s a pretty good payoff for a simple roll and press.