Imagine a shim as a tiny superhero for your doors. They swoop in to save the day when hinges are a tad too tight or when your door isn’t quite aligned with its frame. Using a plastic shim is a straightforward, hands-on task anyone can tackle. Whether you’re facing a door that’s too high, too low, or just doesn’t want to latch properly, a shim can help you make those minor adjustments without much hassle.
In this guide, we’ll explore how to use a plastic shim for minor door adjustments, ensuring your entryways work smoothly and effortlessly. So, grab your tools, and let’s dive into the world of shimming!
What Is a Plastic Shim?
A plastic shim is a thin piece of material used to fill gaps or spaces. Think of it as a small wedge that helps things stay balanced and stable. They come in various sizes and materials, but plastic is popular because it’s durable and resists moisture.
You might find plastic shims at your local hardware store, often sold in bulk. They’re usually inexpensive, making them a smart tool to have around. When it comes to doors, plastic shims can correct misalignments caused by settling floors, humidity changes, or even just time.
Here’s a fun fact: shimming isn’t just for doors! You can also use them for leveling furniture, windows, and even appliances. The flexibility of plastic shims makes them an invaluable tool in home maintenance.
Why Use a Shim for Door Adjustments?
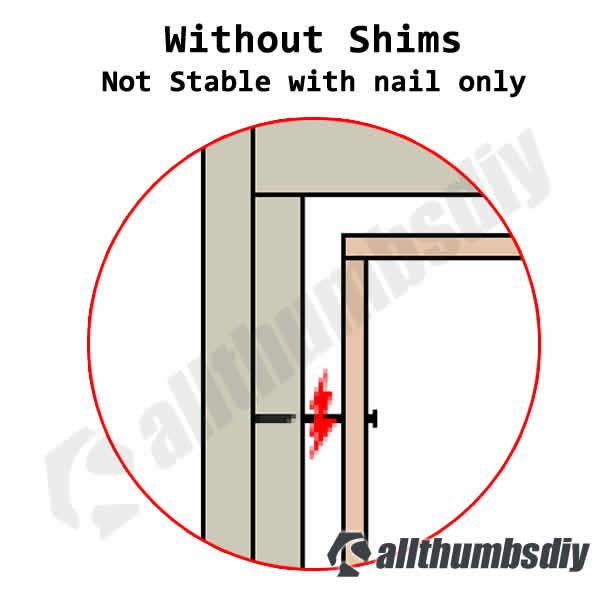
You might be wondering why bother with a shim when a door could just be adjusted using a screwdriver. While adjusting hinges is effective, sometimes the problem isn’t with the hardware but rather with the door alignment itself. Here’s where a shim shines.
Plastic shims provide a non-invasive way to reposition a door, especially when you notice it binding or dragging against the frame. Rather than relying on complicated fixes, a shim can offer a simple and immediate solution.
Moreover, adjusting with shims can help protect your door frame and hinges from unnecessary wear. Over time, even a small misalignment can lead to bigger problems, like warped doors or broken hardware. Using a shim can save you trouble (and money) down the line.
Identifying Door Issues
Before jumping into the shim game, you need to identify the specific issue with your door. Here are some common problems:
- Door Sticking: If your door won’t close smoothly, it might be too low or misaligned.
- Gap at the Top: If there’s a significant gap at the top of the door, it may need elevating.
- Hinge Problems: A door that swings open too easily could be too high.
Take a moment to observe what’s happening. Can you see where the door meets the frame? Are there any noticeable gaps? Pushing the door gently while observing how it moves may also provide insight.
Once you’ve pinpointed the issue, you can plan how to use a plastic shim effectively.
Gathering Your Tools
Before getting started, gather the following tools:
- Plastic Shims: A pack or two of standard-sized shims will work just fine.
- Screwdriver: This may be needed if you have to remove hinges.
- Utility Knife: Useful for trimming the shim to the right size.
- Level: To ensure everything aligns perfectly.
Having these tools on hand will make the process smoother. You don’t want to start adjusting only to realize you’re missing something!
How to Use a Plastic Shim
Now that you have everything ready, let’s walk through the steps to use a plastic shim effectively.
1. Examine the Door Alignment: Stand in front of the door and check how it lines up with the frame. Look for any high or low spots where it may stick or gap.
2. Remove the Hinge (if needed): If your door is severely misaligned, you might need to remove the hinge from the frame. Use your screwdriver to take out the screws carefully.
3. Insert the Shim: Place the shim between the hinge and the door frame. If the door needs to come down, add the shim under the top hinge. For raising, shim under the bottom hinge.
4. Reattach the Hinge: Screw the hinge back in place, ensuring that the door can open and close smoothly.
5. Test the Door: Swing the door open and closed a few times to check the alignment. Adjust the shim as needed until the door operates smoothly.
Using a plastic shim is all about fine-tuning. It’s about finding just the right balance so that your door functions beautifully without those annoying issues.
Common Mistakes to Avoid
While using a shim might feel straightforward, there are a few common pitfalls to watch for:
- Overstuffing: Don’t use more than one shim at a time unless necessary. Too many can cause more misalignment.
- Improper Placement: Make sure the shim is placed correctly; otherwise, it can throw off the entire door alignment.
- Ignoring the Level: Always use a level to check your adjustments. It may seem tedious, but it’s a crucial step!
Mistakes happen, but being mindful of these points can help ensure you get it right on the first try.
Alternatives to Plastic Shims
While plastic shims are fantastic, there are alternatives you might come across:
– Wooden Shims: These are often used in construction but can be less durable and more susceptible to moisture.
– Metal Shims: Ideal for heavy-duty applications but can be more challenging to work with if you’re just making minor adjustments.
When it comes to door adjustments, plastic shims are typically easier to handle and more forgiving. They don’t splinter and can withstand wear and tear better than wood.
Maintaining Your Door After Adjustments
Once you’ve made your adjustments, maintaining your door is key. Regularly check the alignment, especially with changing seasons, as humidity can impact wood doors.
Also, consider lubricating the hinges occasionally to keep everything running smoothly. A little maintenance goes a long way in ensuring a long-lasting, trouble-free door.
Using a plastic shim is a simple yet effective way to fix minor door issues. With just a few tools and these steps, you can make your home more comfortable and functional. So, the next time you hear that troublesome squeak or see a misalignment, remember your trusty plastic shim—it might just save the day!